<?xml version="1.0" encoding="utf-8"?>
<feed xmlns="http://www.w3.org/2005/Atom">
    <id>https://docs.kuberocketci.io/blog</id>
    <title>KubeRocketCI Blog</title>
    <updated>2026-05-05T00:00:00.000Z</updated>
    <generator>https://github.com/jpmonette/feed</generator>
    <link rel="alternate" href="https://docs.kuberocketci.io/blog"/>
    <subtitle>KubeRocketCI Blog</subtitle>
    <icon>https://docs.kuberocketci.io/img/favicon.ico</icon>
    <rights>Copyright © 2026 KubeRocketCI.</rights>
    <entry>
        <title type="html"><![CDATA[krci CLI: From Terminal to AI Agents]]></title>
        <id>https://docs.kuberocketci.io/blog/krci-cli-daily-use</id>
        <link href="https://docs.kuberocketci.io/blog/krci-cli-daily-use"/>
        <updated>2026-05-05T00:00:00.000Z</updated>
        <summary type="html"><![CDATA[How I use the krci CLI as a tool surface for Claude Code and other AI assistants to answer day-to-day platform questions in plain language.]]></summary>
        <content type="html"><![CDATA[<p>Most of my day-to-day platform work happens in a conversation. I sit in a Claude Code session - or any AI assistant with shell access - and ask plain-language questions about the state of our delivery cluster: <em>what's failing, what's drifting, what's vulnerable, what's stale.</em> The agent answers by calling the <a href="https://github.com/KubeRocketCI/cli" target="_blank" rel="noopener noreferrer" class="">krci CLI</a>, the predictable, JSON-emitting client over the <a class="" href="https://docs.kuberocketci.io/docs/developer-guide/reference-architecture">KubeRocketCI Portal's tRPC API</a>. I read the answer, decide what to do, and when a question turns into a routine I drop the underlying invocation into a script and let it run on cron or <code>/loop</code>. This post is a snapshot of that workflow with one running example - operator vulnerability status - and a tour of the other questions the same pattern answers.</p>
<h2 class="anchor anchorTargetStickyNavbar_Vzrq" id="workflows-not-sessions">Workflows, Not Sessions<a href="https://docs.kuberocketci.io/blog/krci-cli-daily-use#workflows-not-sessions" class="hash-link" aria-label="Direct link to Workflows, Not Sessions" title="Direct link to Workflows, Not Sessions" translate="no">​</a></h2>
<p>KubeRocketCI is built so the platform's primitives are reachable from every runtime that matters in modern engineering: the portal, the CLI, Tekton pipelines, GitLab CI, schedulers, and AI agents. A workflow I write once runs everywhere it needs to:</p>
<ul>
<li class=""><strong>Pipelines.</strong> A <code>krci</code> invocation that answers a question in my terminal runs unchanged inside a Tekton task or a GitLab CI job. Quality gates and release governance read live platform state without bespoke API clients.</li>
<li class=""><strong>Schedulers.</strong> A short bash wrapper in cron, or a Kubernetes CronJob produces a daily report on a hands-off cadence - same command, same output, same trust boundary.</li>
<li class=""><strong>Chat and webhooks.</strong> JSON output drops straight into Slack, Teams, or PagerDuty without a translation layer.</li>
<li class=""><strong>AI agents in the SDLC.</strong> AI coding agents - <a href="https://code.claude.com/docs" target="_blank" rel="noopener noreferrer" class="">Claude Code</a>, Cursor, the Anthropic and OpenAI SDKs - read terminal output natively. Giving an agent shell access to <code>krci</code> turns the platform into a tool surface it can call: list codebases, inspect SBOMs, compare branches, summarize changes since the previous run. No MCP server to write, no proprietary protocol to learn, no stale API client to maintain.</li>
</ul>
<p>The portal and the CLI are peers: the portal is the right interface for browsing, comparing, and approving; the CLI is the right interface for composing, scheduling, and handing off to agents. Both are first-class products and ship in lockstep.</p>
<h2 class="anchor anchorTargetStickyNavbar_Vzrq" id="the-krci-cli-as-a-tool-surface">The krci CLI as a Tool Surface<a href="https://docs.kuberocketci.io/blog/krci-cli-daily-use#the-krci-cli-as-a-tool-surface" class="hash-link" aria-label="Direct link to The krci CLI as a Tool Surface" title="Direct link to The krci CLI as a Tool Surface" translate="no">​</a></h2>
<p>A short tour of the top-level surface, because this is what the agent has access to:</p>
<div class="language-text codeBlockContainer_Ckt0 theme-code-block" style="--prism-color:#393A34;--prism-background-color:#f6f8fa"><div class="codeBlockContent_QJqH"><pre tabindex="0" class="prism-code language-text codeBlock_bY9V thin-scrollbar" style="color:#393A34;background-color:#f6f8fa"><code class="codeBlockLines_e6Vv"><div class="token-line" style="color:#393A34"><span class="token plain">$ krci --help</span><br></div><div class="token-line" style="color:#393A34"><span class="token plain">Available Commands:</span><br></div><div class="token-line" style="color:#393A34"><span class="token plain">  auth        Authentication commands</span><br></div><div class="token-line" style="color:#393A34"><span class="token plain">  deployment  Manage deployments (CDPipelines)</span><br></div><div class="token-line" style="color:#393A34"><span class="token plain">  env         Inspect KRCI environments (Stages)</span><br></div><div class="token-line" style="color:#393A34"><span class="token plain">  pipelinerun Manage pipeline runs</span><br></div><div class="token-line" style="color:#393A34"><span class="token plain">  project     Manage projects (Codebases)</span><br></div><div class="token-line" style="color:#393A34"><span class="token plain">  sca         Inspect Dependency-Track projects, components, and vulnerability findings</span><br></div><div class="token-line" style="color:#393A34"><span class="token plain">  sonar       Inspect SonarQube projects, quality gates, and issues</span><br></div><div class="token-line" style="color:#393A34"><span class="token plain">  version     Print krci CLI version</span><br></div></code></pre></div></div>
<p>When you run any of these commands - say, <code>krci deployment list</code> to inspect CD pipelines across your environments-the output follows the same disciplined structure. Columns are consistent, status values are predictable, and the table is human-readable <em>and</em> machine-parseable without any translation. Here's what that looks like in practice:</p>
<p><img decoding="async" loading="lazy" alt="Example of krci deployment list command output showing a table with deployment status, environment, sync state, and other metadata. The table displays three deployments: krci-gitfusion with healthy status in dev, and two tekton instances in dev and qa environments with varying sync states." src="https://docs.kuberocketci.io/assets/images/krci-deployment-example-ac15752a9d1b614373f6fe120b0ca725.png" width="1904" height="290" class="img_ev3q"></p>
<p>This table shows exactly what's deployed where. The <code>VERSION</code> column tracks the build artifact (<code>0.5.0-SNAPSHOT.4</code>), the <code>ENV</code> column shows which environment it's in, and the <code>STATUS</code> column tells you health at a glance -<code>healthy</code> or <code>missing</code>. The <code>SYNC</code> column flags when an environment has drifted (<code>OutOfSync</code>) from what GitOps expects. In seconds, you can answer: <em>"What's actually running in qa? Is it in sync? What version?"</em> The agent can answer it too, and answer the next question - <em>"Show me all deployments older than 30 days"</em> - without any special prompting.</p>
<p>Every group follows the same shape - <code>list</code>, <code>get</code>, sometimes a third verb - and the flags repeat (<code>--branch</code>, <code>--severity</code>, <code>-o json|table</code>). Predictability is the point: an agent can reason about the next command from the previous one, and so can I. Authentication is OIDC against the same Keycloak the portal uses; the agent inherits the existing session, so there is no long-lived API key embedded in any prompt.</p>
<h2 class="anchor anchorTargetStickyNavbar_Vzrq" id="asking-the-agent-whats-the-vulnerability-status-of-our-operators">Asking the Agent: "What's the Vulnerability Status of Our Operators?"<a href="https://docs.kuberocketci.io/blog/krci-cli-daily-use#asking-the-agent-whats-the-vulnerability-status-of-our-operators" class="hash-link" aria-label="Direct link to Asking the Agent: &quot;What's the Vulnerability Status of Our Operators?&quot;" title="Direct link to Asking the Agent: &quot;What's the Vulnerability Status of Our Operators?&quot;" translate="no">​</a></h2>
<p>Here's a recent question, verbatim, from a Claude Code session:</p>
<blockquote>
<p><em>"Using krci, give me the current vulnerability status of every operator registered on the platform. Main branch only, critical and high counts, top affected components per operator."</em></p>
</blockquote>
<p>What the agent returned:</p>
<div class="language-text codeBlockContainer_Ckt0 theme-code-block" style="--prism-color:#393A34;--prism-background-color:#f6f8fa"><div class="codeBlockContent_QJqH"><pre tabindex="0" class="prism-code language-text codeBlock_bY9V thin-scrollbar" style="color:#393A34;background-color:#f6f8fa"><code class="codeBlockLines_e6Vv"><div class="token-line" style="color:#393A34"><span class="token plain">OPERATOR               CRIT  HIGH  TOP COMPONENTS (HIGH+)</span><br></div><div class="token-line" style="color:#393A34"><span class="token plain">cd-pipeline-operator     0     0   clean</span><br></div><div class="token-line" style="color:#393A34"><span class="token plain">codebase-operator        0     2   github.com/tektoncd/pipeline</span><br></div><div class="token-line" style="color:#393A34"><span class="token plain">keycloak-operator        0     0   clean</span><br></div><div class="token-line" style="color:#393A34"><span class="token plain">nexus-operator           0     0   clean</span><br></div><div class="token-line" style="color:#393A34"><span class="token plain">sonar-operator           0     0   clean</span><br></div></code></pre></div></div>
<p>One row is doing all the work: <code>codebase-operator</code> master carries two high-severity findings, and both trace back to a single <code>github.com/tektoncd/pipeline</code> cluster. Everything else is clean. That's the kind of answer I can act on without scrolling - one operator, one component, one upgrade to plan.</p>
<p>The command I run by hand to verify the answer is one line:</p>
<div class="language-bash codeBlockContainer_Ckt0 theme-code-block" style="--prism-color:#393A34;--prism-background-color:#f6f8fa"><div class="codeBlockContent_QJqH"><pre tabindex="0" class="prism-code language-bash codeBlock_bY9V thin-scrollbar" style="color:#393A34;background-color:#f6f8fa"><code class="codeBlockLines_e6Vv"><div class="token-line" style="color:#393A34"><span class="token plain">$ krci sca list --page-size </span><span class="token number" style="color:#36acaa">500</span><span class="token plain"> </span><span class="token parameter variable" style="color:#36acaa">-o</span><span class="token plain"> json </span><span class="token punctuation" style="color:#393A34">\</span><span class="token plain"></span><br></div><div class="token-line" style="color:#393A34"><span class="token plain">  </span><span class="token operator" style="color:#393A34">|</span><span class="token plain"> jq </span><span class="token parameter variable" style="color:#36acaa">-r</span><span class="token plain"> </span><span class="token string" style="color:#e3116c">'.data.items[]</span><br></div><div class="token-line" style="color:#393A34"><span class="token string" style="color:#e3116c">           | select(.name | endswith("-operator"))</span><br></div><div class="token-line" style="color:#393A34"><span class="token string" style="color:#e3116c">           | select(.version == "master")</span><br></div><div class="token-line" style="color:#393A34"><span class="token string" style="color:#e3116c">           | [.name, .metrics.critical, .metrics.high] | @tsv'</span><br></div></code></pre></div></div>
<p>That's the whole loop. I described what I wanted in the language of the work, the agent shaped a <code>krci</code> invocation, and I can re-run any step independently to validate the result. No prior knowledge of <code>jq</code> flags, subcommand layout, or the platform's internal data model was required on my side.</p>
<h3 class="anchor anchorTargetStickyNavbar_Vzrq" id="drilling-in-stays-in-plain-language">Drilling In Stays in Plain Language<a href="https://docs.kuberocketci.io/blog/krci-cli-daily-use#drilling-in-stays-in-plain-language" class="hash-link" aria-label="Direct link to Drilling In Stays in Plain Language" title="Direct link to Drilling In Stays in Plain Language" translate="no">​</a></h3>
<p>When a row of the answer needs follow-up, I keep the conversation going:</p>
<blockquote>
<p><em>"Drill into <code>codebase-operator</code> master - which components are driving those two highs?"</em></p>
</blockquote>
<p>The agent's reply (verifiable by running the command yourself):</p>
<div class="language-text codeBlockContainer_Ckt0 theme-code-block" style="--prism-color:#393A34;--prism-background-color:#f6f8fa"><div class="codeBlockContent_QJqH"><pre tabindex="0" class="prism-code language-text codeBlock_bY9V thin-scrollbar" style="color:#393A34;background-color:#f6f8fa"><code class="codeBlockLines_e6Vv"><div class="token-line" style="color:#393A34"><span class="token plain">$ krci sca components codebase-operator --branch=master --severity=high</span><br></div><div class="token-line" style="color:#393A34"><span class="token plain">COMPONENT                       VULNS (C/H/M/L)</span><br></div><div class="token-line" style="color:#393A34"><span class="token plain">github.com/tektoncd/pipeline    0/2/4/0</span><br></div></code></pre></div></div>
<p>One component, both highs, two natural-language turns, two commands. I never had to remember the flag shape; the agent bridged intent to invocation and the CLI's predictable output bridged invocation to answer.</p>
<h2 class="anchor anchorTargetStickyNavbar_Vzrq" id="the-same-pattern-other-questions">The Same Pattern, Other Questions<a href="https://docs.kuberocketci.io/blog/krci-cli-daily-use#the-same-pattern-other-questions" class="hash-link" aria-label="Direct link to The Same Pattern, Other Questions" title="Direct link to The Same Pattern, Other Questions" translate="no">​</a></h2>
<p>Vulnerability status is one of many. The agent + CLI handle the same shape of question across the platform - I describe it in plain language, the agent runs <code>krci</code>, I verify the output against the platform:</p>
<ul>
<li class=""><em>"Which pipeline runs failed in the last 24 hours, grouped by codebase?"</em> → <code>krci pipelinerun list -o json</code> filtered on <code>.status.conditions</code>.</li>
<li class=""><em>"Which environments are running an out-of-date image of <code>code-assistant</code>?"</em> → <code>krci env list -o json</code> joined against the latest tag.</li>
<li class=""><em>"What's the SonarQube quality gate state of every Java codebase?"</em> → <code>krci sonar list -o json</code> filtered by language.</li>
<li class=""><em>"Which projects on the platform haven't produced an SBOM yet?"</em> → diff <code>krci project list</code> against <code>krci sca list</code>.</li>
<li class=""><em>"Show me every CD pipeline whose latest deploy is older than 30 days."</em> → <code>krci deployment list -o json</code> filtered on <code>.status.lastDeploy</code>.</li>
</ul>
<p>Same pattern every time: ask in language, get an answer the CLI can verify, move on. The agent does the orchestration; the CLI does the work.</p>
<h2 class="anchor anchorTargetStickyNavbar_Vzrq" id="making-it-stick-schedule-script-notify">Making It Stick: Schedule, Script, Notify<a href="https://docs.kuberocketci.io/blog/krci-cli-daily-use#making-it-stick-schedule-script-notify" class="hash-link" aria-label="Direct link to Making It Stick: Schedule, Script, Notify" title="Direct link to Making It Stick: Schedule, Script, Notify" translate="no">​</a></h2>
<p>The moment a question becomes recurring, it stops belonging in chat. The same <code>krci</code> invocation the agent assembled in the conversation becomes the body of a script:</p>
<div class="language-bash codeBlockContainer_Ckt0 theme-code-block" style="--prism-color:#393A34;--prism-background-color:#f6f8fa"><div class="codeBlockContent_QJqH"><pre tabindex="0" class="prism-code language-bash codeBlock_bY9V thin-scrollbar" style="color:#393A34;background-color:#f6f8fa"><code class="codeBlockLines_e6Vv"><div class="token-line" style="color:#393A34"><span class="token shebang important">#!/usr/bin/env bash</span><span class="token plain"></span><br></div><div class="token-line" style="color:#393A34"><span class="token plain"></span><span class="token comment" style="color:#999988;font-style:italic"># Daily operator vulnerability digest - main branches only.</span><span class="token plain"></span><br></div><div class="token-line" style="color:#393A34"><span class="token plain">krci sca list --page-size </span><span class="token number" style="color:#36acaa">500</span><span class="token plain"> </span><span class="token parameter variable" style="color:#36acaa">-o</span><span class="token plain"> json </span><span class="token punctuation" style="color:#393A34">\</span><span class="token plain"></span><br></div><div class="token-line" style="color:#393A34"><span class="token plain">  </span><span class="token operator" style="color:#393A34">|</span><span class="token plain"> jq </span><span class="token parameter variable" style="color:#36acaa">-r</span><span class="token plain"> </span><span class="token string" style="color:#e3116c">'.data.items[]</span><br></div><div class="token-line" style="color:#393A34"><span class="token string" style="color:#e3116c">           | select(.name | endswith("-operator"))</span><br></div><div class="token-line" style="color:#393A34"><span class="token string" style="color:#e3116c">           | select(.version == "master")</span><br></div><div class="token-line" style="color:#393A34"><span class="token string" style="color:#e3116c">           | [.name, .metrics.critical, .metrics.high] | @tsv'</span><span class="token plain"> </span><span class="token punctuation" style="color:#393A34">\</span><span class="token plain"></span><br></div><div class="token-line" style="color:#393A34"><span class="token plain">  </span><span class="token operator" style="color:#393A34">|</span><span class="token plain"> </span><span class="token function" style="color:#d73a49">column</span><span class="token plain"> </span><span class="token parameter variable" style="color:#36acaa">-t</span><br></div></code></pre></div></div>
<p>From there it's the standard fan-out:</p>
<ul>
<li class=""><strong>Cron or Kubernetes CronJob</strong> for a daily markdown digest in <code>~/reports/operators-$(date +%F).md</code>.</li>
<li class=""><strong>Slack/Teams webhook</strong> for "first new critical on a release branch" alerts. Pipe the JSON through <code>jq</code>, post on threshold.</li>
<li class=""><strong>Claude Code <code>/loop</code></strong> for a six-hour heartbeat that reports only what changed:</li>
</ul>
<div class="language-text codeBlockContainer_Ckt0 theme-code-block" style="--prism-color:#393A34;--prism-background-color:#f6f8fa"><div class="codeBlockContent_QJqH"><pre tabindex="0" class="prism-code language-text codeBlock_bY9V thin-scrollbar" style="color:#393A34;background-color:#f6f8fa"><code class="codeBlockLines_e6Vv"><div class="token-line" style="color:#393A34"><span class="token plain">/loop 6h  Run cli/scripts/operators-digest.sh and tell me ONLY what</span><br></div><div class="token-line" style="color:#393A34"><span class="token plain">          changed since the previous run. Reply in under 60 words.</span><br></div></code></pre></div></div>
<p>Same script, same JSON, three runtimes. The CLI is unchanged; only the wrapper changes.</p>
<h2 class="anchor anchorTargetStickyNavbar_Vzrq" id="why-the-krci-cli-works-well-as-an-agent-tool-surface">Why the krci CLI Works Well as an Agent Tool Surface<a href="https://docs.kuberocketci.io/blog/krci-cli-daily-use#why-the-krci-cli-works-well-as-an-agent-tool-surface" class="hash-link" aria-label="Direct link to Why the krci CLI Works Well as an Agent Tool Surface" title="Direct link to Why the krci CLI Works Well as an Agent Tool Surface" translate="no">​</a></h2>
<p>Three properties matter, and each one comes from deliberate design rather than accident:</p>
<ul>
<li class=""><strong>Stable, structured output.</strong> <code>krci ... -o json</code> is shaped consistently across releases. The agent doesn't need a parser; it navigates JSON.</li>
<li class=""><strong>Identity is solved upstream.</strong> OIDC sessions are inherited from the developer's existing login. No API keys leak into prompts, transcripts, or scripts.</li>
<li class=""><strong>Predictable verb shape.</strong> <code>list</code>, <code>get</code>, sometimes a third verb, with the same flags everywhere. The agent generalizes from one command to the next, and so do humans.</li>
</ul>
<p>The result is that the conversation with the agent stays in the language of the work - <em>"vulnerability status of operators"</em>, <em>"failed runs in the last 24 hours"</em>, <em>"environments running an out-of-date image"</em> - and the CLI handles the translation. Both pieces are independently inspectable: I can replay any command myself, the agent can replay it tomorrow, and the script that captures a routine is short enough to review in one sitting.</p>
<h2 class="anchor anchorTargetStickyNavbar_Vzrq" id="honest-notes-before-you-adopt-the-pattern">Honest Notes Before You Adopt the Pattern<a href="https://docs.kuberocketci.io/blog/krci-cli-daily-use#honest-notes-before-you-adopt-the-pattern" class="hash-link" aria-label="Direct link to Honest Notes Before You Adopt the Pattern" title="Direct link to Honest Notes Before You Adopt the Pattern" translate="no">​</a></h2>
<p>A few things I learned the slightly hard way:</p>
<ul>
<li class="">Not every codebase produces an SBOM yet. Some appear in <code>project list</code> but are absent from <code>sca list</code> because no CycloneDX upload has happened on their build pipelines. The CLI surfaces the gap rather than hiding it, which is itself useful, but means agent answers should always cross-check both lists.</li>
<li class="">Cross-project aggregation sometimes still uses a shell loop. There's no <code>krci sca list --filter='critical&gt;0'</code> flag yet - native flags are on the roadmap, the agent compensates in the meantime.</li>
<li class="">BOM age (<code>Last BOM</code>) shows up in <code>krci sca get</code> but not on <code>sca list</code>. If staleness matters to your routine, pin it explicitly in your script.</li>
</ul>
<p>I include this list because tools earn trust by being honest about what they don't do yet.</p>
<h2 class="anchor anchorTargetStickyNavbar_Vzrq" id="try-it-yourself">Try It Yourself<a href="https://docs.kuberocketci.io/blog/krci-cli-daily-use#try-it-yourself" class="hash-link" aria-label="Direct link to Try It Yourself" title="Direct link to Try It Yourself" translate="no">​</a></h2>
<ol>
<li class="">Install krci from <a href="https://github.com/KubeRocketCI/cli/releases" target="_blank" rel="noopener noreferrer" class="">the release page</a> and run <code>krci auth login</code>.</li>
<li class="">Open your AI assistant of choice, give it shell access, and ask your own version of the question above. Anything along the lines of <em>"using krci, show me the vulnerability status of every operator on the platform, main branch only"</em> will work on day one.</li>
<li class="">When the answer becomes a routine, drop the underlying command into a script and run it on cron, a CronJob, or <code>/loop</code>.</li>
</ol>
<p>That's the entire loop: ask in language, get an answer the CLI can verify, schedule it when it matters.</p>
<h2 class="anchor anchorTargetStickyNavbar_Vzrq" id="further-reading">Further Reading<a href="https://docs.kuberocketci.io/blog/krci-cli-daily-use#further-reading" class="hash-link" aria-label="Direct link to Further Reading" title="Direct link to Further Reading" translate="no">​</a></h2>
<ul>
<li class=""><a href="https://github.com/KubeRocketCI/cli" target="_blank" rel="noopener noreferrer" class="">krci CLI on GitHub</a> - command reference, authentication setup, and release binaries.</li>
<li class=""><a class="" href="https://docs.kuberocketci.io/docs/operator-guide/devsecops/dependency-track">SCA with Dependency-Track</a> - how SBOMs reach the platform.</li>
<li class=""><a class="" href="https://docs.kuberocketci.io/blog/kubernetes-native-cicd-tekton-kuberocketci">Kubernetes-Native CI/CD with Tekton</a> - the pipeline layer that produces those SBOMs.</li>
<li class=""><a href="https://cyclonedx.org/" target="_blank" rel="noopener noreferrer" class="">CycloneDX SBOM</a>, <a href="https://dependencytrack.org/" target="_blank" rel="noopener noreferrer" class="">Dependency-Track</a>, and <a href="https://code.claude.com/docs" target="_blank" rel="noopener noreferrer" class="">Claude Code</a> - the upstream tools used in this post.</li>
</ul>
<p>The krci CLI is open-source under Apache License 2.0. Source, issues, and release binaries live on <a href="https://github.com/KubeRocketCI/cli" target="_blank" rel="noopener noreferrer" class="">GitHub</a>.</p>]]></content>
        <author>
            <name>Sergiy Kulanov</name>
            <uri>https://github.com/sergk</uri>
        </author>
        <category label="KubeRocketCI" term="KubeRocketCI"/>
        <category label="CLI" term="CLI"/>
        <category label="AI Agents" term="AI Agents"/>
        <category label="DevOps" term="DevOps"/>
        <category label="SCA" term="SCA"/>
        <category label="Claude Code" term="Claude Code"/>
        <category label="Platform Engineering" term="Platform Engineering"/>
        <category label="Dependency-Track" term="Dependency-Track"/>
    </entry>
    <entry>
        <title type="html"><![CDATA[Kubernetes-Native CI/CD with Tekton]]></title>
        <id>https://docs.kuberocketci.io/blog/kubernetes-native-cicd-tekton-kuberocketci</id>
        <link href="https://docs.kuberocketci.io/blog/kubernetes-native-cicd-tekton-kuberocketci"/>
        <updated>2026-05-04T00:00:00.000Z</updated>
        <summary type="html"><![CDATA[Learn how KubeRocketCI builds Kubernetes-native CI/CD on Tekton - covering pipeline task sequences, webhook trigger chain, and how to author custom pipelines.]]></summary>
        <content type="html"><![CDATA[<p>Building CI/CD on Kubernetes used to mean running Jenkins or GitLab CI in a pod and calling it done. <a href="https://tekton.dev/docs/" target="_blank" rel="noopener noreferrer" class="">Tekton</a> changed that by making pipelines first-class Kubernetes objects - Tasks and Pipelines are CRDs, PipelineRuns are namespaced resources, and every step log is a container log. KubeRocketCI goes a step further: it ships a complete, production-grade CI/CD platform on top of Tekton so your team gets sensible defaults, a portal UI, GitOps-managed pipeline definitions, and opinionated quality gates - without the months of plumbing work that comes with assembling those pieces from scratch. I've seen teams go from a bare cluster to a working build-deploy loop in under a day using this stack.</p>
<p>Here's how the layering works in practice - from Tekton's native primitives to the Helm-templated pipeline library, the webhook-to-PipelineRun chain, each pipeline type, and the portal UI that surfaces it all.</p>
<h2 class="anchor anchorTargetStickyNavbar_Vzrq" id="why-does-kubernetes-native-cicd-matter">Why Does Kubernetes-Native CI/CD Matter?<a href="https://docs.kuberocketci.io/blog/kubernetes-native-cicd-tekton-kuberocketci#why-does-kubernetes-native-cicd-matter" class="hash-link" aria-label="Direct link to Why Does Kubernetes-Native CI/CD Matter?" title="Direct link to Why Does Kubernetes-Native CI/CD Matter?" translate="no">​</a></h2>
<p>Traditional CI servers are external systems that <em>talk to</em> Kubernetes. They authenticate, schedule jobs, wait for responses, and manage their own scaling independently of the cluster. Tekton turns that model inside out - the cluster <em>is</em> the CI engine. Every pipeline run is a pod, every step is a container, and the Kubernetes control plane handles scheduling, scaling, and secrets injection natively.</p>
<p>The practical consequences:</p>
<ul>
<li class=""><strong>No CI server to maintain.</strong> No Jenkins controller HA setup, no separate runner fleet. Tekton scales horizontally with your cluster.</li>
<li class=""><strong>Uniform RBAC.</strong> Pipeline permissions use Kubernetes ServiceAccounts - no separate credential management UI.</li>
<li class=""><strong>Pipeline as code.</strong> Pipeline definitions are YAML manifests, version-controlled alongside application code, and applied to any conformant Kubernetes cluster identically.</li>
<li class=""><strong>Native secret injection.</strong> Tekton Tasks consume Kubernetes Secrets and ConfigMaps directly - no plugin abstraction required.</li>
<li class=""><strong>Shift-left by default.</strong> Code quality, security scanning, and test gates run inside the cluster as ordinary containers, co-located with the workloads they protect.</li>
</ul>
<h2 class="anchor anchorTargetStickyNavbar_Vzrq" id="kuberocketci-and-the-tekton-stack">KubeRocketCI and the Tekton Stack<a href="https://docs.kuberocketci.io/blog/kubernetes-native-cicd-tekton-kuberocketci#kuberocketci-and-the-tekton-stack" class="hash-link" aria-label="Direct link to KubeRocketCI and the Tekton Stack" title="Direct link to KubeRocketCI and the Tekton Stack" translate="no">​</a></h2>
<p><a class="" href="https://docs.kuberocketci.io/docs/about-platform">KubeRocketCI</a> is an open-source, cloud-agnostic SaaS/PaaS platform built on <a href="https://tekton.dev/docs/" target="_blank" rel="noopener noreferrer" class="">Tekton</a> - a CNCF Graduated project - developed and maintained by EPAM Systems. Where Tekton gives you primitives, KubeRocketCI gives you a working system.</p>
<p>The platform deploys and manages the full Tekton component set:</p>
<table><thead><tr><th>Component</th><th>Role</th></tr></thead><tbody><tr><td><strong>Tekton Pipelines</strong></td><td>Executes all CI and CD pipeline runs</td></tr><tr><td><strong>Tekton Triggers</strong></td><td>Listens for Git webhook events and fires the matching pipeline</td></tr><tr><td><strong>Tekton Interceptors</strong></td><td>Enriches and filters GitHub, GitLab, and Bitbucket payloads before routing</td></tr><tr><td><strong>Tekton Chains</strong></td><td>Signs pipeline artifacts for supply-chain provenance</td></tr><tr><td><strong>Tekton Results</strong></td><td>Stores run history for audit trails and portal display</td></tr></tbody></table>
<p>On top of Tekton, KubeRocketCI adds:</p>
<ul>
<li class=""><strong>Pipeline library</strong> - Helm-packaged Tasks and Pipelines for Java, Go, Node.js, Python, .NET, Helm, Terraform, and more.</li>
<li class=""><strong>Portal UI</strong> - full pipeline management with DAG visualization, live log streaming, and inline manual approval gates.</li>
<li class=""><strong>Argo CD integration</strong> - pipeline definitions are stored in Git and synchronized by Argo CD. Every change to a pipeline is a reviewed, audited commit.</li>
</ul>
<p>See <a class="" href="https://docs.kuberocketci.io/docs/basic-concepts">Basic Concepts</a> and the <a class="" href="https://docs.kuberocketci.io/docs/user-guide/tekton-pipelines">Tekton Overview</a> for the full capability matrix.</p>
<h2 class="anchor anchorTargetStickyNavbar_Vzrq" id="how-are-tekton-pipelines-defined-in-kuberocketci">How Are Tekton Pipelines Defined in KubeRocketCI?<a href="https://docs.kuberocketci.io/blog/kubernetes-native-cicd-tekton-kuberocketci#how-are-tekton-pipelines-defined-in-kuberocketci" class="hash-link" aria-label="Direct link to How Are Tekton Pipelines Defined in KubeRocketCI?" title="Direct link to How Are Tekton Pipelines Defined in KubeRocketCI?" translate="no">​</a></h2>
<h3 class="anchor anchorTargetStickyNavbar_Vzrq" id="the-helm-templated-library">The Helm-Templated Library<a href="https://docs.kuberocketci.io/blog/kubernetes-native-cicd-tekton-kuberocketci#the-helm-templated-library" class="hash-link" aria-label="Direct link to The Helm-Templated Library" title="Direct link to The Helm-Templated Library" translate="no">​</a></h3>
<p>Pipelines in KubeRocketCI are not hand-written one-offs - they are generated by Helm from a structured library in <a href="https://github.com/epam/edp-tekton" target="_blank" rel="noopener noreferrer" class="">edp-tekton</a>. The naming convention follows:</p>
<div class="language-text codeBlockContainer_Ckt0 theme-code-block" style="--prism-color:#393A34;--prism-background-color:#f6f8fa"><div class="codeBlockContent_QJqH"><pre tabindex="0" class="prism-code language-text codeBlock_bY9V thin-scrollbar" style="color:#393A34;background-color:#f6f8fa"><code class="codeBlockLines_e6Vv"><div class="token-line" style="color:#393A34"><span class="token plain">{gitProvider}-{buildTool}-{framework}-app-{pipelineType}-{versioning}</span><br></div></code></pre></div></div>
<p>For example, a Java 17 Maven build pipeline triggered from GitHub with default versioning renders as:</p>
<div class="language-text codeBlockContainer_Ckt0 theme-code-block" style="--prism-color:#393A34;--prism-background-color:#f6f8fa"><div class="codeBlockContent_QJqH"><pre tabindex="0" class="prism-code language-text codeBlock_bY9V thin-scrollbar" style="color:#393A34;background-color:#f6f8fa"><code class="codeBlockLines_e6Vv"><div class="token-line" style="color:#393A34"><span class="token plain">github-maven-java17-app-build-default</span><br></div></code></pre></div></div>
<p>The same pipeline for GitLab becomes <code>gitlab-maven-java17-app-build-default</code>. This pattern means every combination of git provider, language, framework, and versioning strategy gets a consistently named, independently configurable pipeline - without duplicating task logic. Shared task sequences live in common Helm templates (e.g., <code>_common_java_maven.yaml</code>) and are included by reference.</p>
<h3 class="anchor anchorTargetStickyNavbar_Vzrq" id="the-real-build-task-sequence">The Real Build Task Sequence<a href="https://docs.kuberocketci.io/blog/kubernetes-native-cicd-tekton-kuberocketci#the-real-build-task-sequence" class="hash-link" aria-label="Direct link to The Real Build Task Sequence" title="Direct link to The Real Build Task Sequence" translate="no">​</a></h3>
<p>For a Java Maven application, the build pipeline executes these tasks in order:</p>
<div class="language-text codeBlockContainer_Ckt0 theme-code-block" style="--prism-color:#393A34;--prism-background-color:#f6f8fa"><div class="codeBlockContent_QJqH"><pre tabindex="0" class="prism-code language-text codeBlock_bY9V thin-scrollbar" style="color:#393A34;background-color:#f6f8fa"><code class="codeBlockLines_e6Vv"><div class="token-line" style="color:#393A34"><span class="token plain">get-version</span><br></div><div class="token-line" style="color:#393A34"><span class="token plain">  └─ update-build-number</span><br></div><div class="token-line" style="color:#393A34"><span class="token plain">       └─ get-cache</span><br></div><div class="token-line" style="color:#393A34"><span class="token plain">            └─ compile</span><br></div><div class="token-line" style="color:#393A34"><span class="token plain">                 └─ test  (JaCoCo coverage)</span><br></div><div class="token-line" style="color:#393A34"><span class="token plain">                      └─ sonar  (quality gate: sonar.qualitygate.wait=true)</span><br></div><div class="token-line" style="color:#393A34"><span class="token plain">                           └─ build  (mvn clean package -DskipTests)</span><br></div><div class="token-line" style="color:#393A34"><span class="token plain">                                └─ push  (mvn deploy -DskipTests)</span><br></div></code></pre></div></div>
<p>The <code>sonar</code> step blocks with <code>sonar.qualitygate.wait=true</code> - the build fails fast at the quality gate rather than discovering issues downstream. In my experience, this single flag is the difference between catching technical debt in minutes versus after a release candidate is already tagged. Code that doesn't pass SonarQube never produces an artifact.</p>
<p>Each task is a reusable Tekton <code>Task</code> CRD (<code>maven</code>, <code>sonarqube-maven</code>) - the pipeline only sets parameters and <code>runAfter</code> ordering. Swap the <code>maven</code> task image to change the JDK version; the pipeline logic stays the same.</p>
<h3 class="anchor anchorTargetStickyNavbar_Vzrq" id="the-webhook-to-pipelinerun-chain">The Webhook-to-PipelineRun Chain<a href="https://docs.kuberocketci.io/blog/kubernetes-native-cicd-tekton-kuberocketci#the-webhook-to-pipelinerun-chain" class="hash-link" aria-label="Direct link to The Webhook-to-PipelineRun Chain" title="Direct link to The Webhook-to-PipelineRun Chain" translate="no">​</a></h3>
<p>When a pull request is merged on GitHub, the event travels through four Tekton resources before a PipelineRun starts:</p>
<!-- -->
<p>The <strong>Custom Interceptor</strong> is the key piece. It enriches the raw GitHub payload with platform-specific <code>extensions</code> that the webhook payload alone doesn't contain:</p>
<ul>
<li class=""><code>extensions.codebase</code> - the KubeRocketCI codebase name for this repository</li>
<li class=""><code>extensions.codebasebranch</code> - the branch object with its pipeline configuration</li>
<li class=""><code>extensions.pipelines.build</code> - the exact pipeline name to run (e.g., <code>github-maven-java17-app-build-default</code>)</li>
<li class=""><code>extensions.pullRequest.headSha</code>, <code>extensions.pullRequest.author</code>, <code>extensions.pullRequest.url</code></li>
</ul>
<p>The <strong>TriggerBinding</strong> then extracts these into named parameters: <code>gitrevision</code>, <code>targetBranch</code>, <code>gitsha</code>, <code>codebase</code>, <code>codebasebranch</code>, <code>pipelineName</code>, <code>commitMessagePattern</code>, and Jira integration fields. The <strong>TriggerTemplate</strong> stamps these into a PipelineRun spec and creates it in the cluster.</p>
<p>This architecture means the decision of <em>which pipeline runs for which codebase</em> is stored in the platform's Kubernetes objects - not hardcoded in webhook configuration.</p>
<h2 class="anchor anchorTargetStickyNavbar_Vzrq" id="pipeline-types-from-code-review-to-release">Pipeline Types: From Code Review to Release<a href="https://docs.kuberocketci.io/blog/kubernetes-native-cicd-tekton-kuberocketci#pipeline-types-from-code-review-to-release" class="hash-link" aria-label="Direct link to Pipeline Types: From Code Review to Release" title="Direct link to Pipeline Types: From Code Review to Release" translate="no">​</a></h2>
<p>KubeRocketCI defines seven pipeline types, identified by the <code>app.edp.epam.com/pipelinetype</code> label. All are implemented as Tekton Pipelines.</p>
<h3 class="anchor anchorTargetStickyNavbar_Vzrq" id="review-pipeline-pipelinetype-review">Review Pipeline (<code>pipelinetype: review</code>)<a href="https://docs.kuberocketci.io/blog/kubernetes-native-cicd-tekton-kuberocketci#review-pipeline-pipelinetype-review" class="hash-link" aria-label="Direct link to review-pipeline-pipelinetype-review" title="Direct link to review-pipeline-pipelinetype-review" translate="no">​</a></h3>
<p>Triggered by a pull request. Runs static analysis, linting, unit tests, and code-quality gates before a merge is allowed. Typically completes in under five minutes.</p>
<p>Trigger methods: open a PR against a configured branch, comment <code>/recheck</code> or <code>/ok-to-test</code>, or use the <strong>Run Again</strong> button in the portal.</p>
<h3 class="anchor anchorTargetStickyNavbar_Vzrq" id="build-pipeline-pipelinetype-build">Build Pipeline (<code>pipelinetype: build</code>)<a href="https://docs.kuberocketci.io/blog/kubernetes-native-cicd-tekton-kuberocketci#build-pipeline-pipelinetype-build" class="hash-link" aria-label="Direct link to build-pipeline-pipelinetype-build" title="Direct link to build-pipeline-pipelinetype-build" translate="no">​</a></h3>
<p>Triggered on merge to the target branch. Executes the full task sequence (see above), builds and pushes a container image, and produces a versioned artifact. Versioning follows either <code>BRANCH-[DATETIME]</code> (default) or SemVer (MAJOR.MINOR.PATCH-BUILD_ID) depending on project configuration.</p>
<h3 class="anchor anchorTargetStickyNavbar_Vzrq" id="deploy-pipeline-pipelinetype-deploy">Deploy Pipeline (<code>pipelinetype: deploy</code>)<a href="https://docs.kuberocketci.io/blog/kubernetes-native-cicd-tekton-kuberocketci#deploy-pipeline-pipelinetype-deploy" class="hash-link" aria-label="Direct link to deploy-pipeline-pipelinetype-deploy" title="Direct link to deploy-pipeline-pipelinetype-deploy" translate="no">​</a></h3>
<p>Takes a versioned artifact and applies it to a target environment. Trigger modes: manual (via portal), <code>Auto</code> (deploy automatically on new artifact), or <code>Auto-stable</code> (promote only the rebuilt component, keep others at stable versions).</p>
<h3 class="anchor anchorTargetStickyNavbar_Vzrq" id="clean-pipeline-pipelinetype-clean">Clean Pipeline (<code>pipelinetype: clean</code>)<a href="https://docs.kuberocketci.io/blog/kubernetes-native-cicd-tekton-kuberocketci#clean-pipeline-pipelinetype-clean" class="hash-link" aria-label="Direct link to clean-pipeline-pipelinetype-clean" title="Direct link to clean-pipeline-pipelinetype-clean" translate="no">​</a></h3>
<p>Tears down an environment on demand. Paired with <code>Auto</code> deploys and dynamic environments, this enables full ephemeral workflows - spin up for a PR, validate, clean up on merge.</p>
<h3 class="anchor anchorTargetStickyNavbar_Vzrq" id="security-pipeline-pipelinetype-security">Security Pipeline (<code>pipelinetype: security</code>)<a href="https://docs.kuberocketci.io/blog/kubernetes-native-cicd-tekton-kuberocketci#security-pipeline-pipelinetype-security" class="hash-link" aria-label="Direct link to security-pipeline-pipelinetype-security" title="Direct link to security-pipeline-pipelinetype-security" translate="no">​</a></h3>
<p>A standalone pipeline decoupled from build, purpose-built for vulnerability scanning. Scan results surface in the portal's <strong>Results</strong> tab and link through to DefectDojo. Decoupling security means scans can run at any cadence without affecting build cycle time.</p>
<h3 class="anchor anchorTargetStickyNavbar_Vzrq" id="test-pipeline-pipelinetype-tests">Test Pipeline (<code>pipelinetype: tests</code>)<a href="https://docs.kuberocketci.io/blog/kubernetes-native-cicd-tekton-kuberocketci#test-pipeline-pipelinetype-tests" class="hash-link" aria-label="Direct link to test-pipeline-pipelinetype-tests" title="Direct link to test-pipeline-pipelinetype-tests" translate="no">​</a></h3>
<p>Executes automated test suites against already-deployed environments, independent of the deploy cycle. Teams validate application behavior on demand without triggering a full redeploy.</p>
<h3 class="anchor anchorTargetStickyNavbar_Vzrq" id="release-pipeline-pipelinetype-release">Release Pipeline (<code>pipelinetype: release</code>)<a href="https://docs.kuberocketci.io/blog/kubernetes-native-cicd-tekton-kuberocketci#release-pipeline-pipelinetype-release" class="hash-link" aria-label="Direct link to release-pipeline-pipelinetype-release" title="Direct link to release-pipeline-pipelinetype-release" translate="no">​</a></h3>
<p>Orchestrates approval and publishing for new releases. KubeRocketCI does not ship a pre-built release pipeline - release governance is organization-specific. The full Tekton API surface is available to build custom approval steps, external system integrations, and auditable release flows.</p>
<p>The complete pipeline type reference is in <a class="" href="https://docs.kuberocketci.io/docs/user-guide/pipelines">Pipelines Overview</a> and <a class="" href="https://docs.kuberocketci.io/docs/user-guide/tekton-pipelines">Tekton Overview</a>.</p>
<h2 class="anchor anchorTargetStickyNavbar_Vzrq" id="customizing-pipelines">Customizing Pipelines<a href="https://docs.kuberocketci.io/blog/kubernetes-native-cicd-tekton-kuberocketci#customizing-pipelines" class="hash-link" aria-label="Direct link to Customizing Pipelines" title="Direct link to Customizing Pipelines" translate="no">​</a></h2>
<p>The pre-built library covers most tech stacks, but production workloads always have exceptions. KubeRocketCI supports two customization patterns without forking the platform.</p>
<h3 class="anchor anchorTargetStickyNavbar_Vzrq" id="custom-framework--build-tool">Custom Framework / Build Tool<a href="https://docs.kuberocketci.io/blog/kubernetes-native-cicd-tekton-kuberocketci#custom-framework--build-tool" class="hash-link" aria-label="Direct link to Custom Framework / Build Tool" title="Direct link to Custom Framework / Build Tool" translate="no">​</a></h3>
<p>Define a custom pipeline once with a naming pattern, and every project matching that pattern picks it up automatically. The <a class="" href="https://docs.kuberocketci.io/docs/use-cases/tekton-custom-pipelines">Tekton custom pipelines use case</a> walks through the full authoring flow.</p>
<h3 class="anchor anchorTargetStickyNavbar_Vzrq" id="branch-specific-pipelines">Branch-Specific Pipelines<a href="https://docs.kuberocketci.io/blog/kubernetes-native-cicd-tekton-kuberocketci#branch-specific-pipelines" class="hash-link" aria-label="Direct link to Branch-Specific Pipelines" title="Direct link to Branch-Specific Pipelines" translate="no">​</a></h3>
<p>When different branches need different logic - <code>main</code> with full integration tests, <code>release</code> with image signing - pipelines are defined explicitly per branch. See the <a class="" href="https://docs.kuberocketci.io/docs/use-cases/custom-pipelines-flow#replace-existing-pipelines-for-components-with-custom-pipelines">custom pipelines flow guide</a>.</p>
<p>Both approaches follow the same Git-first workflow: write Tekton YAML, apply to the cluster to verify, commit, and let Argo CD synchronize the authoritative state.</p>
<h2 class="anchor anchorTargetStickyNavbar_Vzrq" id="the-portal-pipeline-management-ui">The Portal: Pipeline Management UI<a href="https://docs.kuberocketci.io/blog/kubernetes-native-cicd-tekton-kuberocketci#the-portal-pipeline-management-ui" class="hash-link" aria-label="Direct link to The Portal: Pipeline Management UI" title="Direct link to The Portal: Pipeline Management UI" translate="no">​</a></h2>
<p>The KubeRocketCI portal ships a dedicated <code>tekton</code> module with full pipeline management across four page areas: pipeline list, pipeline details, PipelineRun list, and PipelineRun details.</p>
<p><strong>Pipeline list with type filter.</strong> The pipeline list filters by <code>app.edp.epam.com/pipelinetype</code> label - select <code>build</code>, <code>review</code>, <code>deploy</code>, or any of the seven types to narrow the view. Each pipeline shows its type, last run status, and a <strong>Run with params</strong> button.</p>
<p><strong>Run with params.</strong> Clicking <strong>Run with params</strong> fetches the <code>TriggerTemplate</code> linked to the pipeline (via the <code>app.edp.epam.com/triggertemplate</code> label), generates a PipelineRun draft pre-filled with correct parameters, opens a YAML editor for review, and creates the PipelineRun resource via the Kubernetes API on save. No <code>kubectl</code> required.</p>
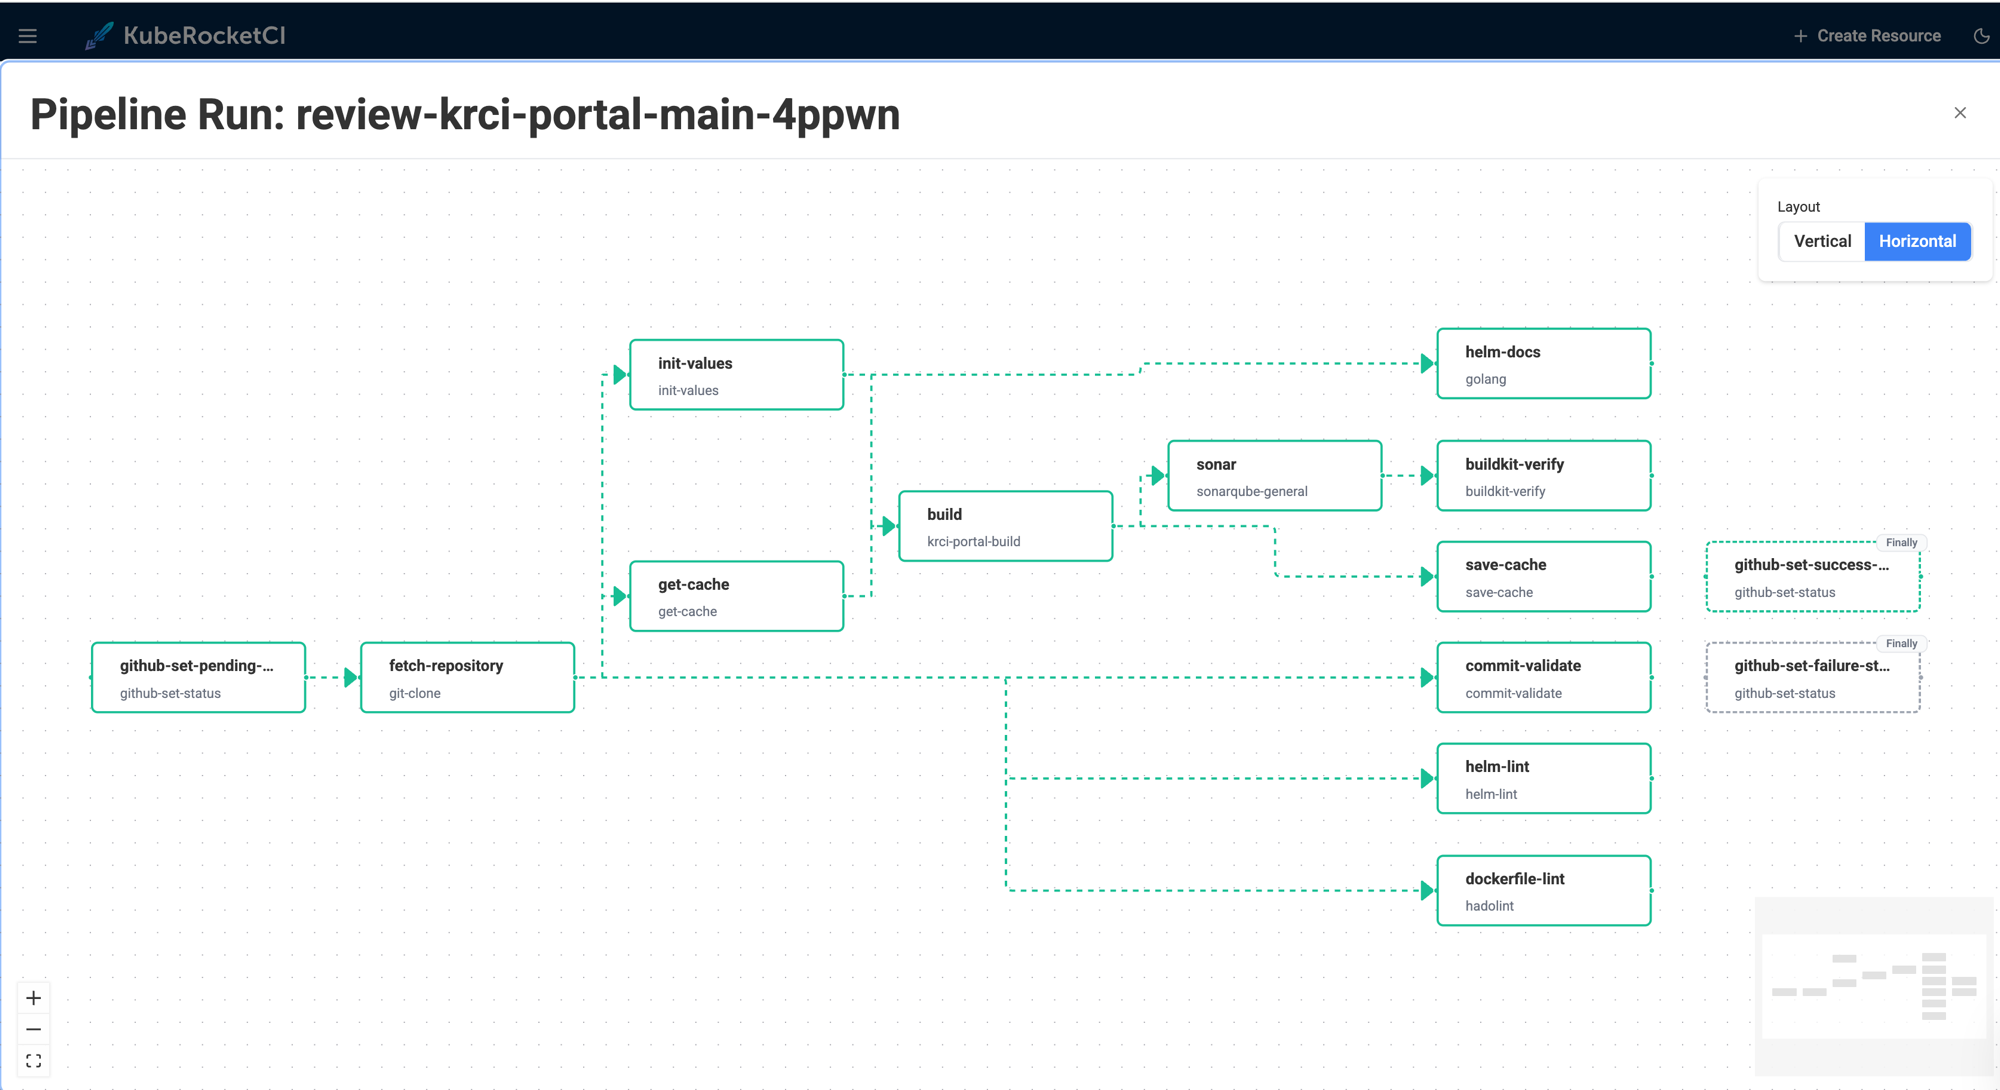
<p><strong>DAG visualization.</strong> The pipeline details page renders the task graph using React Flow - nodes for each task, directed edges from <code>runAfter</code> dependencies, isolated tasks shown separately. Colors map to live status: blue (running), green (succeeded), red (failed), amber (pending). Finally-tasks are distinguished visually from the main execution chain.</p>
<p><img decoding="async" loading="lazy" alt="KubeRocketCI portal DAG view of a review pipeline - tasks for sonar, helm-lint, dockerfile-lint, and GitHub status reporting" src="https://docs.kuberocketci.io/assets/images/dag-pipeline-visualization-7e515dc29a2b3db43fed35350ec4d4b9.png" width="2000" height="1090" class="img_ev3q"></p>
<p><strong>Live logs and history.</strong> The PipelineRun details page streams live container logs while a run is active. After completion, logs are served from Tekton Results - the same view, no separate log aggregation setup needed.</p>
<p><strong>Inline manual approval.</strong> When a pipeline step is an <code>ApprovalTask</code> (a platform-native CRD), the portal renders Approve / Reject buttons directly in the task view - with an optional comment field. The approval decision (<code>spec.action</code>, <code>spec.approve.approvedBy</code>, <code>spec.approve.comment</code>) is written back to the <code>ApprovalTask</code> resource. This is how release gates and environment promotion approvals are implemented as Kubernetes-native objects.</p>
<h2 class="anchor anchorTargetStickyNavbar_Vzrq" id="getting-started">Getting Started<a href="https://docs.kuberocketci.io/blog/kubernetes-native-cicd-tekton-kuberocketci#getting-started" class="hash-link" aria-label="Direct link to Getting Started" title="Direct link to Getting Started" translate="no">​</a></h2>
<h3 class="anchor anchorTargetStickyNavbar_Vzrq" id="step-1---install-the-platform">Step 1 - Install the platform<a href="https://docs.kuberocketci.io/blog/kubernetes-native-cicd-tekton-kuberocketci#step-1---install-the-platform" class="hash-link" aria-label="Direct link to Step 1 - Install the platform" title="Direct link to Step 1 - Install the platform" translate="no">​</a></h3>
<p>Follow the <a class="" href="https://docs.kuberocketci.io/docs/quick-start/platform-installation">Quick Start: Install KubeRocketCI</a> guide for a local cluster. For production on AWS, see <a class="" href="https://docs.kuberocketci.io/docs/operator-guide/deploy-aws-eks">Deploy on AWS EKS</a>.</p>
<h3 class="anchor anchorTargetStickyNavbar_Vzrq" id="step-2---install-tekton-components">Step 2 - Install Tekton components<a href="https://docs.kuberocketci.io/blog/kubernetes-native-cicd-tekton-kuberocketci#step-2---install-tekton-components" class="hash-link" aria-label="Direct link to Step 2 - Install Tekton components" title="Direct link to Step 2 - Install Tekton components" translate="no">​</a></h3>
<p>The <a class="" href="https://docs.kuberocketci.io/docs/operator-guide/install-tekton">Install Tekton</a> guide covers both vanilla Kubernetes and OKD/OpenShift (Tekton Operator). For the fully automated path, see <a class="" href="https://docs.kuberocketci.io/docs/operator-guide/add-ons-overview">Add-Ons Overview</a>.</p>
<h3 class="anchor anchorTargetStickyNavbar_Vzrq" id="step-3---connect-your-git-provider">Step 3 - Connect your Git provider<a href="https://docs.kuberocketci.io/blog/kubernetes-native-cicd-tekton-kuberocketci#step-3---connect-your-git-provider" class="hash-link" aria-label="Direct link to Step 3 - Connect your Git provider" title="Direct link to Step 3 - Connect your Git provider" translate="no">​</a></h3>
<p>Walk through <a class="" href="https://docs.kuberocketci.io/docs/quick-start/integrate-github">Integrate GitHub</a> or configure GitLab/Bitbucket in the portal under <strong>Git Servers</strong>.</p>
<h3 class="anchor anchorTargetStickyNavbar_Vzrq" id="step-4---integrate-container-registry-and-code-quality">Step 4 - Integrate container registry and code quality<a href="https://docs.kuberocketci.io/blog/kubernetes-native-cicd-tekton-kuberocketci#step-4---integrate-container-registry-and-code-quality" class="hash-link" aria-label="Direct link to Step 4 - Integrate container registry and code quality" title="Direct link to Step 4 - Integrate container registry and code quality" translate="no">​</a></h3>
<p><a class="" href="https://docs.kuberocketci.io/docs/quick-start/integrate-container-registry">Integrate DockerHub</a> wires up image push. <a class="" href="https://docs.kuberocketci.io/docs/quick-start/integrate-sonarcloud">Integrate SonarQube</a> activates the quality gate step in the build pipeline.</p>
<h3 class="anchor anchorTargetStickyNavbar_Vzrq" id="step-5---onboard-your-first-application">Step 5 - Onboard your first application<a href="https://docs.kuberocketci.io/blog/kubernetes-native-cicd-tekton-kuberocketci#step-5---onboard-your-first-application" class="hash-link" aria-label="Direct link to Step 5 - Onboard your first application" title="Direct link to Step 5 - Onboard your first application" translate="no">​</a></h3>
<p><a class="" href="https://docs.kuberocketci.io/docs/quick-start/create-application">Create Application</a> registers your codebase. The platform provisions a review and build pipeline for the default branch automatically - the Helm-templated library selects the correct pipeline name based on your tech stack.</p>
<h3 class="anchor anchorTargetStickyNavbar_Vzrq" id="step-6---configure-a-deployment-environment">Step 6 - Configure a deployment environment<a href="https://docs.kuberocketci.io/blog/kubernetes-native-cicd-tekton-kuberocketci#step-6---configure-a-deployment-environment" class="hash-link" aria-label="Direct link to Step 6 - Configure a deployment environment" title="Direct link to Step 6 - Configure a deployment environment" translate="no">​</a></h3>
<p><a class="" href="https://docs.kuberocketci.io/docs/quick-start/deploy-application">Deploy Application</a> connects Argo CD and configures the first CD pipeline stage. <a class="" href="https://docs.kuberocketci.io/docs/quick-start/integrate-argocd">Integrate Argo CD</a> covers the Argo CD setup.</p>
<p>From a fresh cluster to a working build-and-deploy loop typically takes a few hours.</p>
<h2 class="anchor anchorTargetStickyNavbar_Vzrq" id="what-every-onboarded-app-gets-automatically">What Every Onboarded App Gets Automatically<a href="https://docs.kuberocketci.io/blog/kubernetes-native-cicd-tekton-kuberocketci#what-every-onboarded-app-gets-automatically" class="hash-link" aria-label="Direct link to What Every Onboarded App Gets Automatically" title="Direct link to What Every Onboarded App Gets Automatically" translate="no">​</a></h2>
<p>Once the platform is running, every onboarded application has:</p>
<ul>
<li class="">A <strong>review pipeline</strong> on every pull request - compile, test, SonarQube quality gate.</li>
<li class="">A <strong>build pipeline</strong> on every merge - versioned artifact, container image pushed, Tekton Chains provenance attestation.</li>
<li class="">A <strong>CD pipeline</strong> connected to Argo CD - promoting artifacts through configured stages.</li>
<li class=""><strong>Pipeline definitions in Git</strong> - every change to a pipeline goes through code review, synchronized by Argo CD.</li>
<li class=""><strong>Live + archived logs</strong> - streaming during a run, served from Tekton Results after completion.</li>
<li class=""><strong>Manual approval gates</strong> - inline approve/reject in the portal for any pipeline step that requires human sign-off.</li>
</ul>
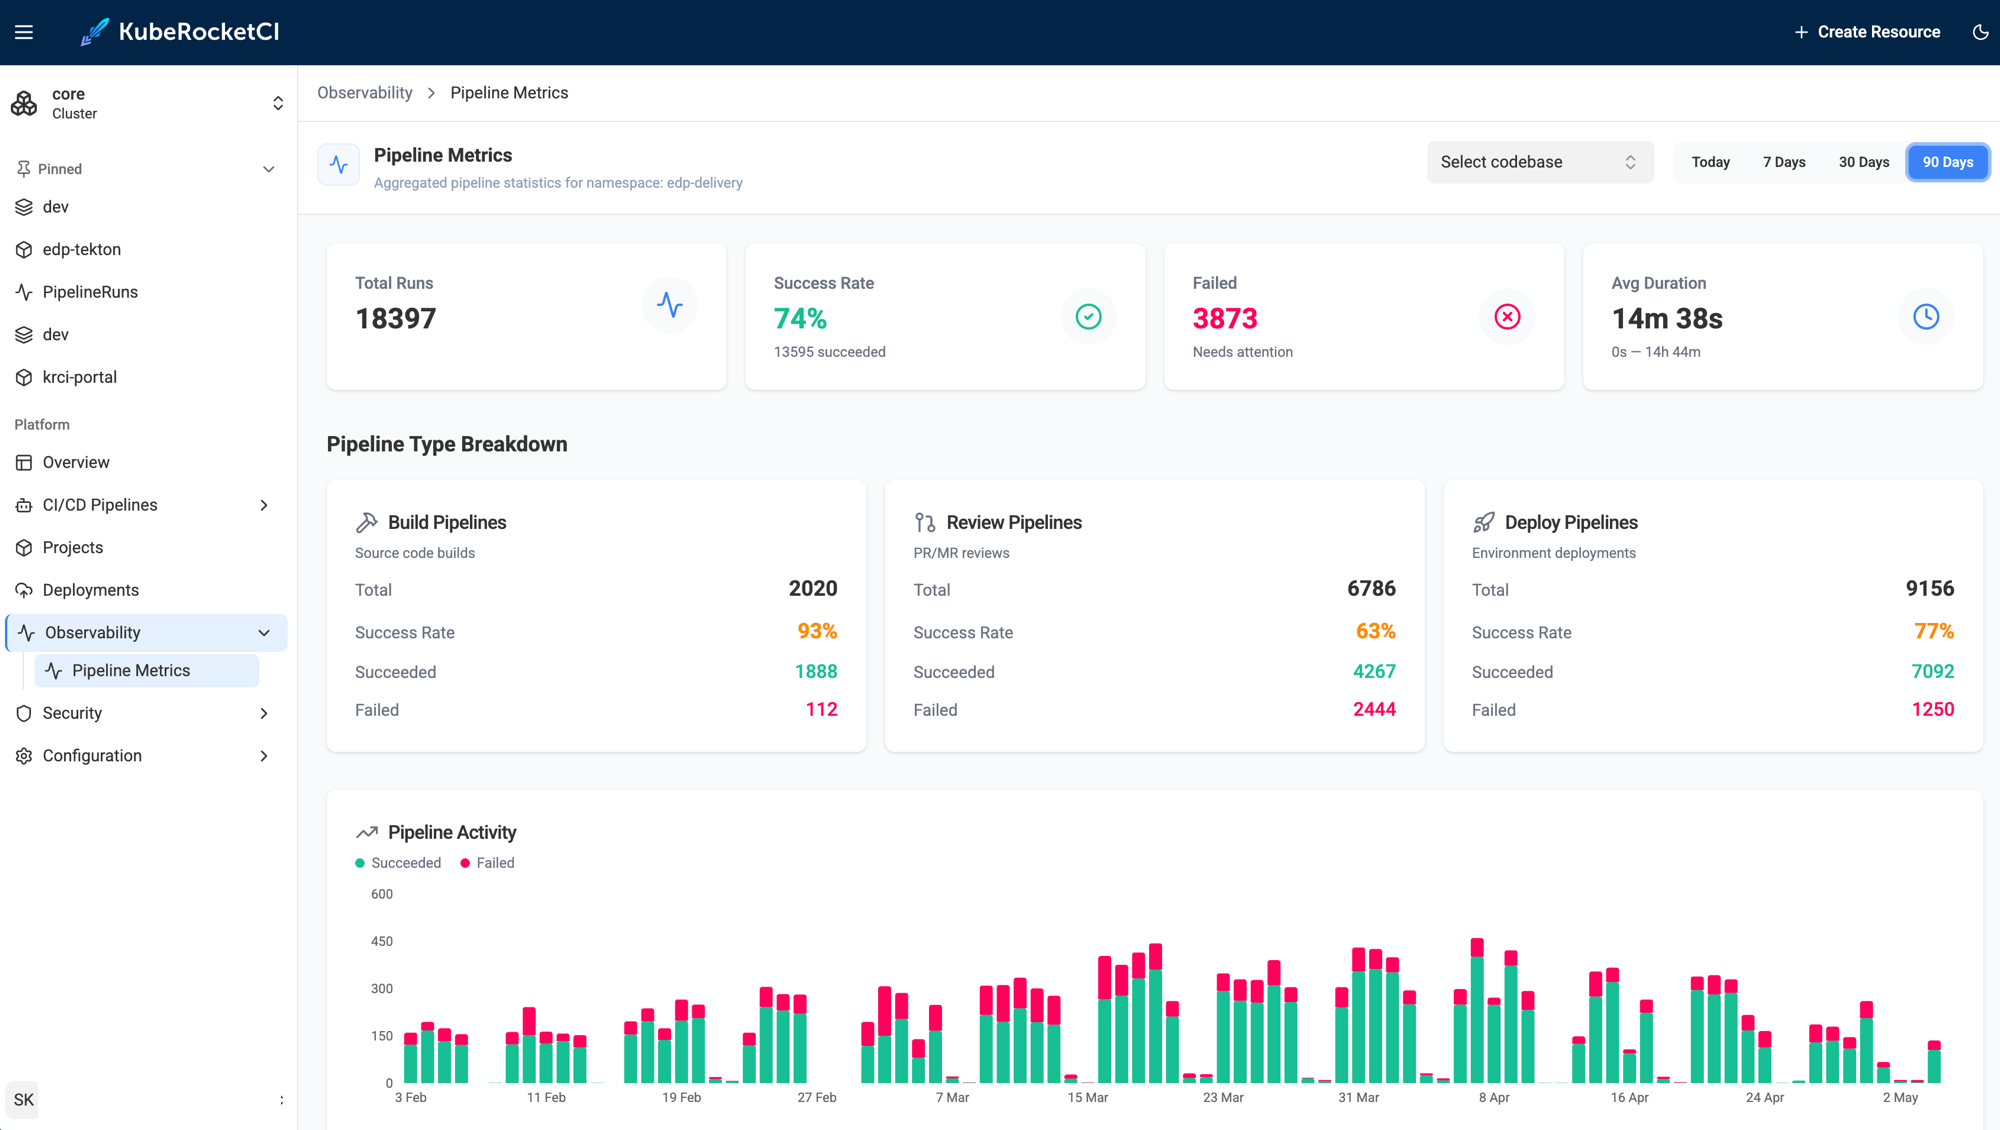
<p>This is what our own dogfooding instance looks like - we run KubeRocketCI on KubeRocketCI itself. Over 90 days, the <code>krci</code> namespace logged <strong>18,397 pipeline runs</strong> (~200/day across build, review, and deploy types), with build pipelines hitting a <strong>93% success rate</strong> at an average duration of <strong>14 minutes 38 seconds</strong>. No external CI server involved.</p>
<p><img decoding="async" loading="lazy" alt="KubeRocketCI Pipeline Metrics: 18,397 runs over 90 days, 74% success rate, 93% build success rate, 14m 38s average duration" src="https://docs.kuberocketci.io/assets/images/pipeline-metrics-fb92750b2ac9881540291e92a70b5043.png" width="2000" height="1130" class="img_ev3q"></p>
<p>The entire path - review pipeline on PR open, build pipeline on merge, artifact versioning, image push, and Argo CD sync - runs without the developer writing a single line of Jenkins Groovy or pipeline YAML. The only required input is declaring the tech stack at onboarding time.</p>
<p>No manual wiring required. The opinionated defaults deliver a production-grade setup from day one, and the full Tekton API surface is available when you need to diverge.</p>
<h2 class="anchor anchorTargetStickyNavbar_Vzrq" id="next-steps">Next Steps<a href="https://docs.kuberocketci.io/blog/kubernetes-native-cicd-tekton-kuberocketci#next-steps" class="hash-link" aria-label="Direct link to Next Steps" title="Direct link to Next Steps" translate="no">​</a></h2>
<ul>
<li class="">Explore the <a class="" href="https://docs.kuberocketci.io/docs/user-guide/tekton-pipelines">Tekton Overview</a> for the complete pipeline type and trigger reference.</li>
<li class="">Try the <a class="" href="https://docs.kuberocketci.io/docs/use-cases/application-scaffolding">application scaffolding use case</a> to see the platform generate a project skeleton with a working CI/CD pipeline in minutes.</li>
<li class="">Follow <a class="" href="https://docs.kuberocketci.io/docs/use-cases/autotest-as-quality-gate">autotest as quality gate</a> to promote automatically only when integration tests pass.</li>
<li class="">Read <a class="" href="https://docs.kuberocketci.io/docs/use-cases/deploy-application-from-feature-branch">deploy application from a feature branch</a> for ephemeral environment patterns.</li>
</ul>
<p>KubeRocketCI is open-source under Apache License 2.0. Platform source, Helm charts, and the full Tekton pipeline library are on <a href="https://github.com/epam/edp-tekton" target="_blank" rel="noopener noreferrer" class="">GitHub</a>.</p>]]></content>
        <author>
            <name>Sergiy Kulanov</name>
            <uri>https://github.com/sergk</uri>
        </author>
        <category label="KubeRocketCI" term="KubeRocketCI"/>
        <category label="Tekton" term="Tekton"/>
        <category label="Kubernetes" term="Kubernetes"/>
        <category label="CI/CD" term="CI/CD"/>
        <category label="DevOps" term="DevOps"/>
        <category label="Platform Engineering" term="Platform Engineering"/>
        <category label="GitOps" term="GitOps"/>
    </entry>
    <entry>
        <title type="html"><![CDATA[Integrating OIDC Authentication with Microsoft Entra in AWS EKS]]></title>
        <id>https://docs.kuberocketci.io/blog/integrating-oidc-authentication-microsoft-entra-aws-eks</id>
        <link href="https://docs.kuberocketci.io/blog/integrating-oidc-authentication-microsoft-entra-aws-eks"/>
        <updated>2024-12-03T00:00:00.000Z</updated>
        <summary type="html"><![CDATA[Learn how to implement Single Sign-On (SSO) using OpenID Connect (OIDC) and Microsoft Entra to enhance security and streamline authentication processes in Amazon Elastic Kubernetes Service (AWS EKS).]]></summary>
        <content type="html"><![CDATA[<p>In modern cloud environments, secure and efficient access management is essential, especially for platforms like Amazon EKS. This blog will guide you through integrating OpenID Connect (OIDC) authentication using Microsoft Entra, making it easier to manage access to your EKS clusters and KubeRocketCI Portal. By implementing this approach, you can simplify user authentication while ensuring strong security controls. Whether you're improving compliance or streamlining access for your team, this integration is a practical solution to enhance your cloud-native workflows.</p>
<h2 class="anchor anchorTargetStickyNavbar_Vzrq" id="prerequisites">Prerequisites<a href="https://docs.kuberocketci.io/blog/integrating-oidc-authentication-microsoft-entra-aws-eks#prerequisites" class="hash-link" aria-label="Direct link to Prerequisites" title="Direct link to Prerequisites" translate="no">​</a></h2>
<p>Before you begin, ensure you have the following:</p>
<ul>
<li class="">Access to the <a href="https://entra.microsoft.com/?feature.msaljs=true#home" target="_blank" rel="noopener noreferrer" class="">Microsoft Entra Admin Center</a> with administrative privileges.</li>
<li class="">A running <a href="https://docs.aws.amazon.com/eks/latest/userguide/create-cluster.html" target="_blank" rel="noopener noreferrer" class="">AWS EKS</a> cluster with the necessary permissions for access and management.</li>
<li class="">The <a href="https://github.com/int128/kubelogin" target="_blank" rel="noopener noreferrer" class="">kubelogin</a> plugin installed for authenticating to the EKS cluster using OIDC.</li>
<li class="">The <a href="https://kubernetes.io/docs/tasks/tools/#kubectl" target="_blank" rel="noopener noreferrer" class="">kubectl</a> CLI tool installed.</li>
<li class="">The <a href="https://aws.amazon.com/cli/" target="_blank" rel="noopener noreferrer" class="">aws cli</a> tool installed.</li>
</ul>
<h2 class="anchor anchorTargetStickyNavbar_Vzrq" id="understanding-sso-oidc-and-microsoft-entra">Understanding SSO, OIDC, and Microsoft Entra<a href="https://docs.kuberocketci.io/blog/integrating-oidc-authentication-microsoft-entra-aws-eks#understanding-sso-oidc-and-microsoft-entra" class="hash-link" aria-label="Direct link to Understanding SSO, OIDC, and Microsoft Entra" title="Direct link to Understanding SSO, OIDC, and Microsoft Entra" translate="no">​</a></h2>
<p>In the context of enhancing digital security and user experience, we prioritize the integration of three key elements: Single Sign-On (SSO), OpenID Connect (OIDC), and Microsoft Entra. Here’s how they connect:</p>
<ul>
<li class="">
<p><strong>Single Sign-On (SSO)</strong> serves as the foundation, enabling users to access multiple applications with one set of login credentials, significantly simplifying the authentication process.</p>
</li>
<li class="">
<p><strong>OpenID Connect (OIDC)</strong> builds on the SSO framework by providing an authentication layer, which uses straightforward identity verification to ensure secure and seamless access across services.</p>
</li>
<li class="">
<p><strong>Microsoft Entra</strong> (formerly known as <strong>Azure Active Directory</strong>) is Microsoft's comprehensive identity and access management solution. It supports the implementation of both Single Sign-On (SSO) and OpenID Connect (OIDC), enabling organizations to securely manage user identities and enforce access controls. With its reliable set of tools, Microsoft Entra simplifies authentication, enhances security, and ensures seamless access to applications and services, making it an essential platform for modern identity management.</p>
</li>
</ul>
<p>Together, these technologies streamline the login process, reinforce security, and enhance the user experience by allowing secure, seamless navigation across our digital ecosystem.</p>
<h3 class="anchor anchorTargetStickyNavbar_Vzrq" id="microsoft-entra-overview">Microsoft Entra Overview<a href="https://docs.kuberocketci.io/blog/integrating-oidc-authentication-microsoft-entra-aws-eks#microsoft-entra-overview" class="hash-link" aria-label="Direct link to Microsoft Entra Overview" title="Direct link to Microsoft Entra Overview" translate="no">​</a></h3>
<p>Microsoft Entra, formerly known as Azure Active Directory (Azure AD), is a modern identity and access management solution designed for secure access to applications and services. It provides features like Single Sign-On (SSO), identity federation, and seamless integration with on-premises directories such as LDAP and Active Directory. Microsoft Entra supports industry-standard protocols, including OpenID Connect (OIDC), OAuth 2.0, and Security Assertion Markup Language (SAML) 2.0, making it a versatile solution for managing user identities. By leveraging Microsoft Entra, organizations can enhance security, simplify user access, and avoid the complexities of building identity management features from scratch. For more details, see the <a href="https://learn.microsoft.com/en-gb/entra/identity/" target="_blank" rel="noopener noreferrer" class="">Microsoft Entra official documentation</a>.</p>
<h2 class="anchor anchorTargetStickyNavbar_Vzrq" id="create-a-new-microsoft-entra-tenant">Create a new Microsoft Entra Tenant<a href="https://docs.kuberocketci.io/blog/integrating-oidc-authentication-microsoft-entra-aws-eks#create-a-new-microsoft-entra-tenant" class="hash-link" aria-label="Direct link to Create a new Microsoft Entra Tenant" title="Direct link to Create a new Microsoft Entra Tenant" translate="no">​</a></h2>
<p>To get started with Microsoft Entra, you need to create a new tenant in the Microsoft Entra Admin Center. Follow these steps:</p>
<ol>
<li class="">
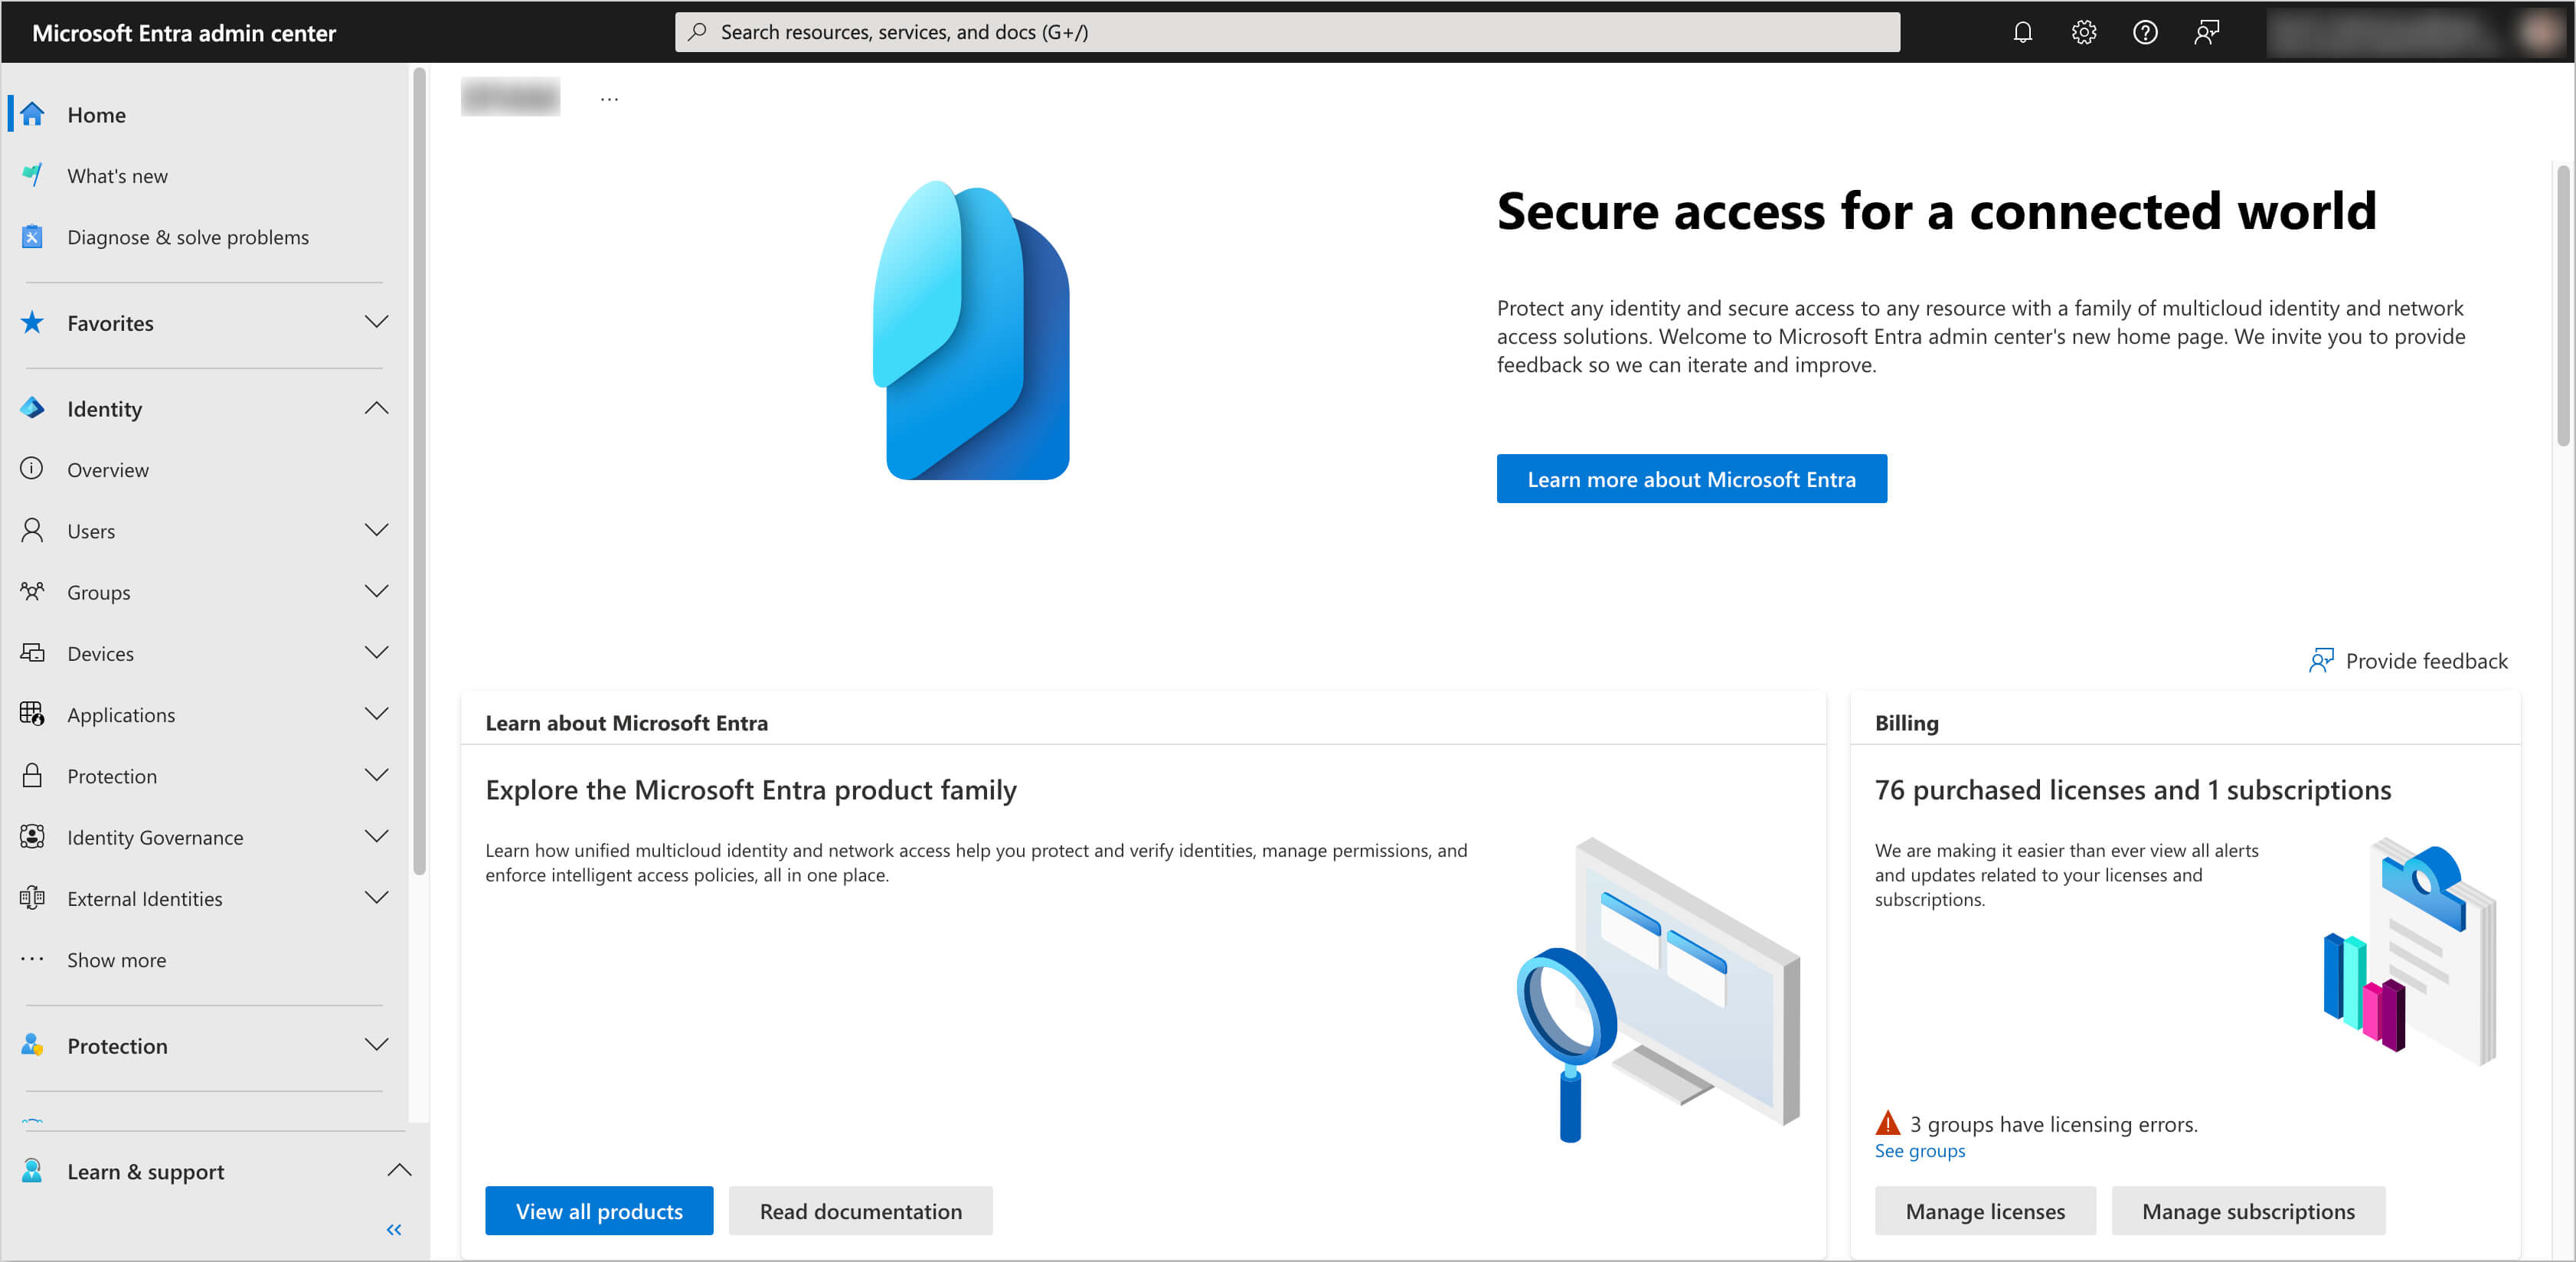
<p>Log in to the <a href="https://entra.microsoft.com/?feature.msaljs=true#home" target="_blank" rel="noopener noreferrer" class="">Microsoft Entra Admin Center</a> using your Microsoft account.</p>
<p><img decoding="async" loading="lazy" alt="Microsoft Entra Admin Center" src="https://docs.kuberocketci.io/assets/images/microsoft-entra-admin-center-8a597425e8e1e33a8867e316ee37be41.png" width="3364" height="1648" class="img_ev3q"></p>
</li>
<li class="">
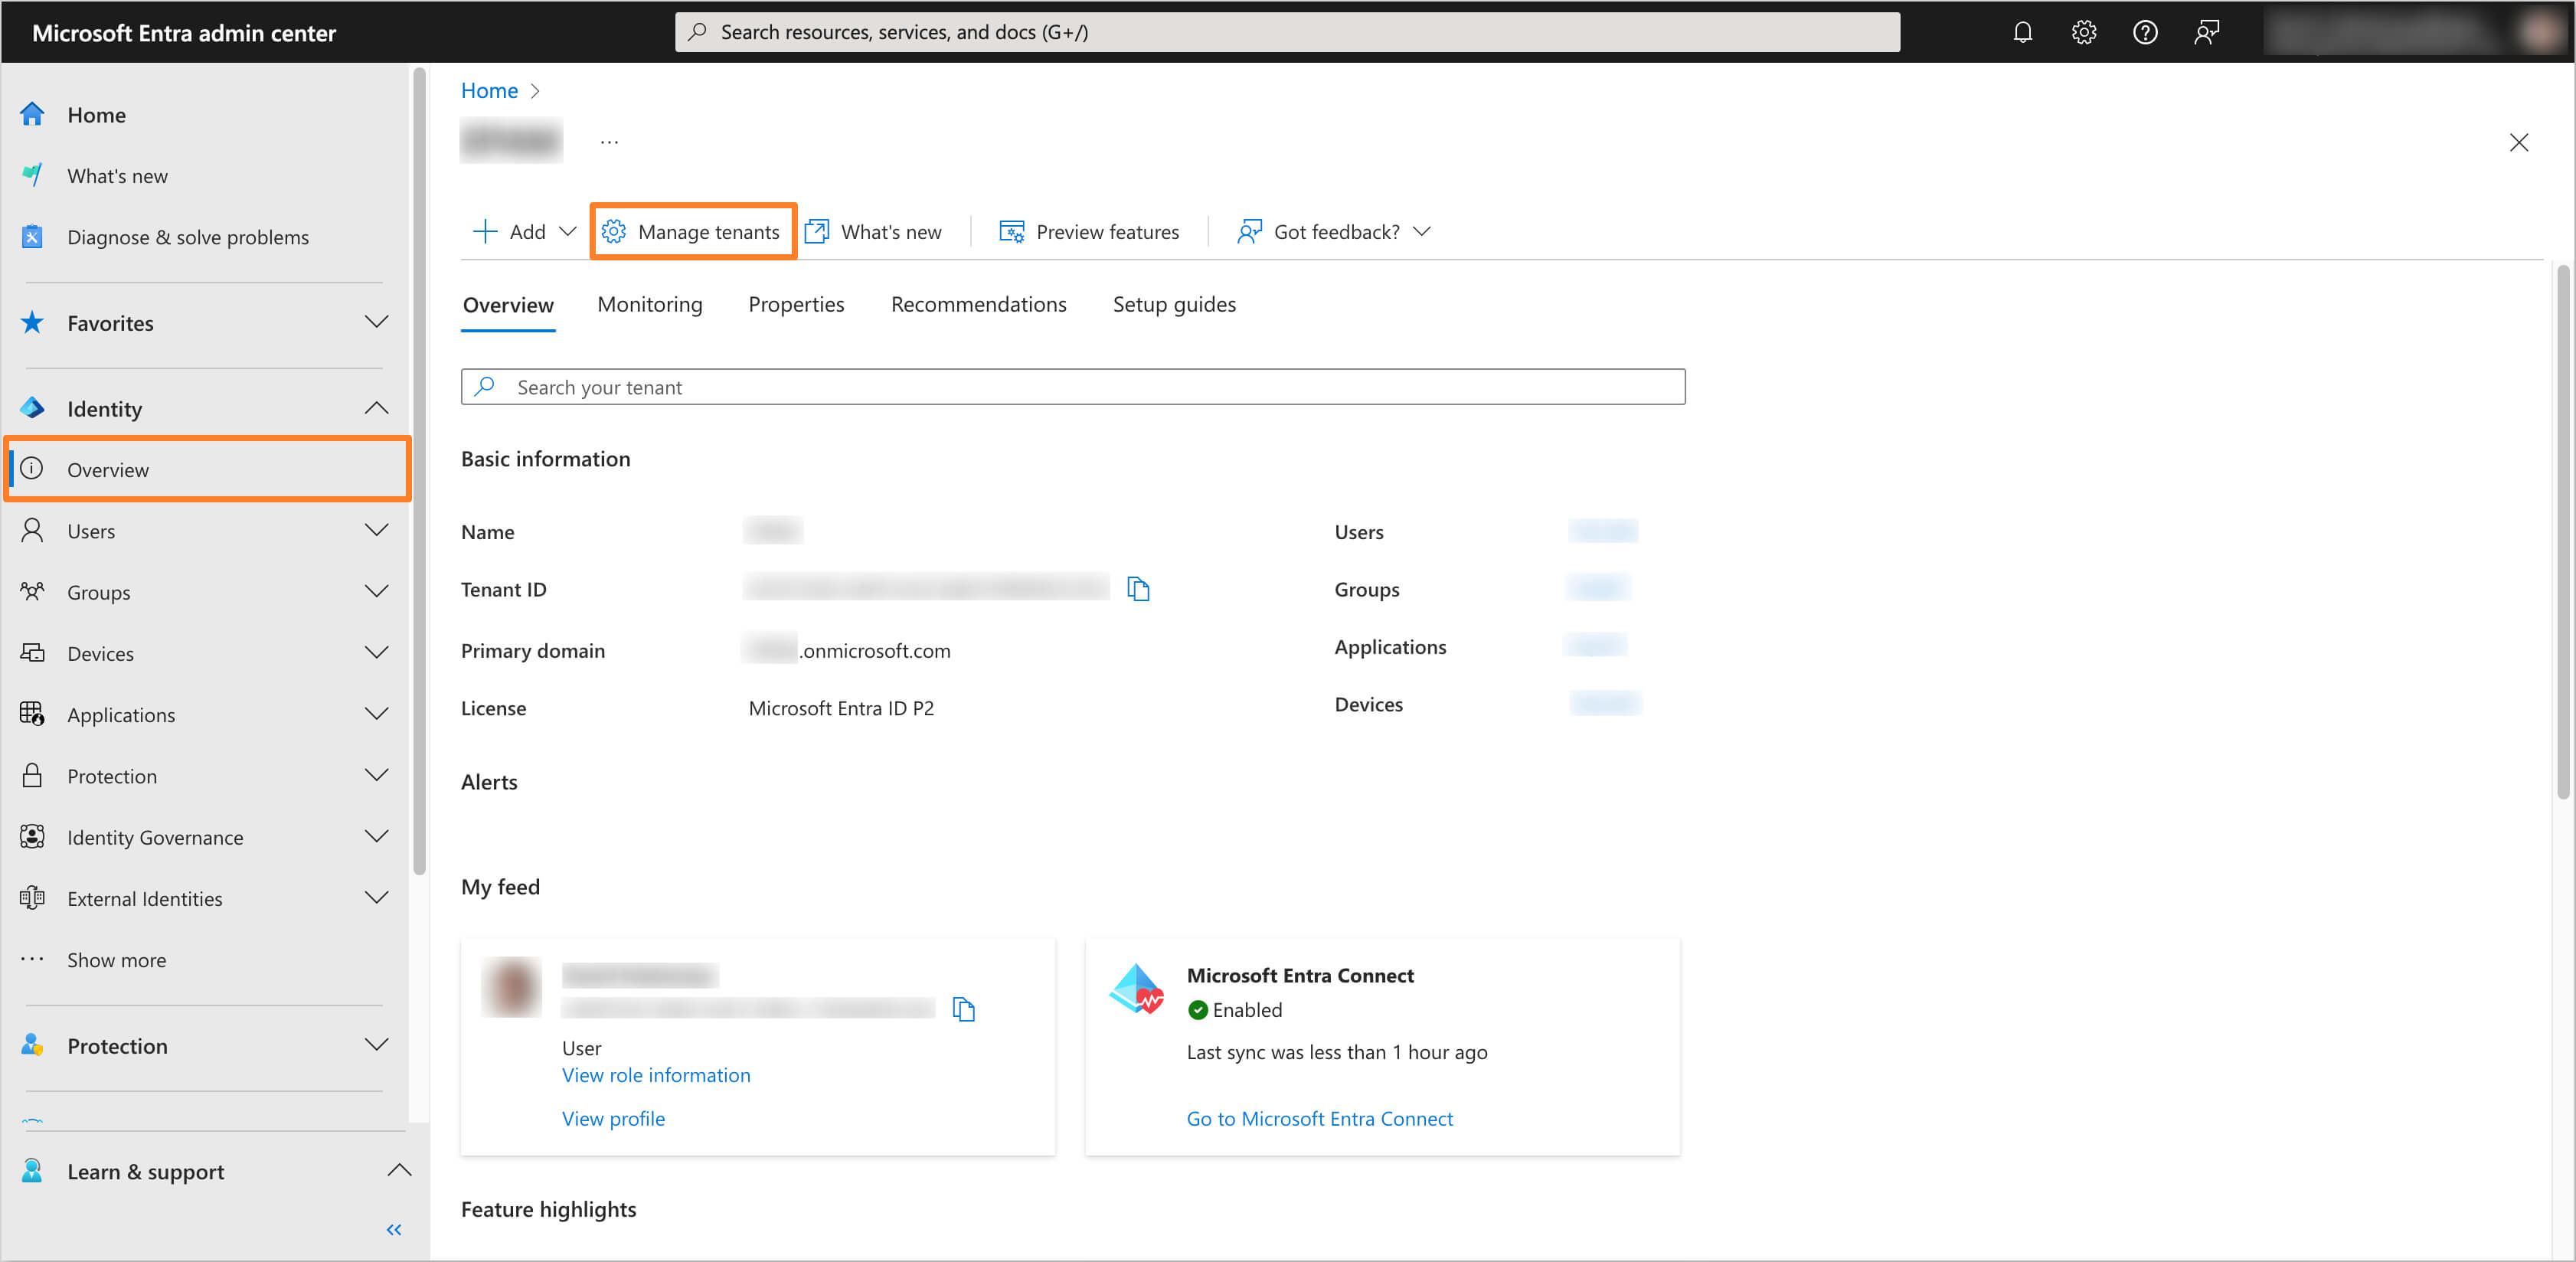
<p>In the left sidebar menu, select <strong>Overview</strong> section and then navigate to <strong>Manage tenants</strong> tab.</p>
<p><img decoding="async" loading="lazy" alt="Manage Tenants" src="https://docs.kuberocketci.io/assets/images/manage-tenants-c260f4975163bf0c5cb83eeb99217660.png" width="3364" height="1648" class="img_ev3q"></p>
</li>
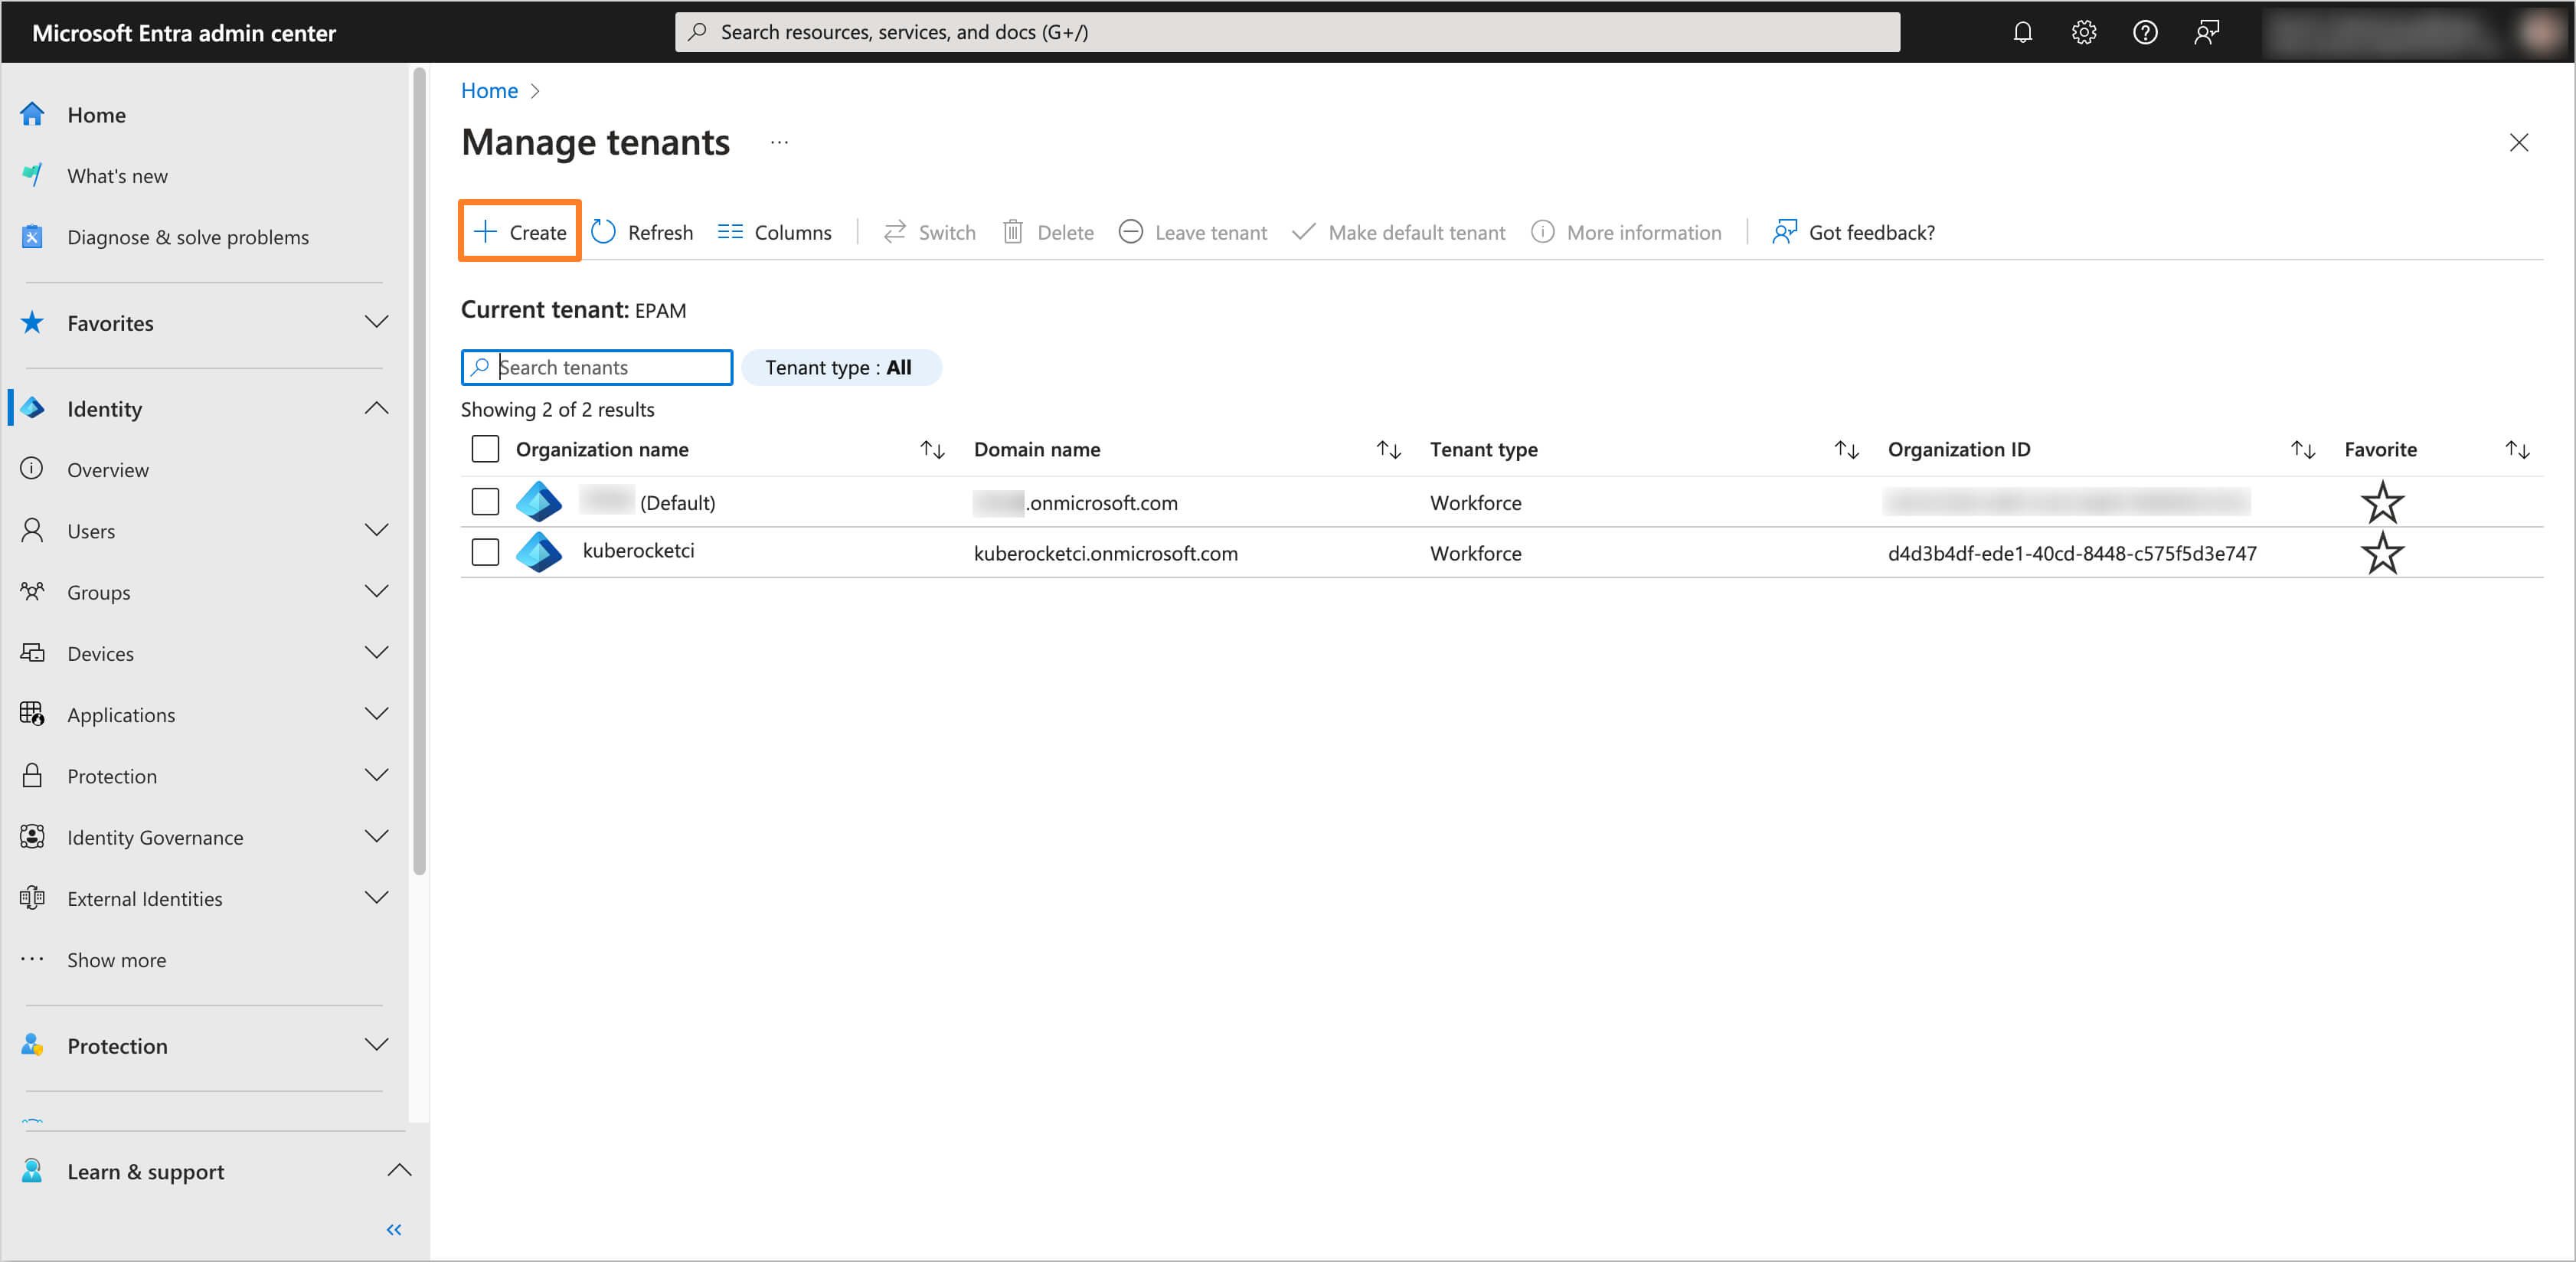
<li class="">
<p>Click on <strong>Create</strong> button to create a new tenant.</p>
<p><img decoding="async" loading="lazy" alt="Create Tenant" src="https://docs.kuberocketci.io/assets/images/create-tenant-ea455de07150c662e89cc2896be821ff.png" width="3364" height="1648" class="img_ev3q"></p>
</li>
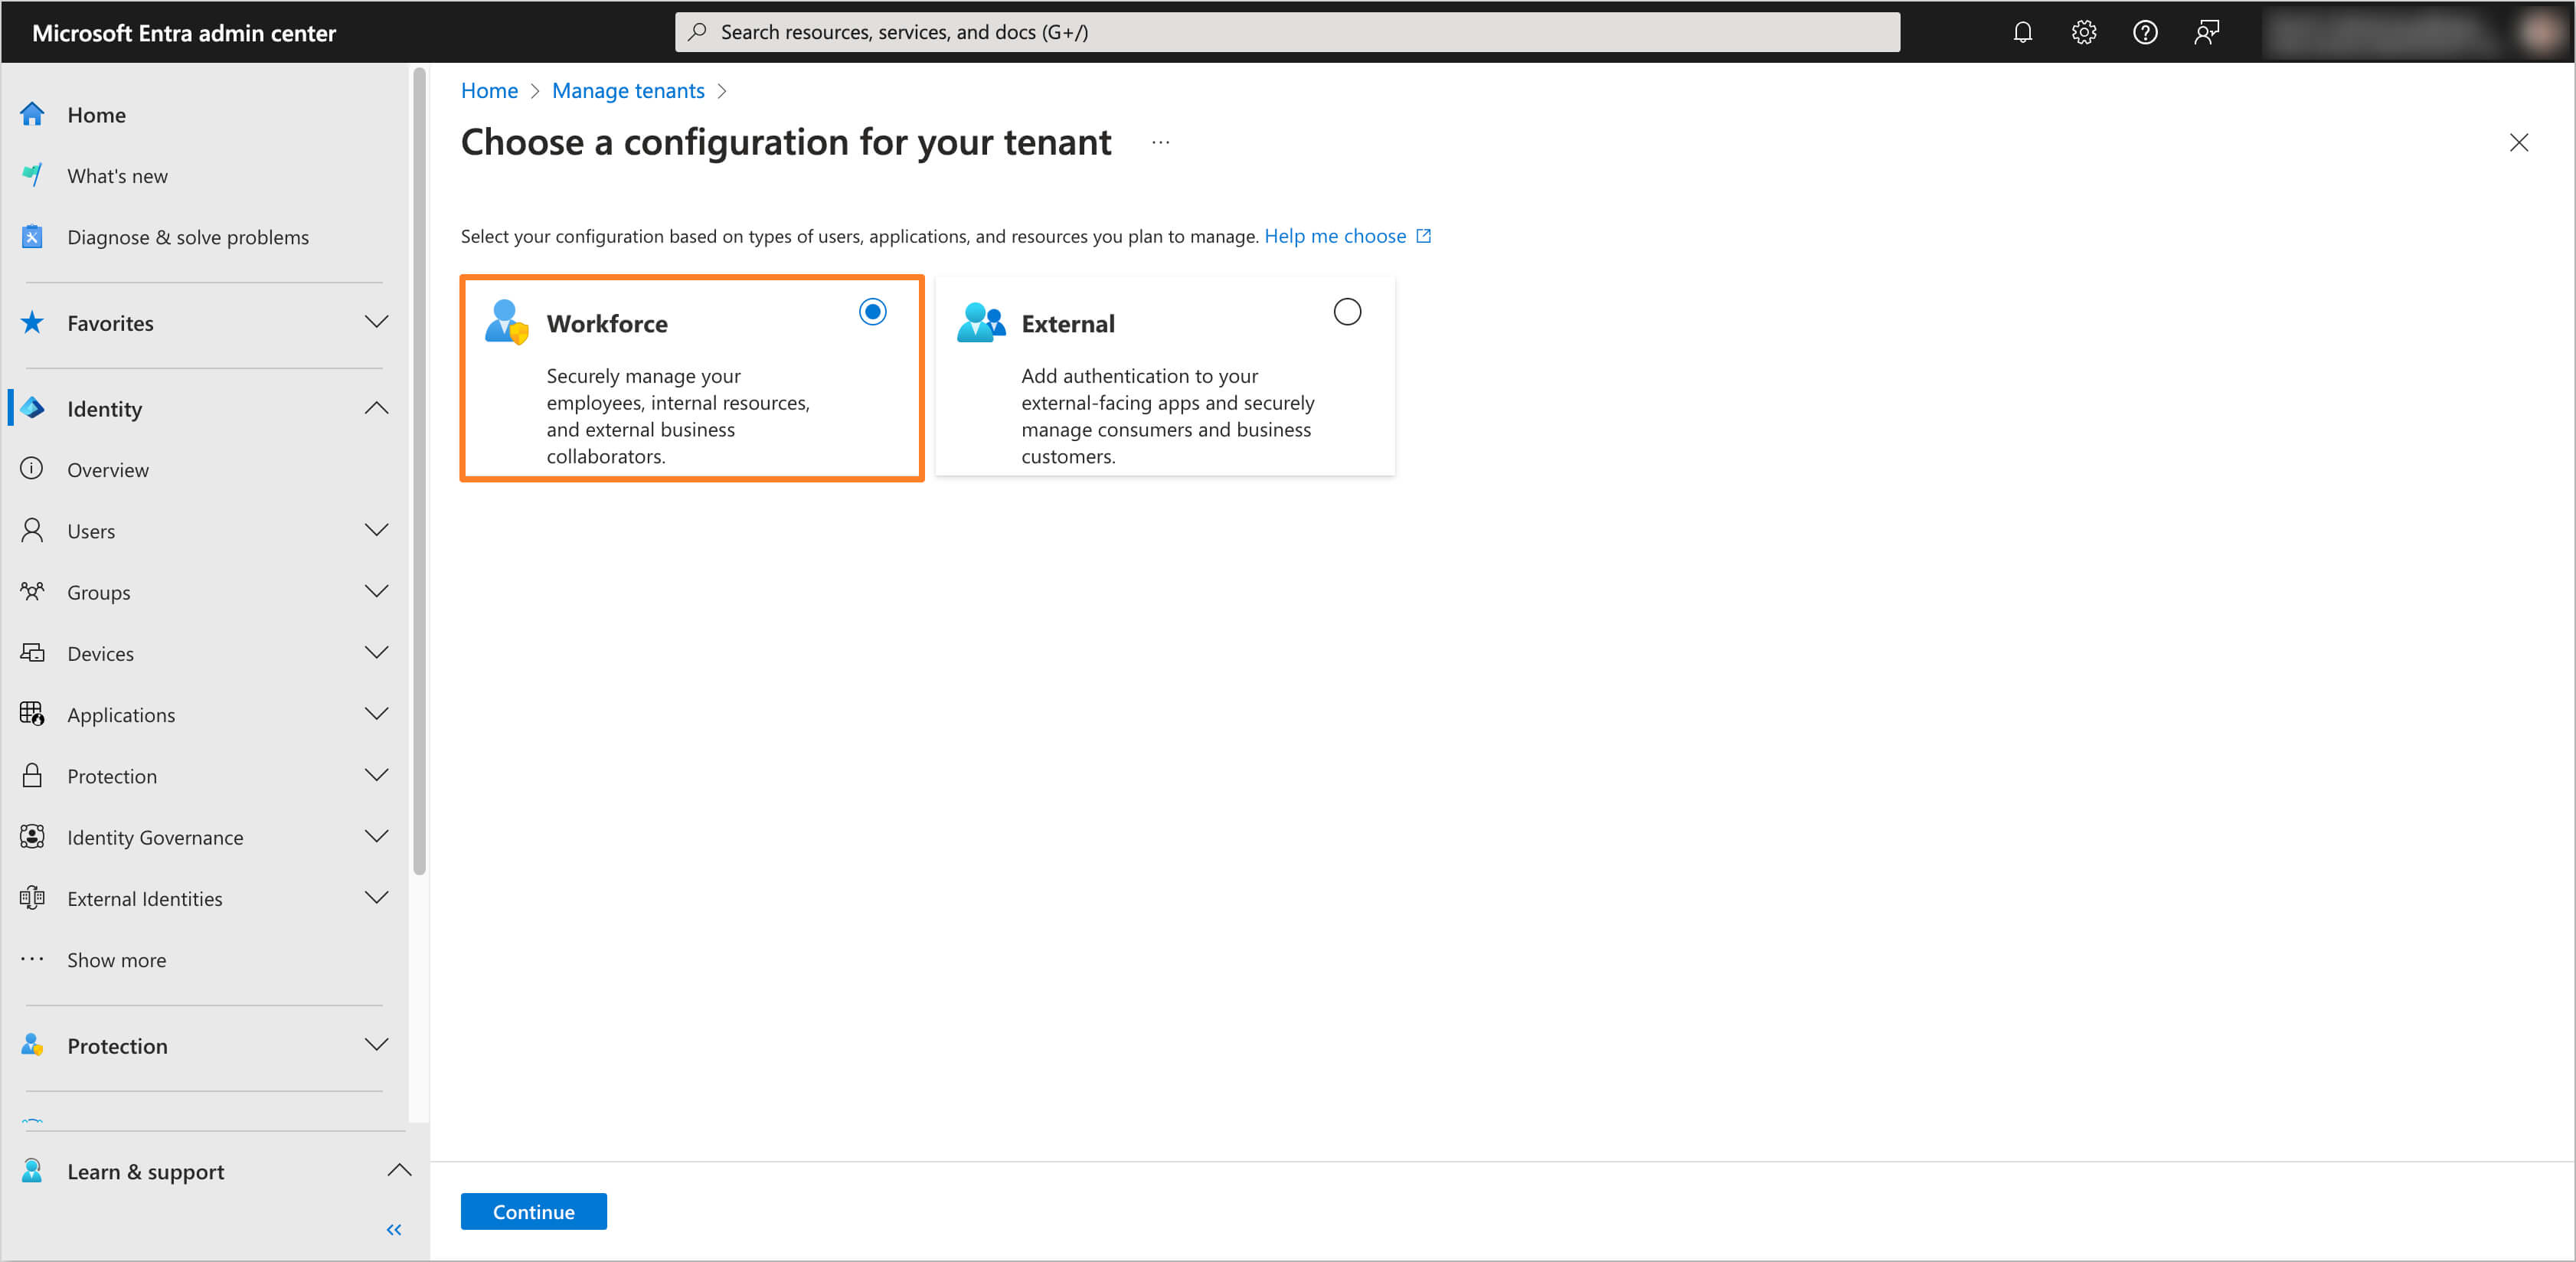
<li class="">
<p>Select the configuration type <strong>Workforce</strong>.</p>
<p><img decoding="async" loading="lazy" alt="Configuration Type" src="https://docs.kuberocketci.io/assets/images/configuration-type-31ef85a58475500f22b83a05c93b4276.png" width="3364" height="1648" class="img_ev3q"></p>
</li>
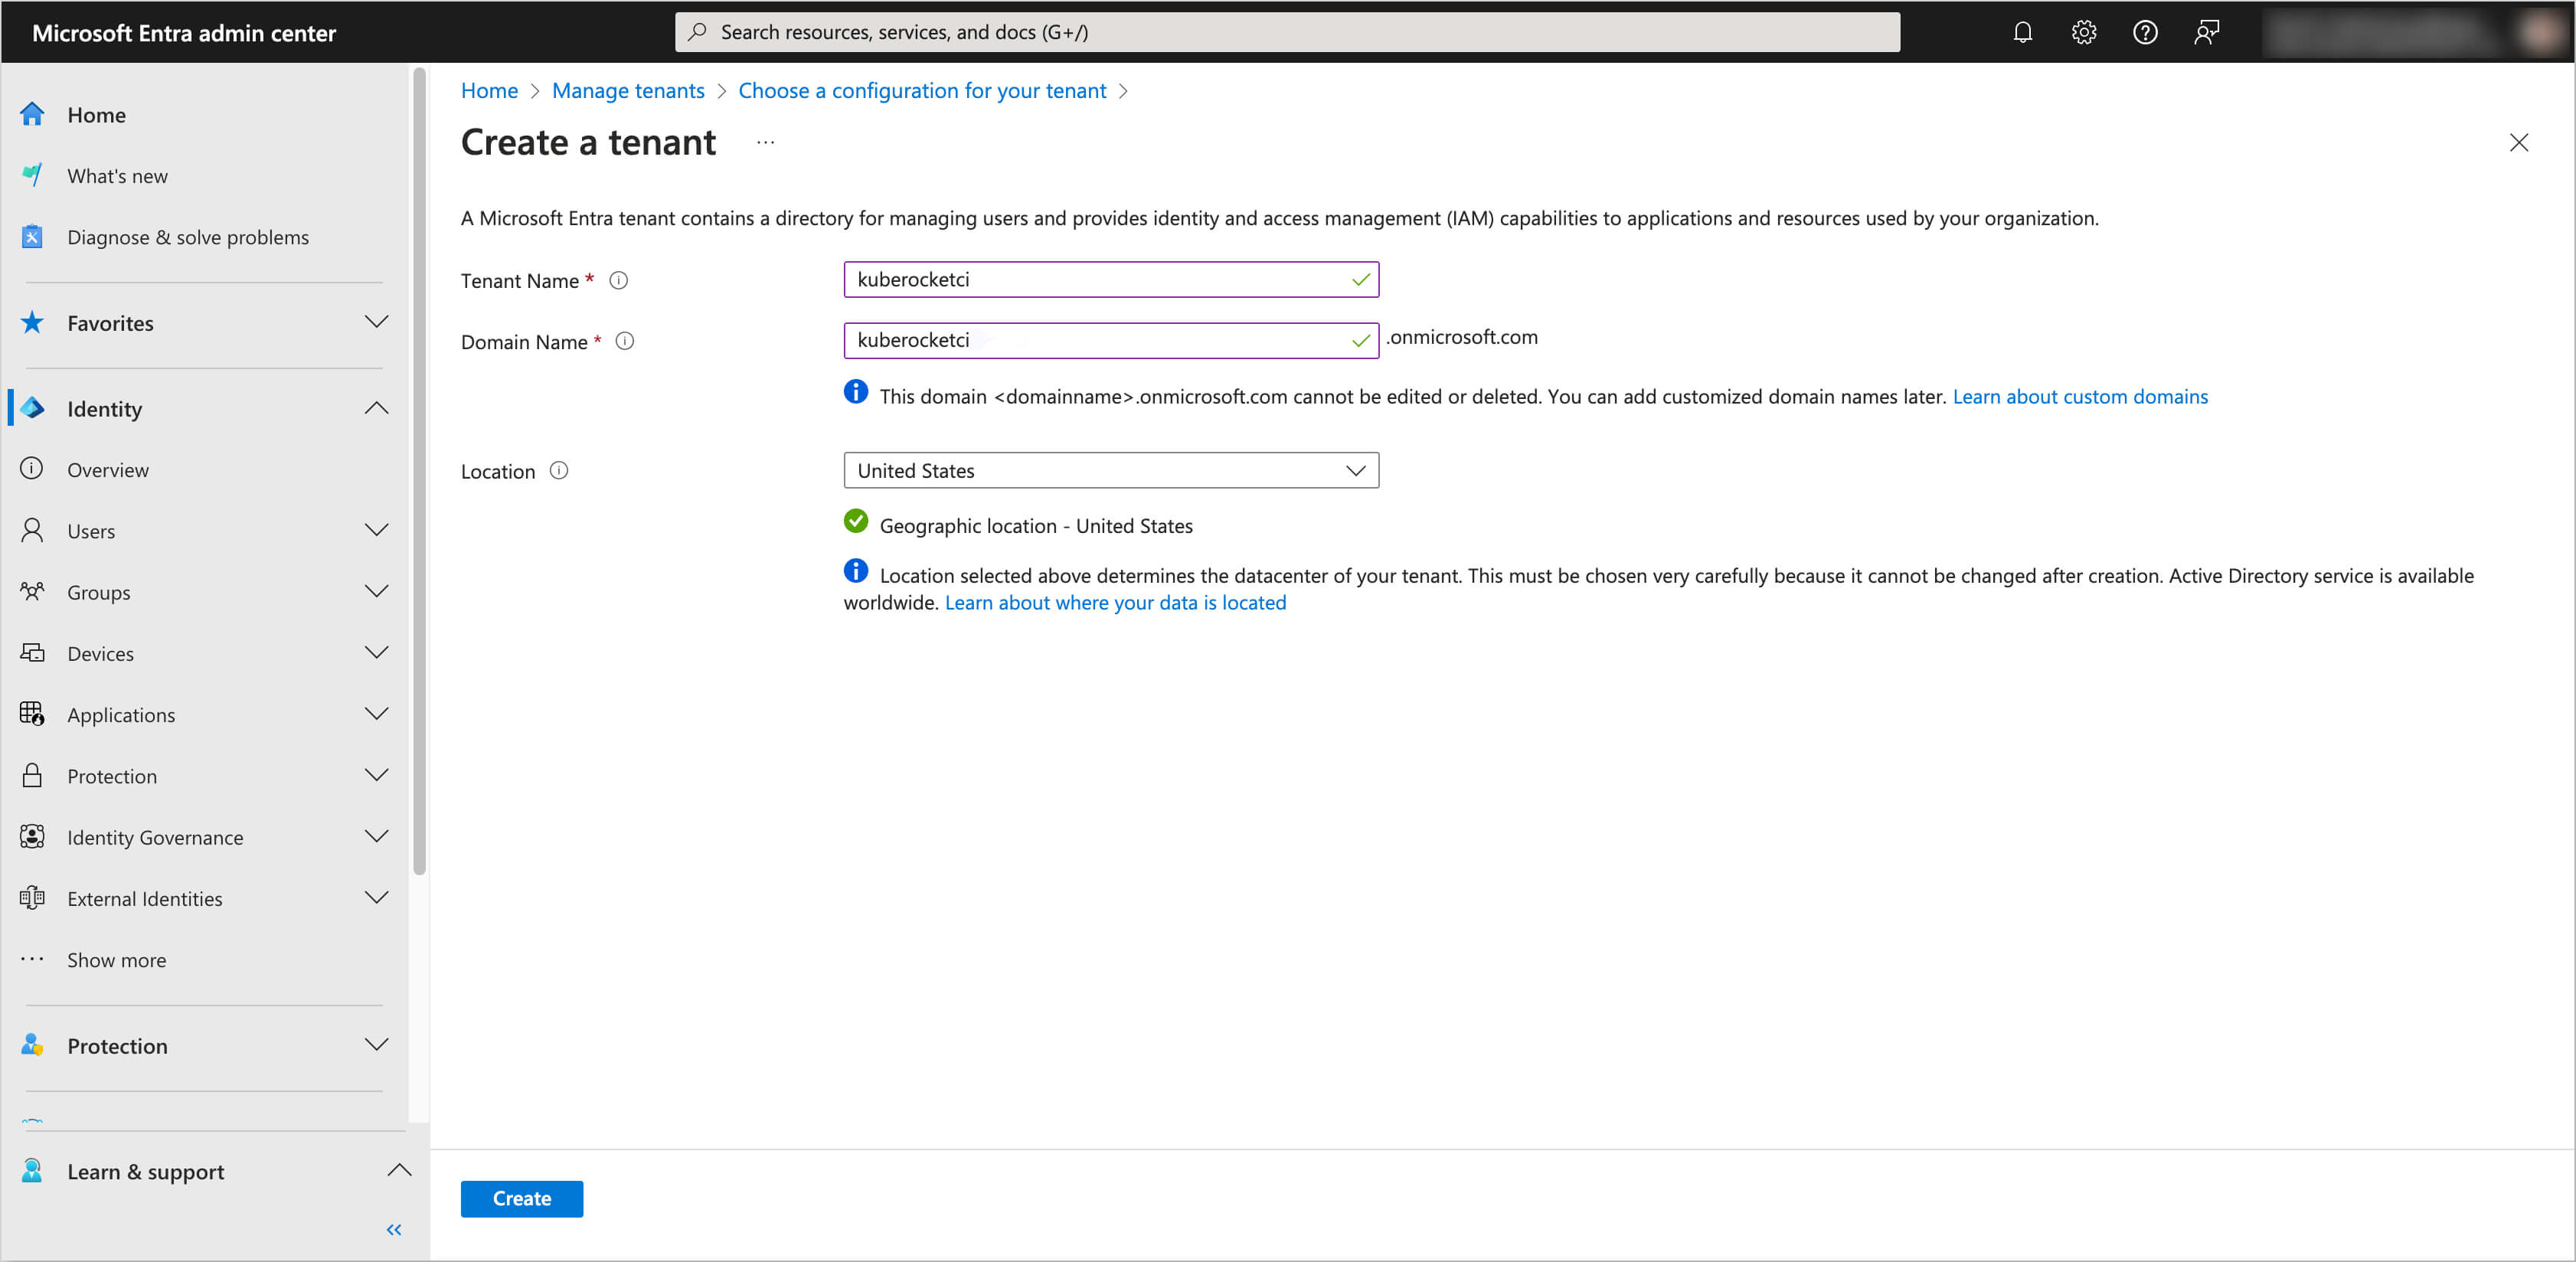
<li class="">
<p>Fill in the fields for <strong>Tenant Name</strong>, <strong>Domain Name</strong>, and <strong>Location</strong>.</p>
<div class="theme-admonition theme-admonition-note admonition_xJq3 alert alert--secondary"><div class="admonitionHeading_Gvgb"><span class="admonitionIcon_Rf37"><svg viewBox="0 0 14 16"><path fill-rule="evenodd" d="M6.3 5.69a.942.942 0 0 1-.28-.7c0-.28.09-.52.28-.7.19-.18.42-.28.7-.28.28 0 .52.09.7.28.18.19.28.42.28.7 0 .28-.09.52-.28.7a1 1 0 0 1-.7.3c-.28 0-.52-.11-.7-.3zM8 7.99c-.02-.25-.11-.48-.31-.69-.2-.19-.42-.3-.69-.31H6c-.27.02-.48.13-.69.31-.2.2-.3.44-.31.69h1v3c.02.27.11.5.31.69.2.2.42.31.69.31h1c.27 0 .48-.11.69-.31.2-.19.3-.42.31-.69H8V7.98v.01zM7 2.3c-3.14 0-5.7 2.54-5.7 5.68 0 3.14 2.56 5.7 5.7 5.7s5.7-2.55 5.7-5.7c0-3.15-2.56-5.69-5.7-5.69v.01zM7 .98c3.86 0 7 3.14 7 7s-3.14 7-7 7-7-3.12-7-7 3.14-7 7-7z"></path></svg></span>note</div><div class="admonitionContent_BuS1"><p>The <strong>Tenant Name</strong> and <strong>Domain Name</strong> <code>kuberocketci</code> are used as a demonstration examples. In your case, it is recommended to choose names that align with your organization's specific needs and naming conventions.</p></div></div>
<p><img decoding="async" loading="lazy" alt="Tenant Details" src="https://docs.kuberocketci.io/assets/images/tenant-details-6753dbbdbe872963be3e49632442654b.png" width="3364" height="1648" class="img_ev3q"></p>
</li>
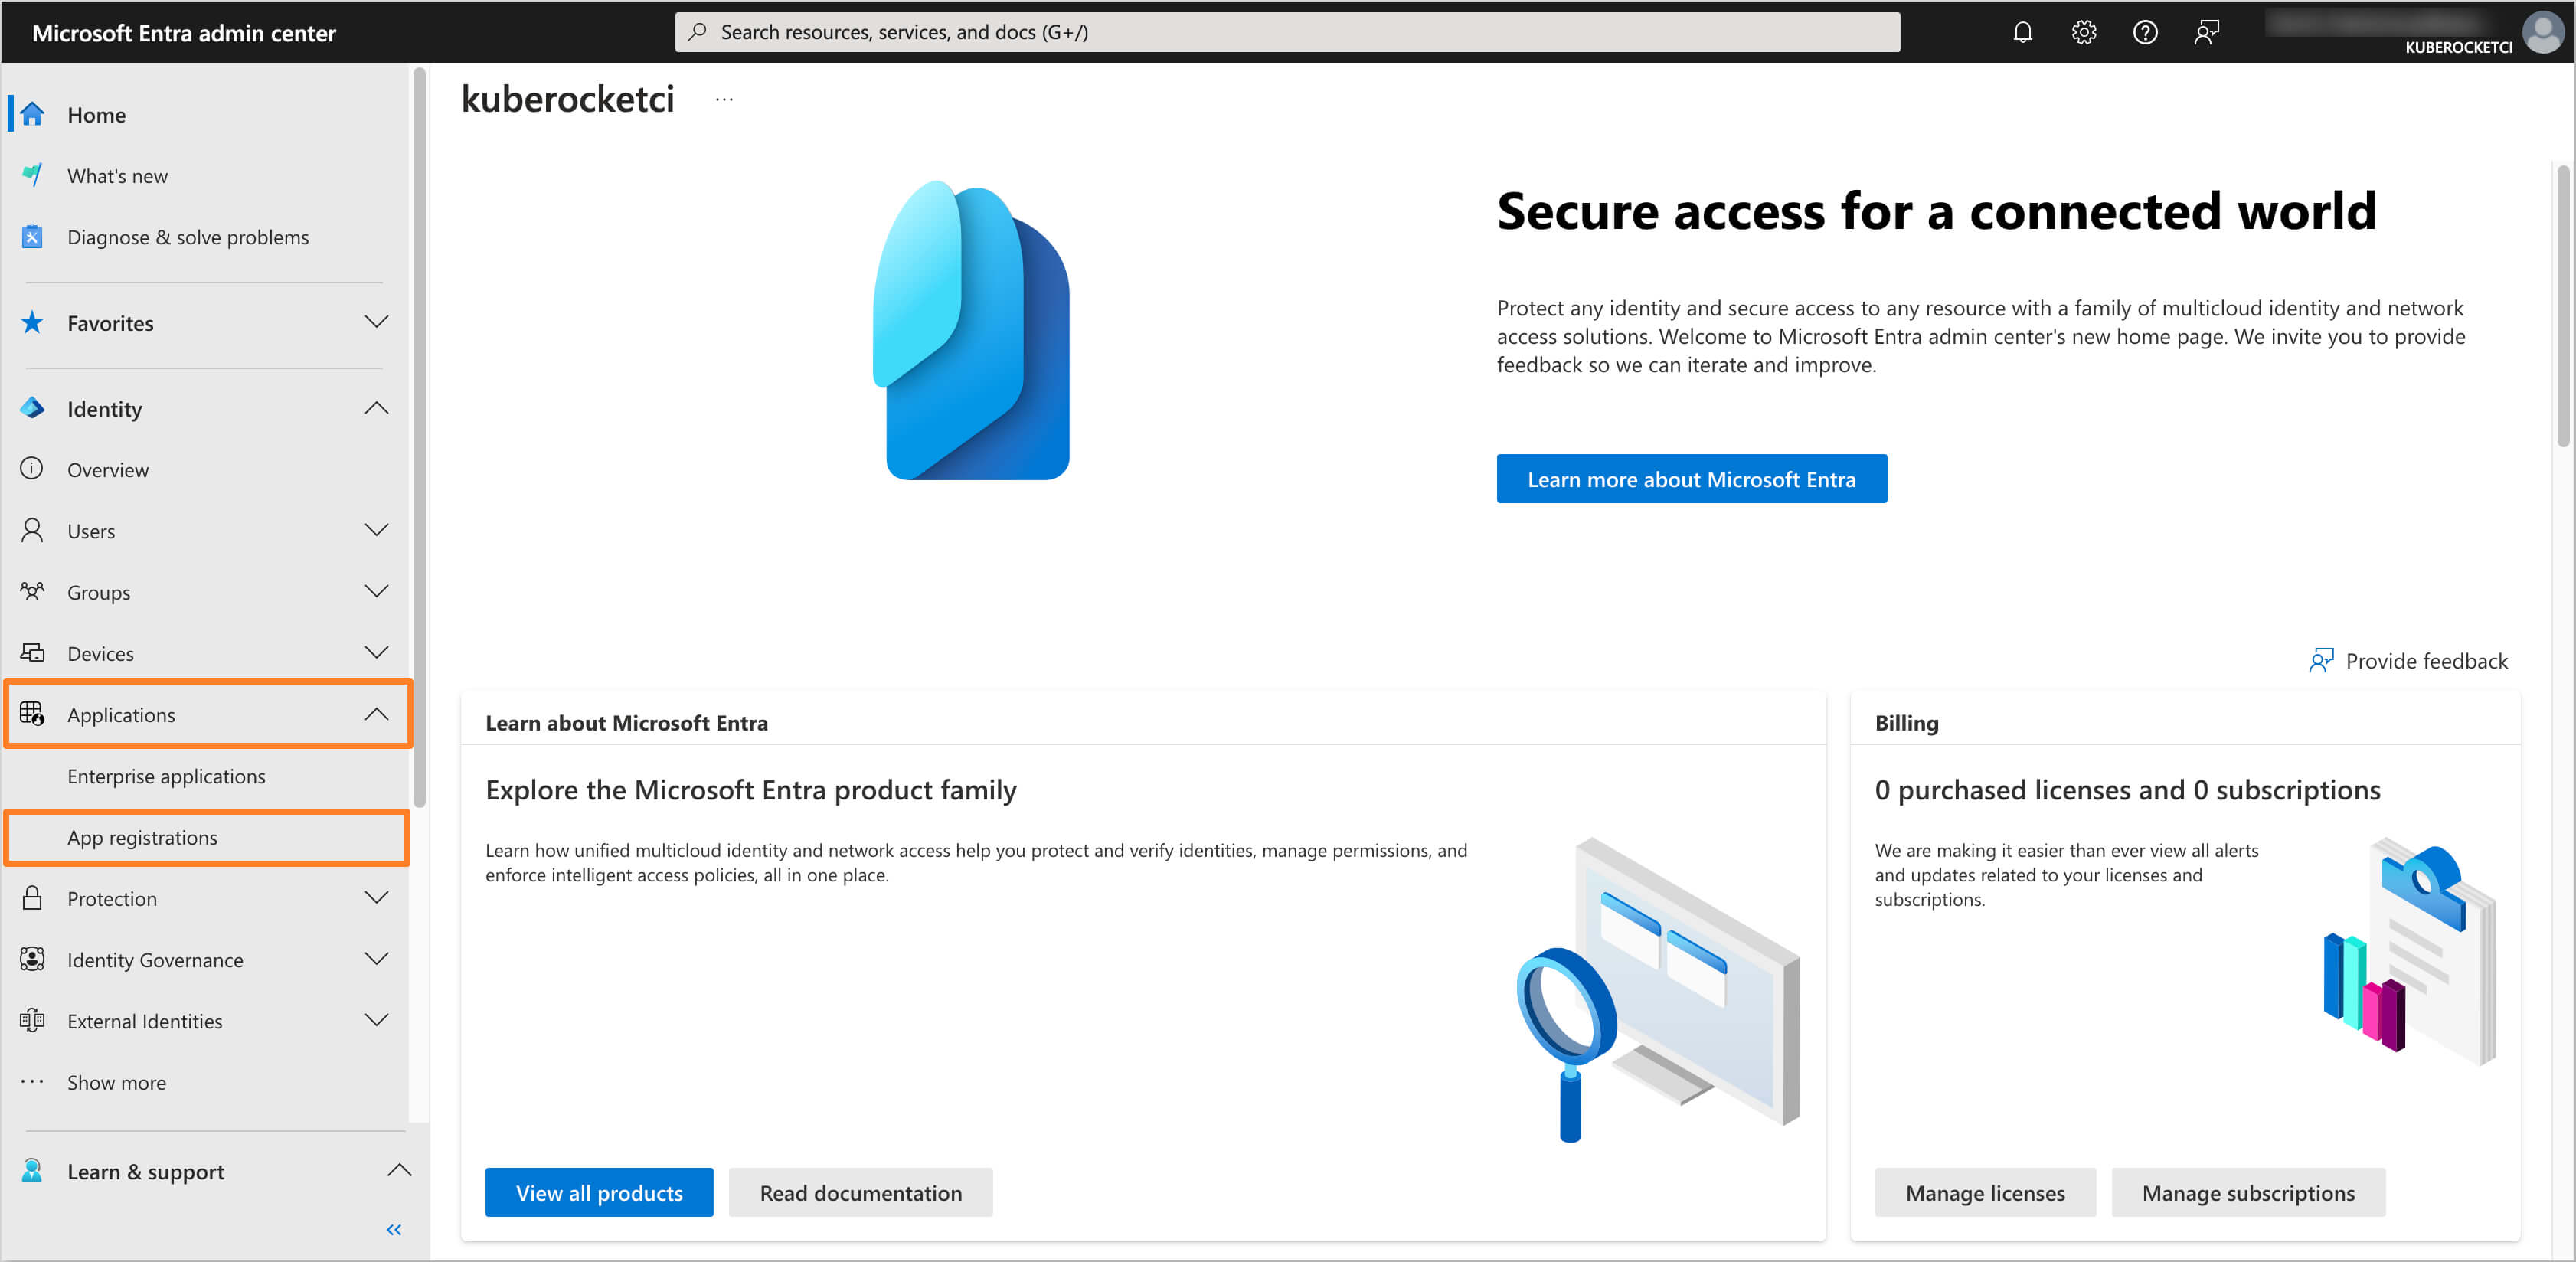
<li class="">
<p>The new tenant will be created, and you can start configuring it for OIDC integration. Ensure you have switched to the new tenant.</p>
</li>
</ol>
<h2 class="anchor anchorTargetStickyNavbar_Vzrq" id="creating-and-configuring-oidc-application-in-microsoft-entra">Creating and Configuring OIDC Application in Microsoft Entra<a href="https://docs.kuberocketci.io/blog/integrating-oidc-authentication-microsoft-entra-aws-eks#creating-and-configuring-oidc-application-in-microsoft-entra" class="hash-link" aria-label="Direct link to Creating and Configuring OIDC Application in Microsoft Entra" title="Direct link to Creating and Configuring OIDC Application in Microsoft Entra" translate="no">​</a></h2>
<p>After creating the tenant, you need to set up an OIDC Application in Microsoft Entra. Here's how you can do it:</p>
<ol>
<li class="">
<p>In the Microsoft Entra Admin Center, in the left sidebar menu, select <strong>Applications</strong> and then click on <strong>App registrations</strong>.</p>
<p><img decoding="async" loading="lazy" alt="App Registrations" src="https://docs.kuberocketci.io/assets/images/app-registrations-c04b119572cc459069182f6aeab95995.png" width="3364" height="1648" class="img_ev3q"></p>
</li>
<li class="">
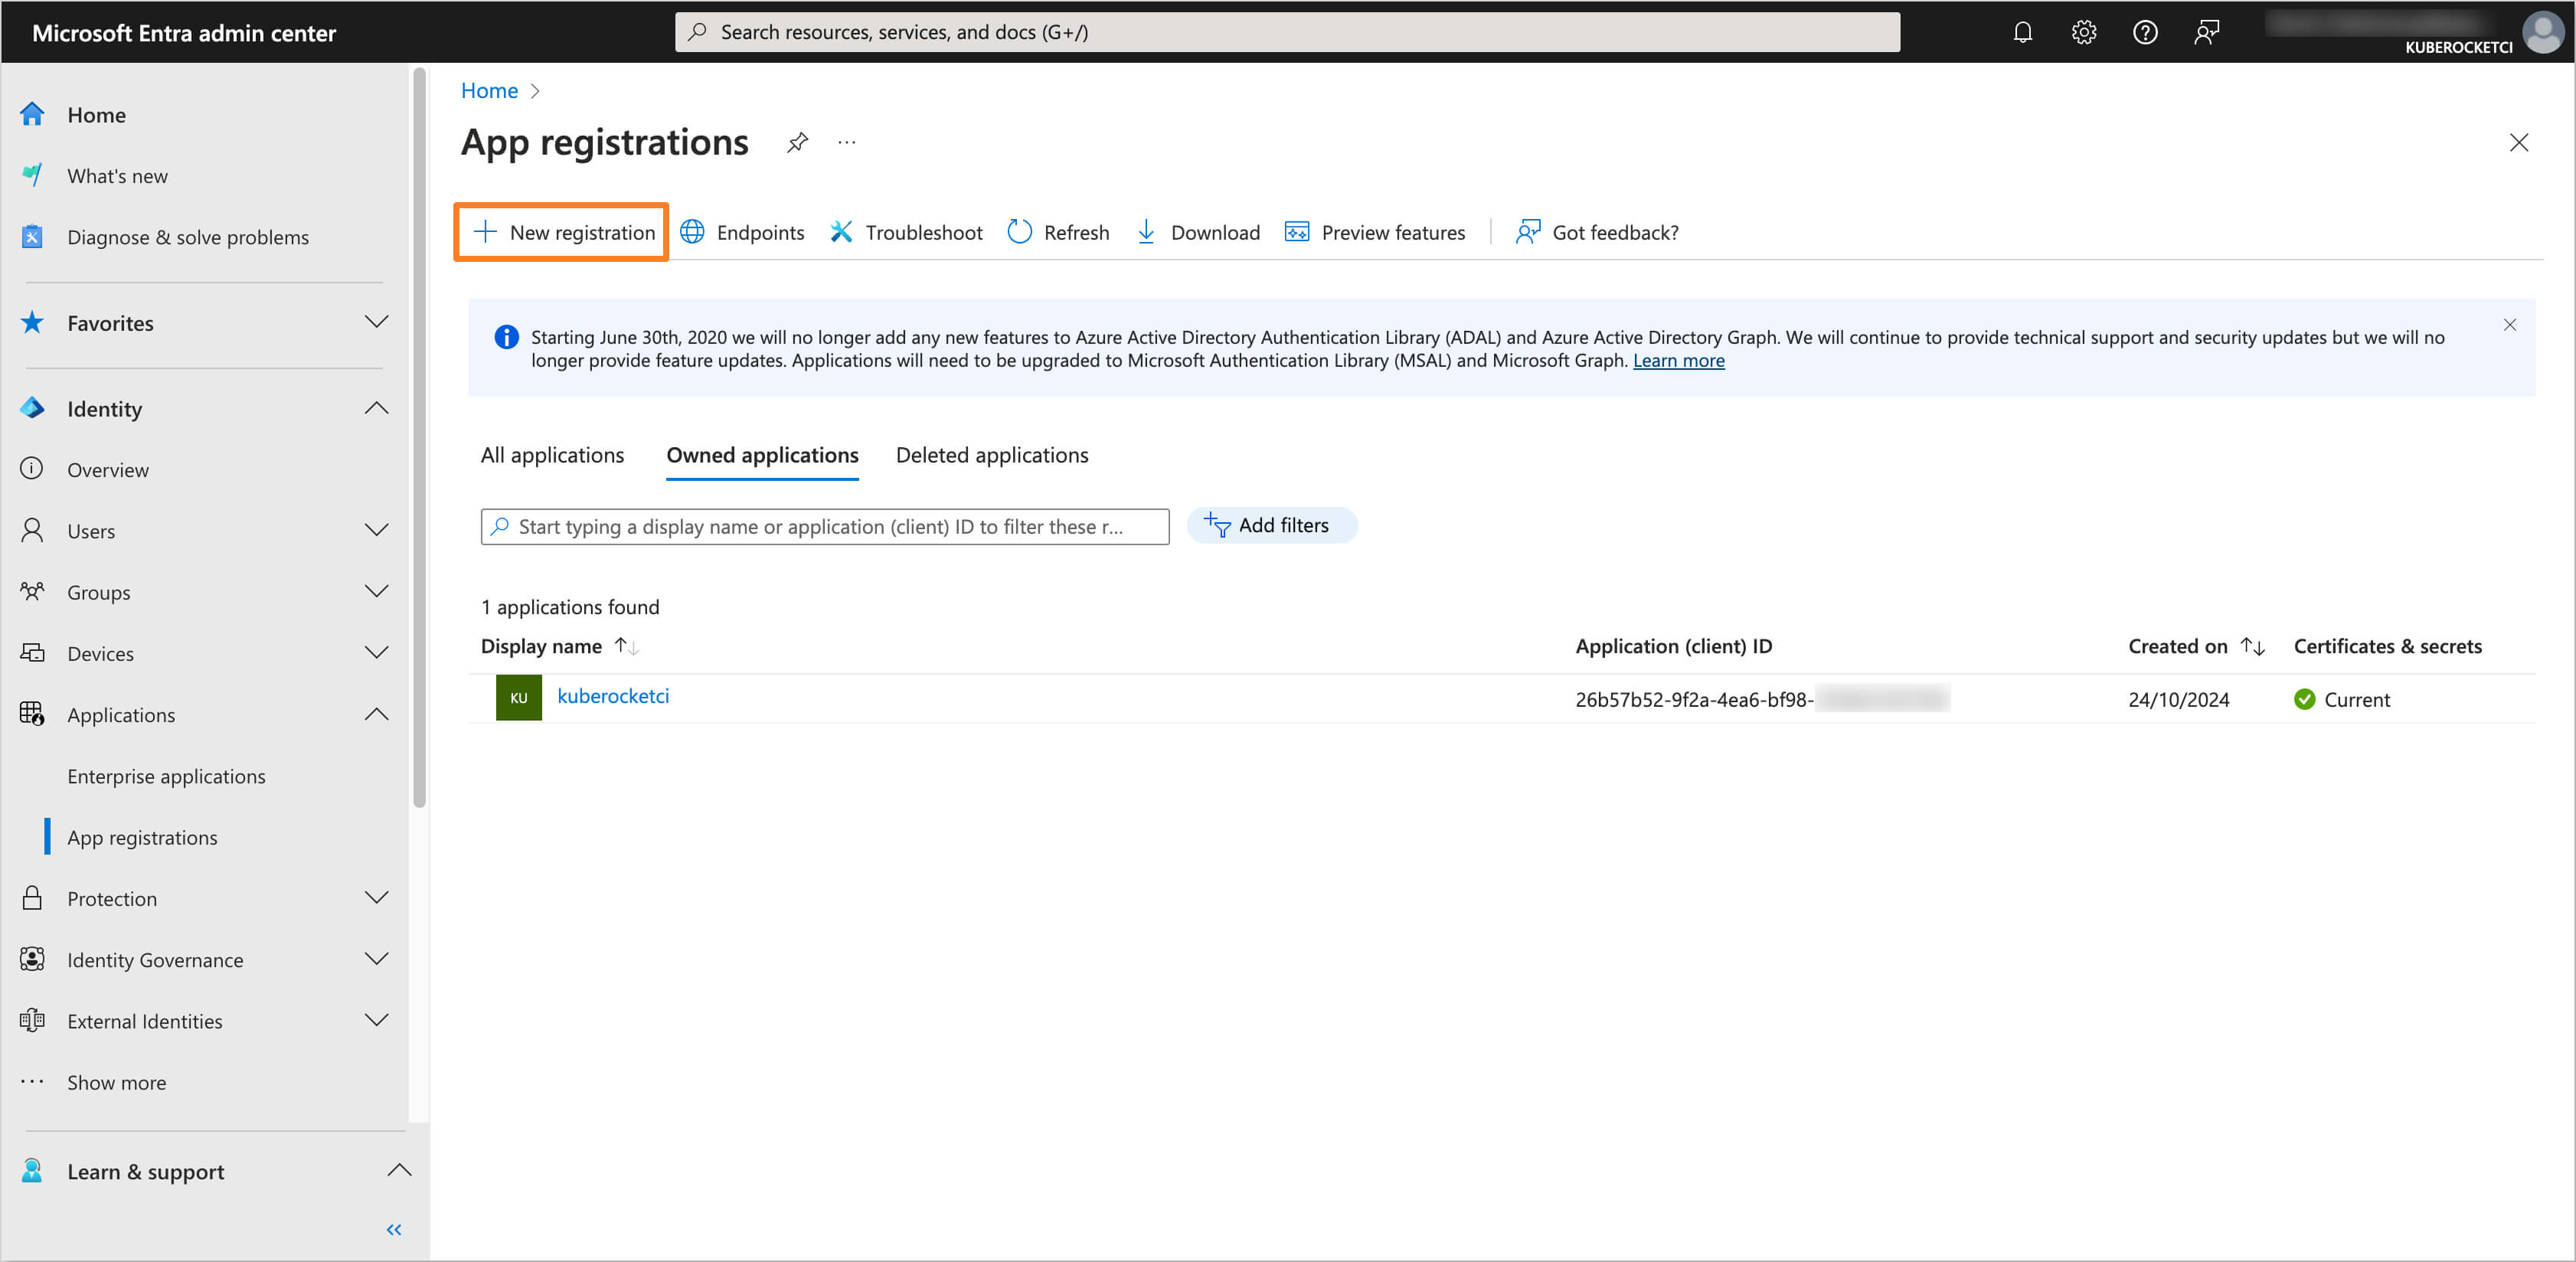
<p>Click on the <strong>New registration</strong> button to create a new application.</p>
<p><img decoding="async" loading="lazy" alt="New Registration" src="https://docs.kuberocketci.io/assets/images/new-registration-63846c96d5ff493abbc9903c638fb6cf.png" width="3364" height="1648" class="img_ev3q"></p>
</li>
<li class="">
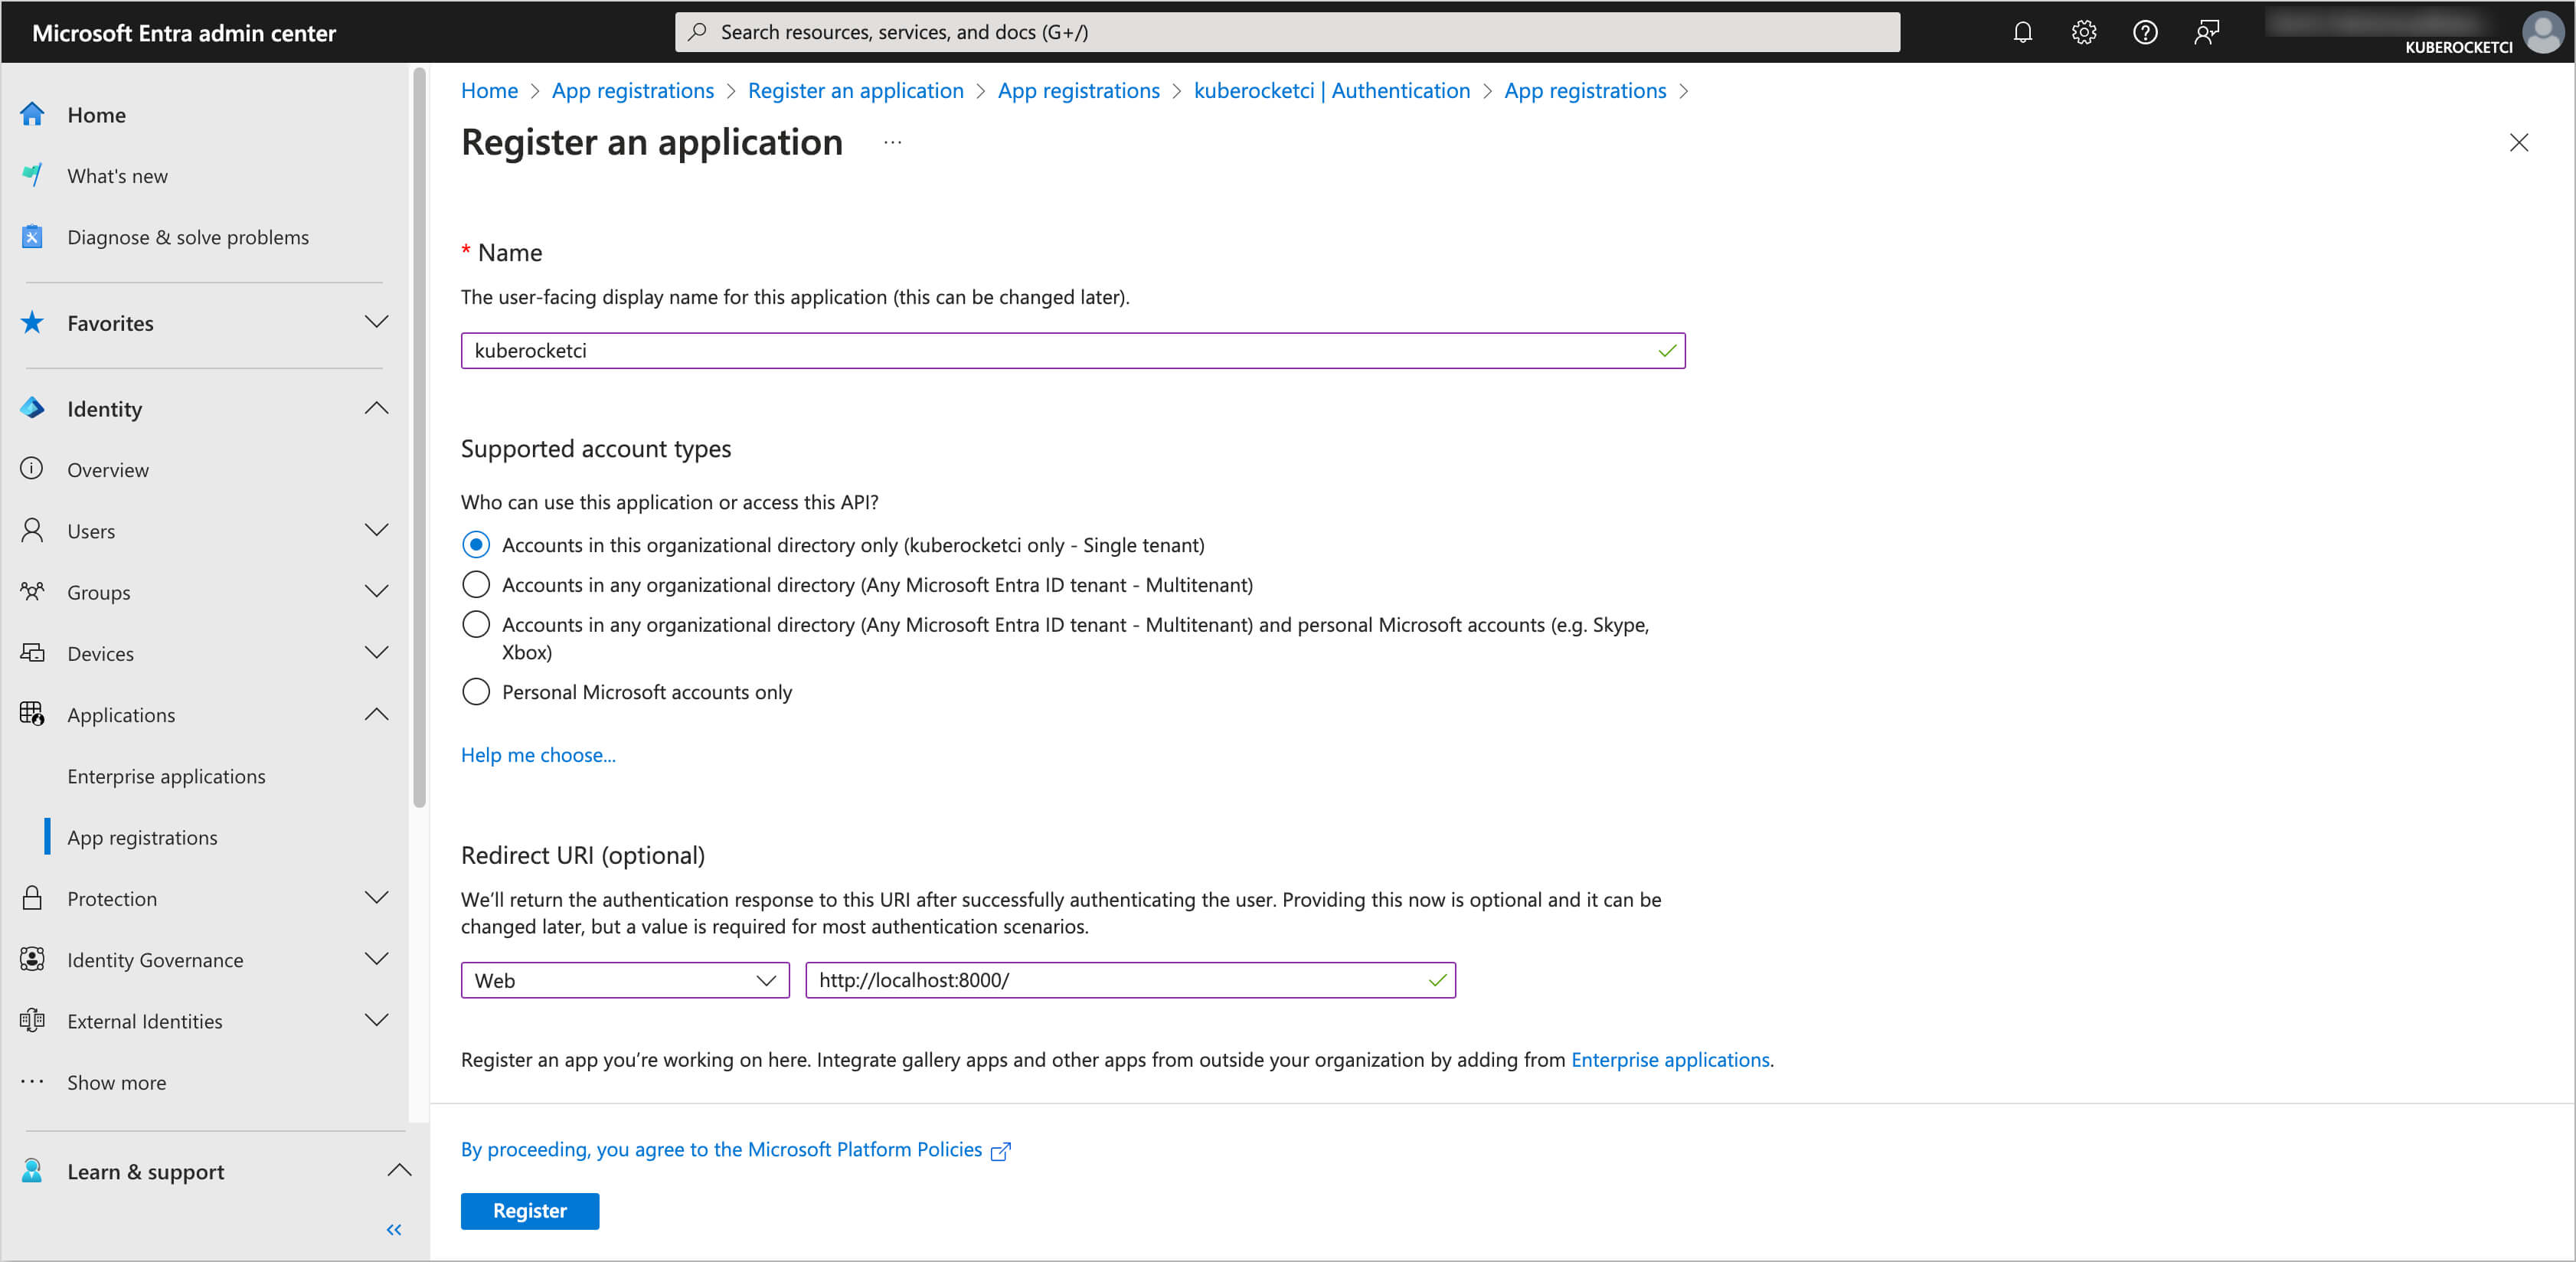
<p>Fill in the details for the application, such as <strong>Name</strong>, <strong>Supported account types</strong>, and <strong>Redirect URI</strong> (<code>http://localhost:8000/</code>).</p>
<div class="theme-admonition theme-admonition-note admonition_xJq3 alert alert--secondary"><div class="admonitionHeading_Gvgb"><span class="admonitionIcon_Rf37"><svg viewBox="0 0 14 16"><path fill-rule="evenodd" d="M6.3 5.69a.942.942 0 0 1-.28-.7c0-.28.09-.52.28-.7.19-.18.42-.28.7-.28.28 0 .52.09.7.28.18.19.28.42.28.7 0 .28-.09.52-.28.7a1 1 0 0 1-.7.3c-.28 0-.52-.11-.7-.3zM8 7.99c-.02-.25-.11-.48-.31-.69-.2-.19-.42-.3-.69-.31H6c-.27.02-.48.13-.69.31-.2.2-.3.44-.31.69h1v3c.02.27.11.5.31.69.2.2.42.31.69.31h1c.27 0 .48-.11.69-.31.2-.19.3-.42.31-.69H8V7.98v.01zM7 2.3c-3.14 0-5.7 2.54-5.7 5.68 0 3.14 2.56 5.7 5.7 5.7s5.7-2.55 5.7-5.7c0-3.15-2.56-5.69-5.7-5.69v.01zM7 .98c3.86 0 7 3.14 7 7s-3.14 7-7 7-7-3.12-7-7 3.14-7 7-7z"></path></svg></span>note</div><div class="admonitionContent_BuS1"><p>The <strong>Name</strong> <code>kuberocketci</code> is used as a demonstration example. In your case, it is recommended to choose a name that aligns with your application's specific needs and naming conventions (e.g. your AWS EKS cluster name).</p></div></div>
<p><img decoding="async" loading="lazy" alt="Application Details" src="https://docs.kuberocketci.io/assets/images/application-details-b0691226247a0b3f611936922040e4b6.png" width="3364" height="1648" class="img_ev3q"></p>
</li>
<li class="">
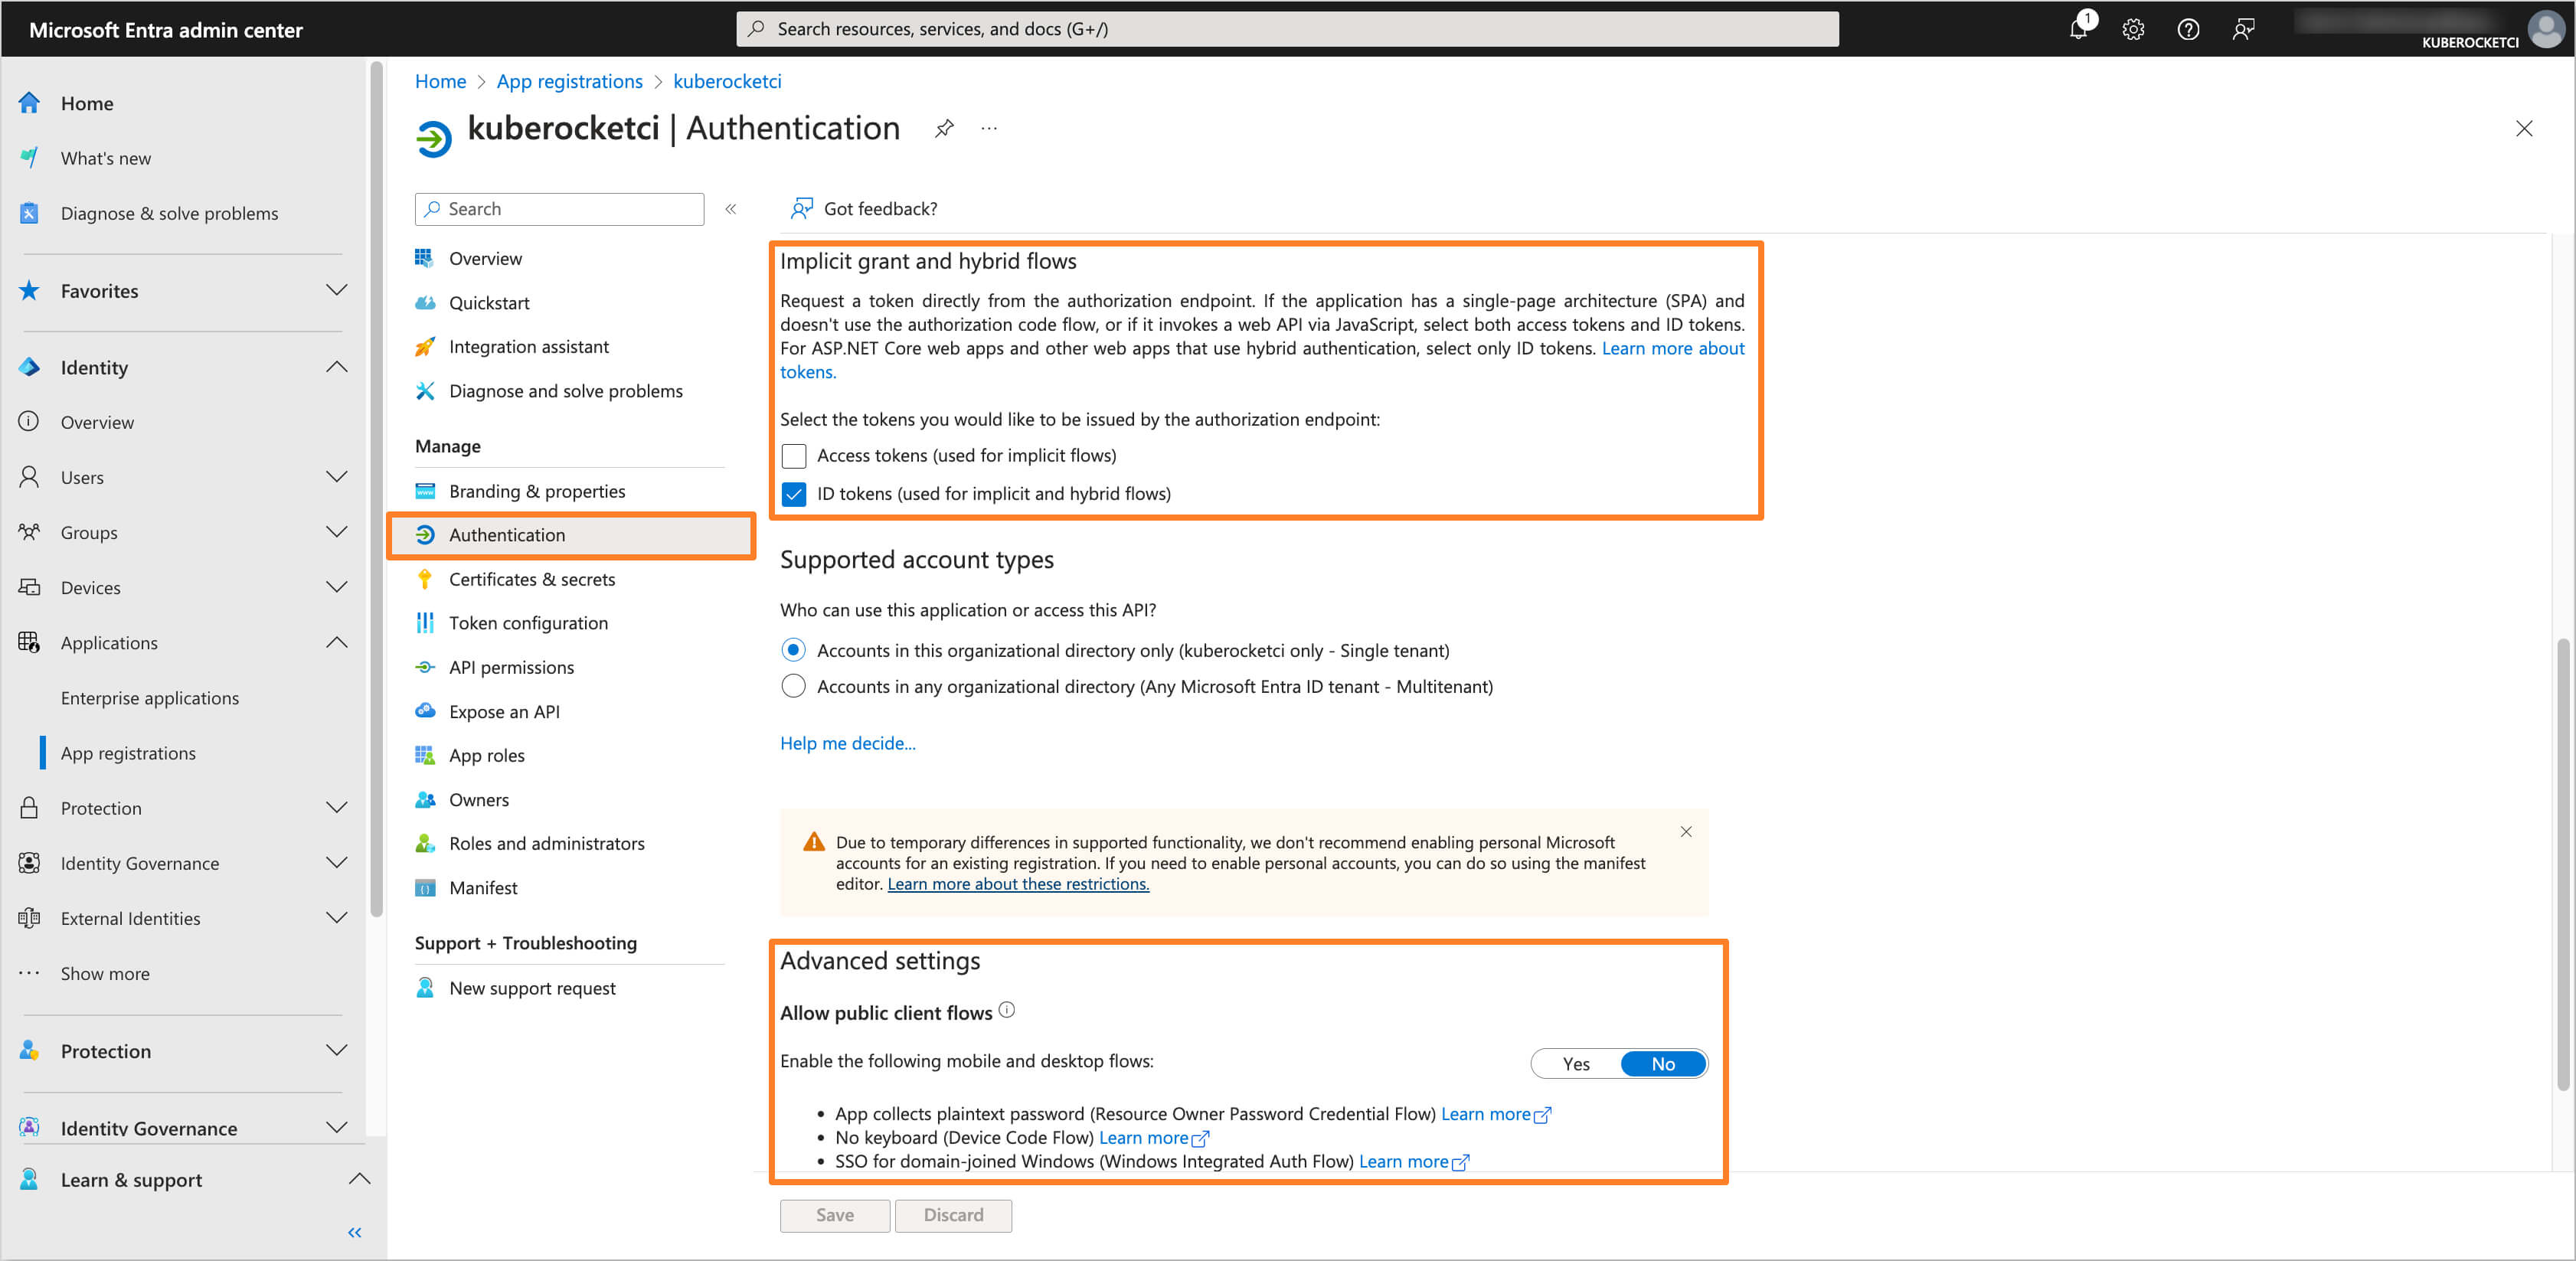
<p>In the created application, navigate to the <strong>Authentication</strong> section from the left sidebar menu. In the <strong>Implicit grant and hybrid flows</strong> section, select <strong>ID tokens</strong> for the token type. In the <strong>Allow public client flows</strong> section, set the value to <strong>No</strong>.</p>
<p><img decoding="async" loading="lazy" alt="Authentication Settings" src="https://docs.kuberocketci.io/assets/images/authentication-settings-b3ad780dbc75b519a96e4138242666dd.png" width="3364" height="1647" class="img_ev3q"></p>
</li>
<li class="">
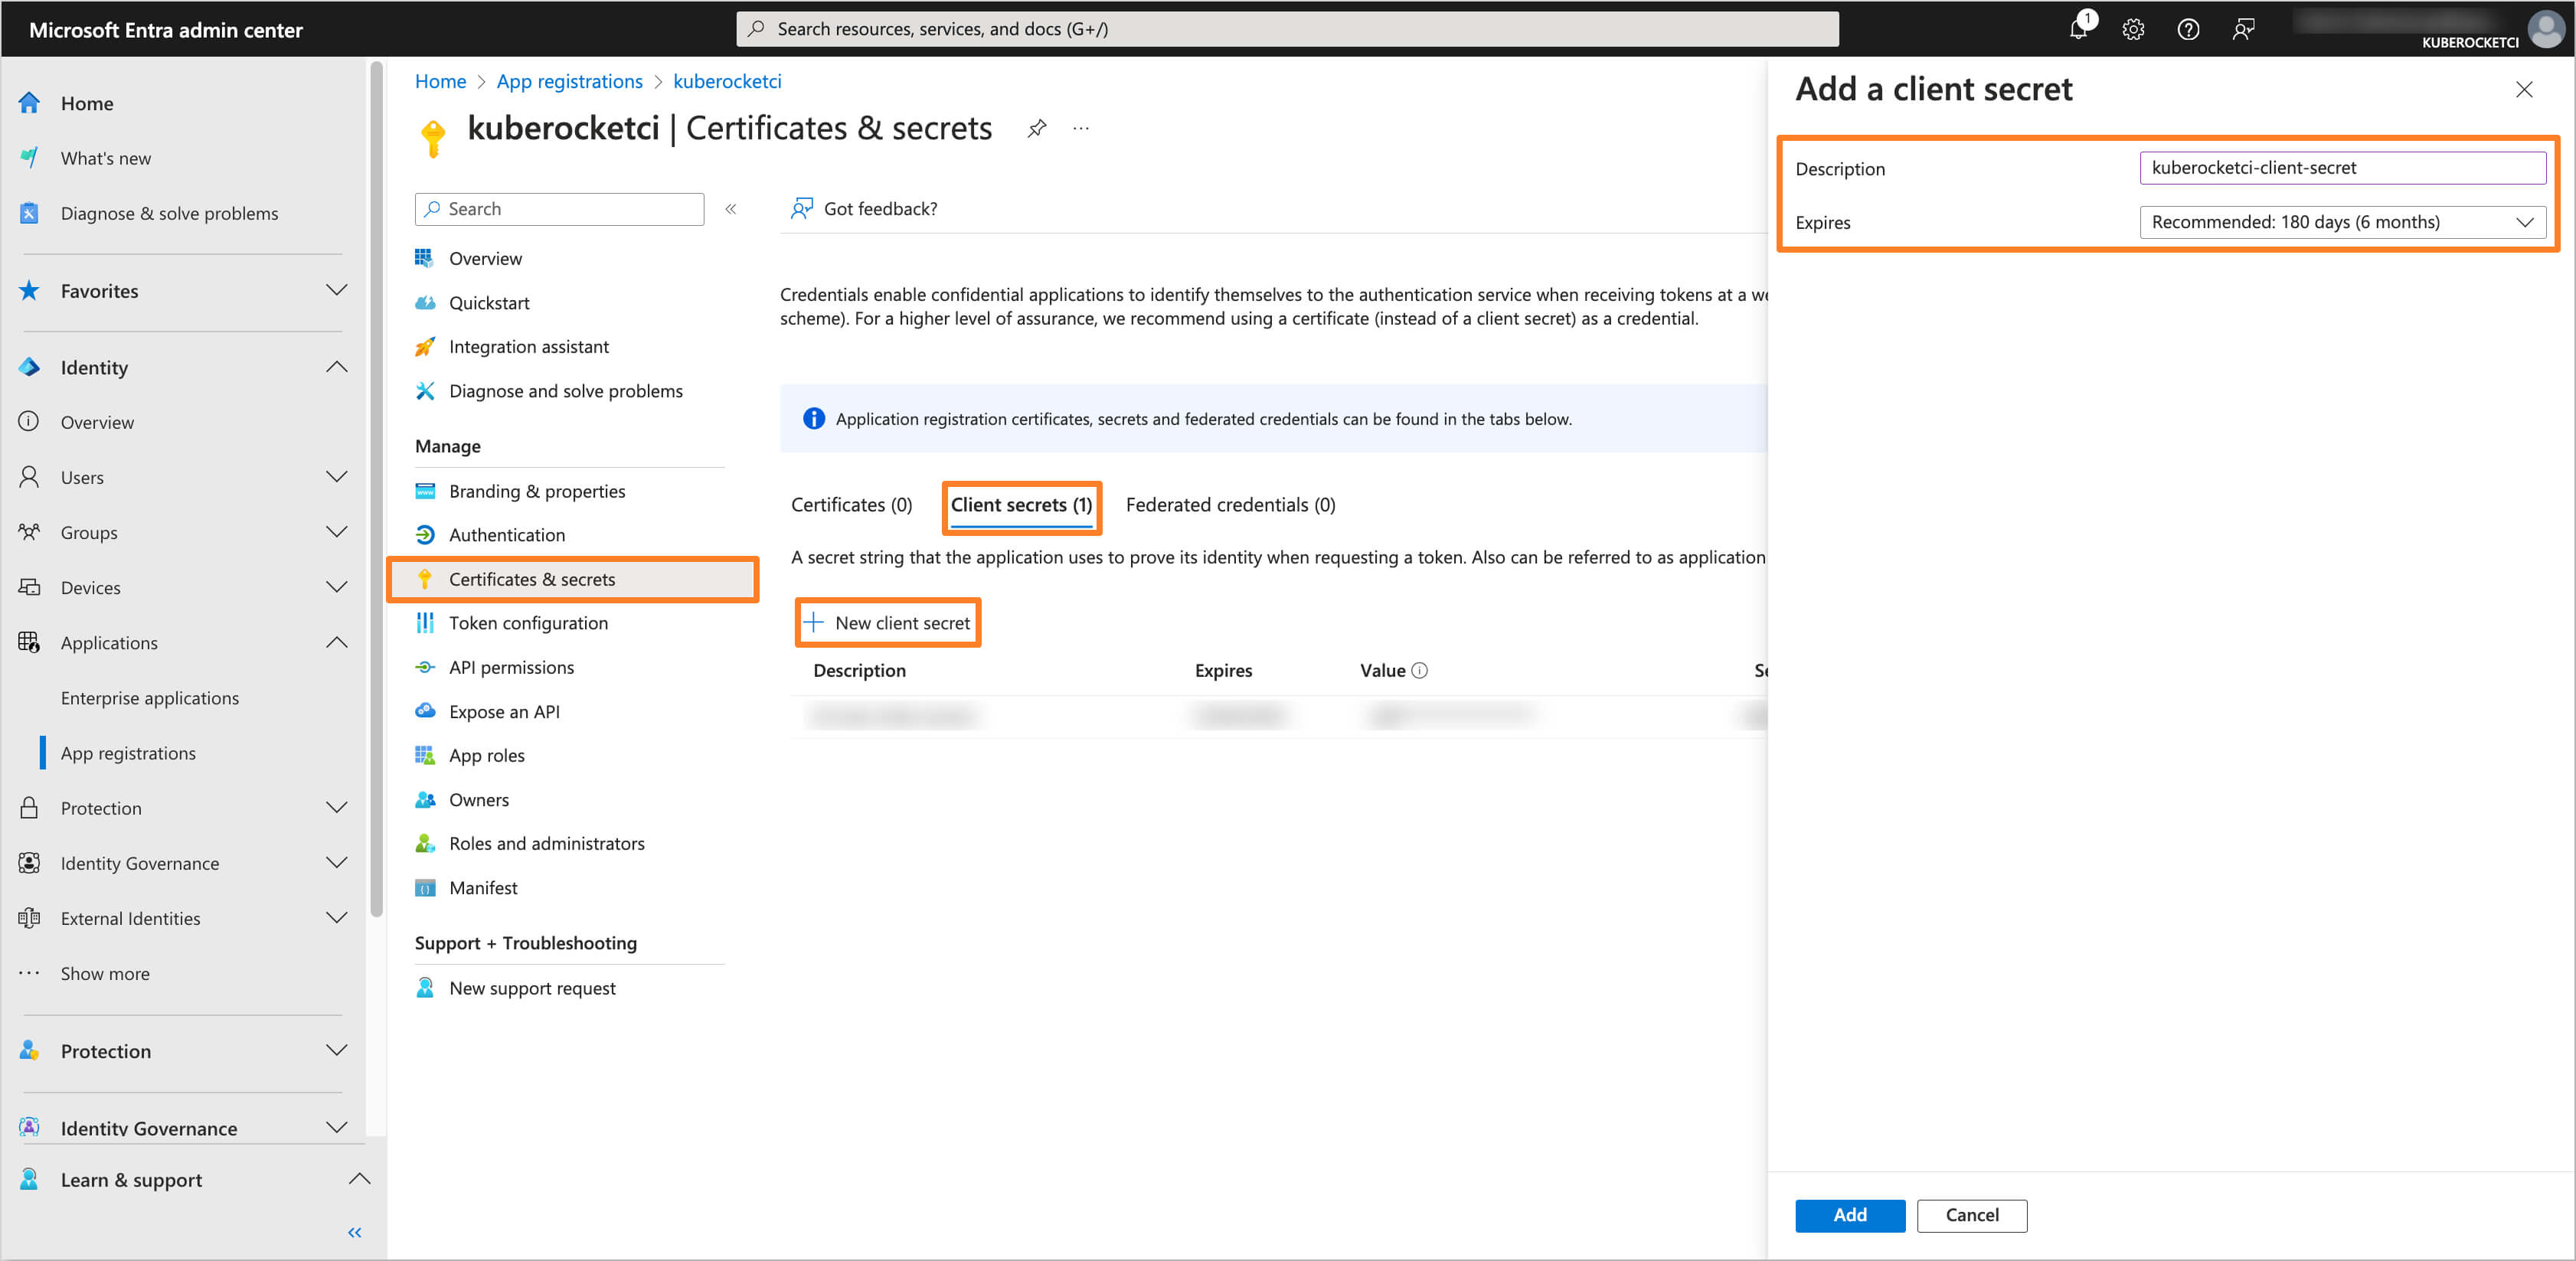
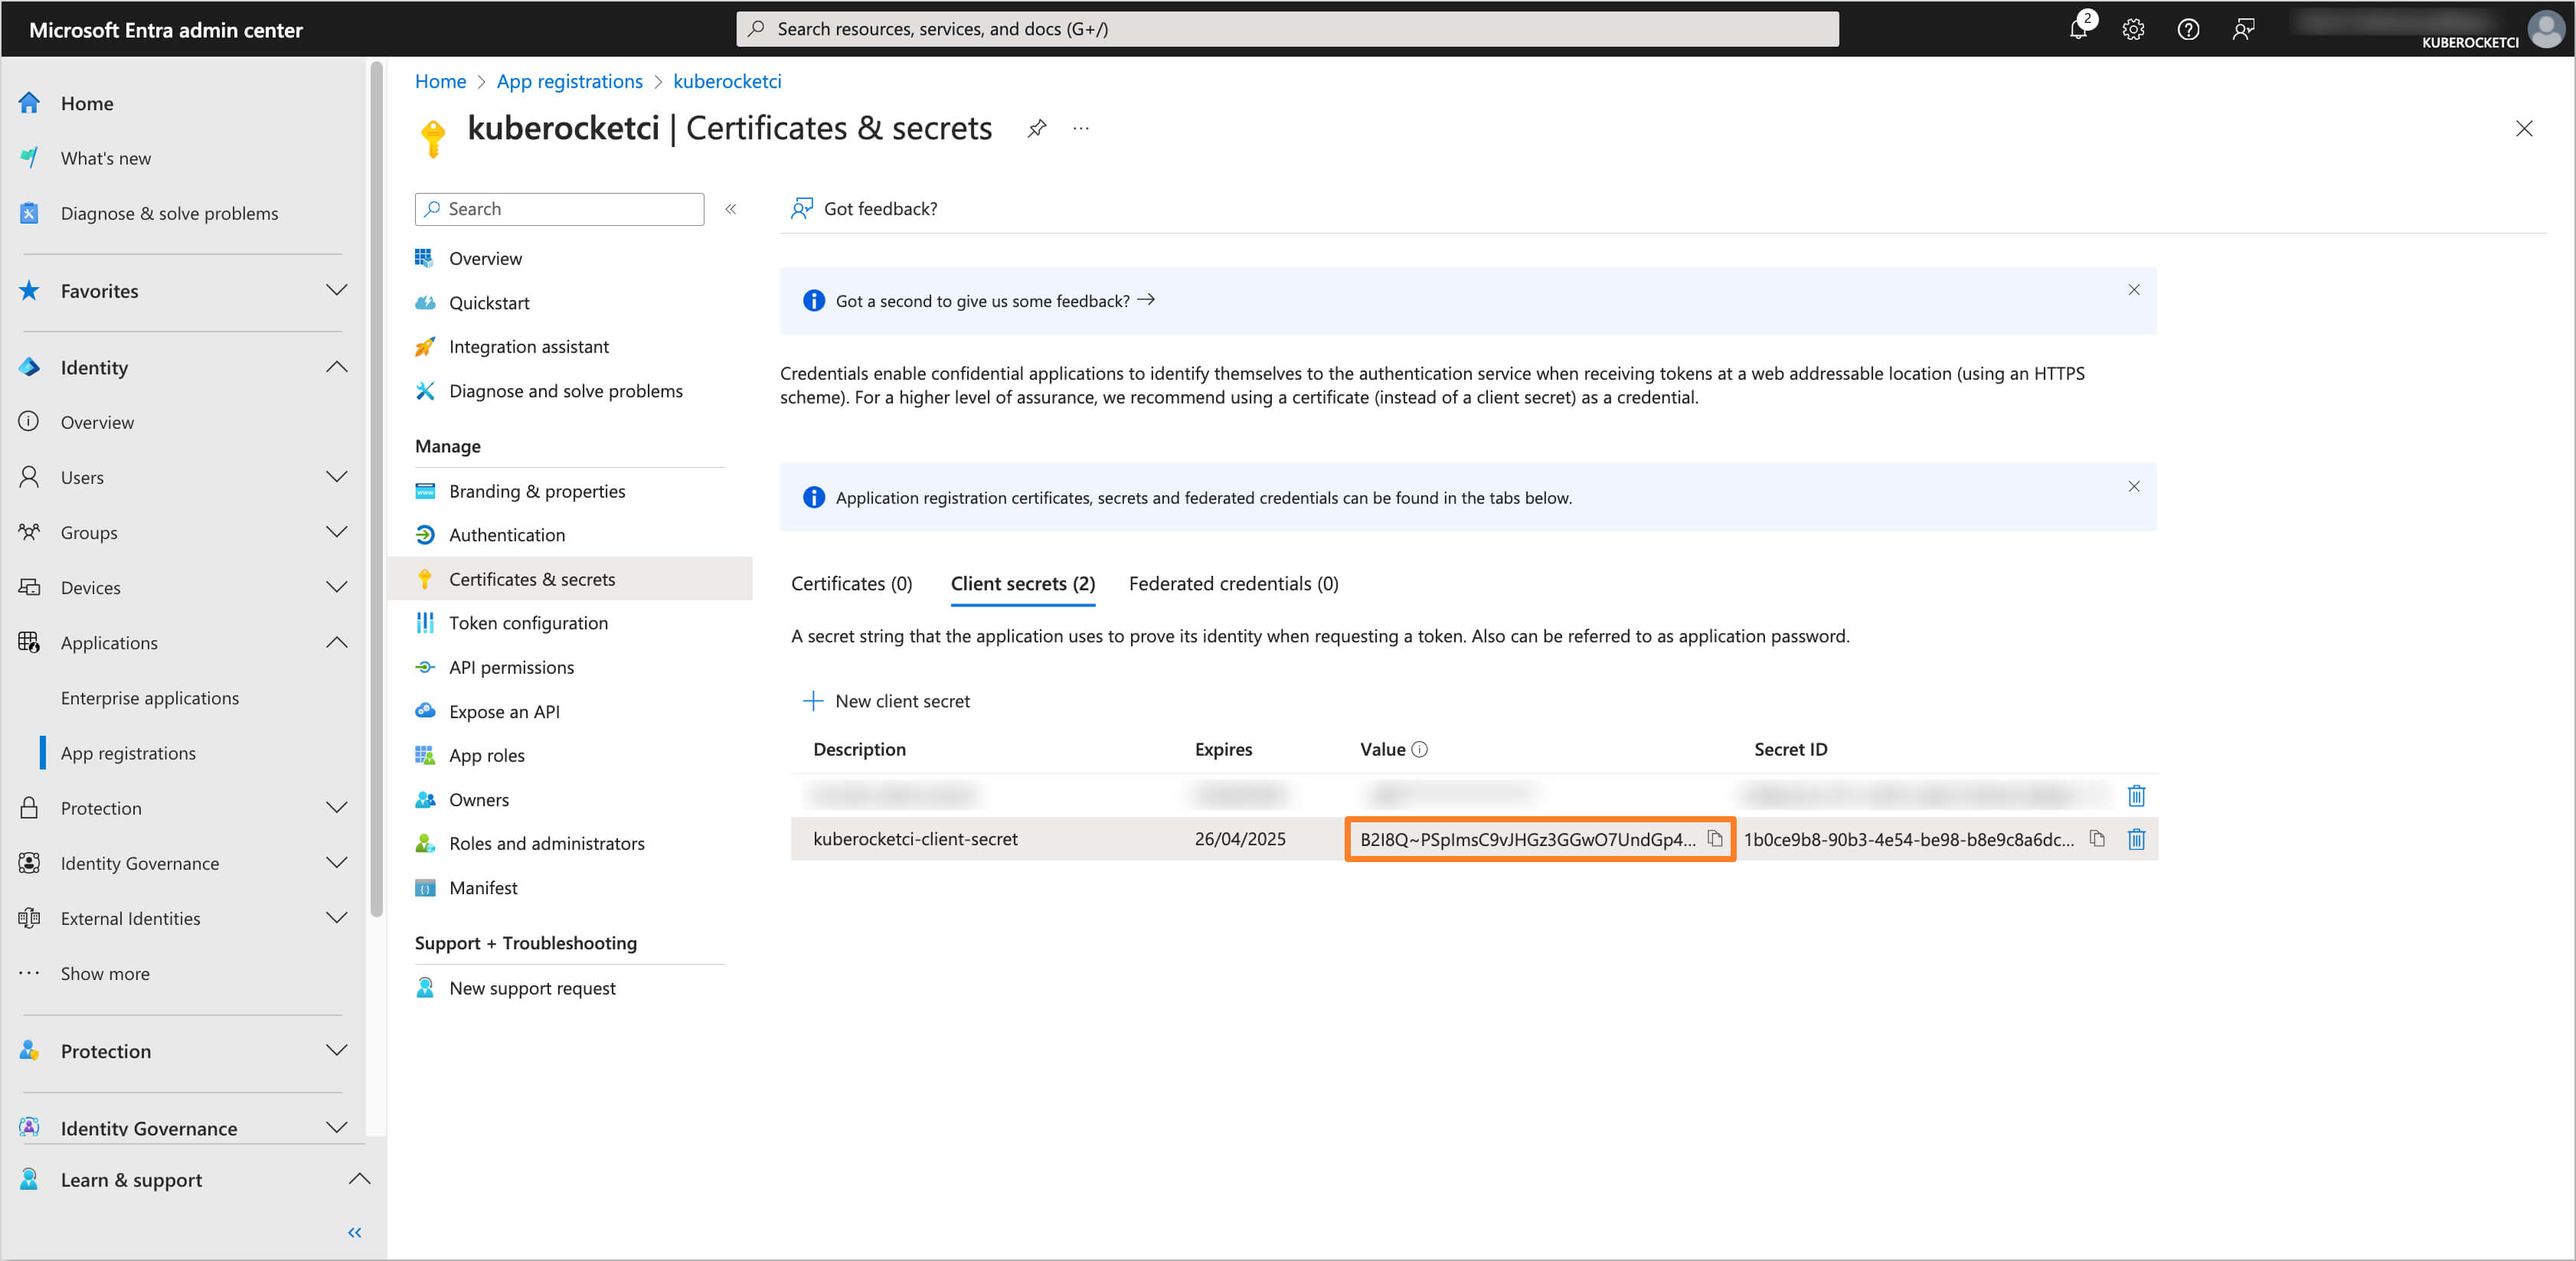
<p>Navigate to the <strong>Certificates &amp; secrets</strong> section from the left sidebar menu. In the <strong>Client secrets</strong> tab, click on the <strong>New client secret</strong> button to create a new secret.</p>
<p><img decoding="async" loading="lazy" alt="Client Secret" src="https://docs.kuberocketci.io/assets/images/client-secret-2adb6894937ed5c8e84c077423b51fbb.png" width="3364" height="1647" class="img_ev3q"></p>
</li>
<li class="">
<p>Copy the generated client secret value and store it securely.</p>
<p><img decoding="async" loading="lazy" alt="Client Secret Value" src="https://docs.kuberocketci.io/assets/images/client-secret-value-26326b1338acafd94f8e5a647f6407f4.png" width="3364" height="1647" class="img_ev3q"></p>
</li>
<li class="">
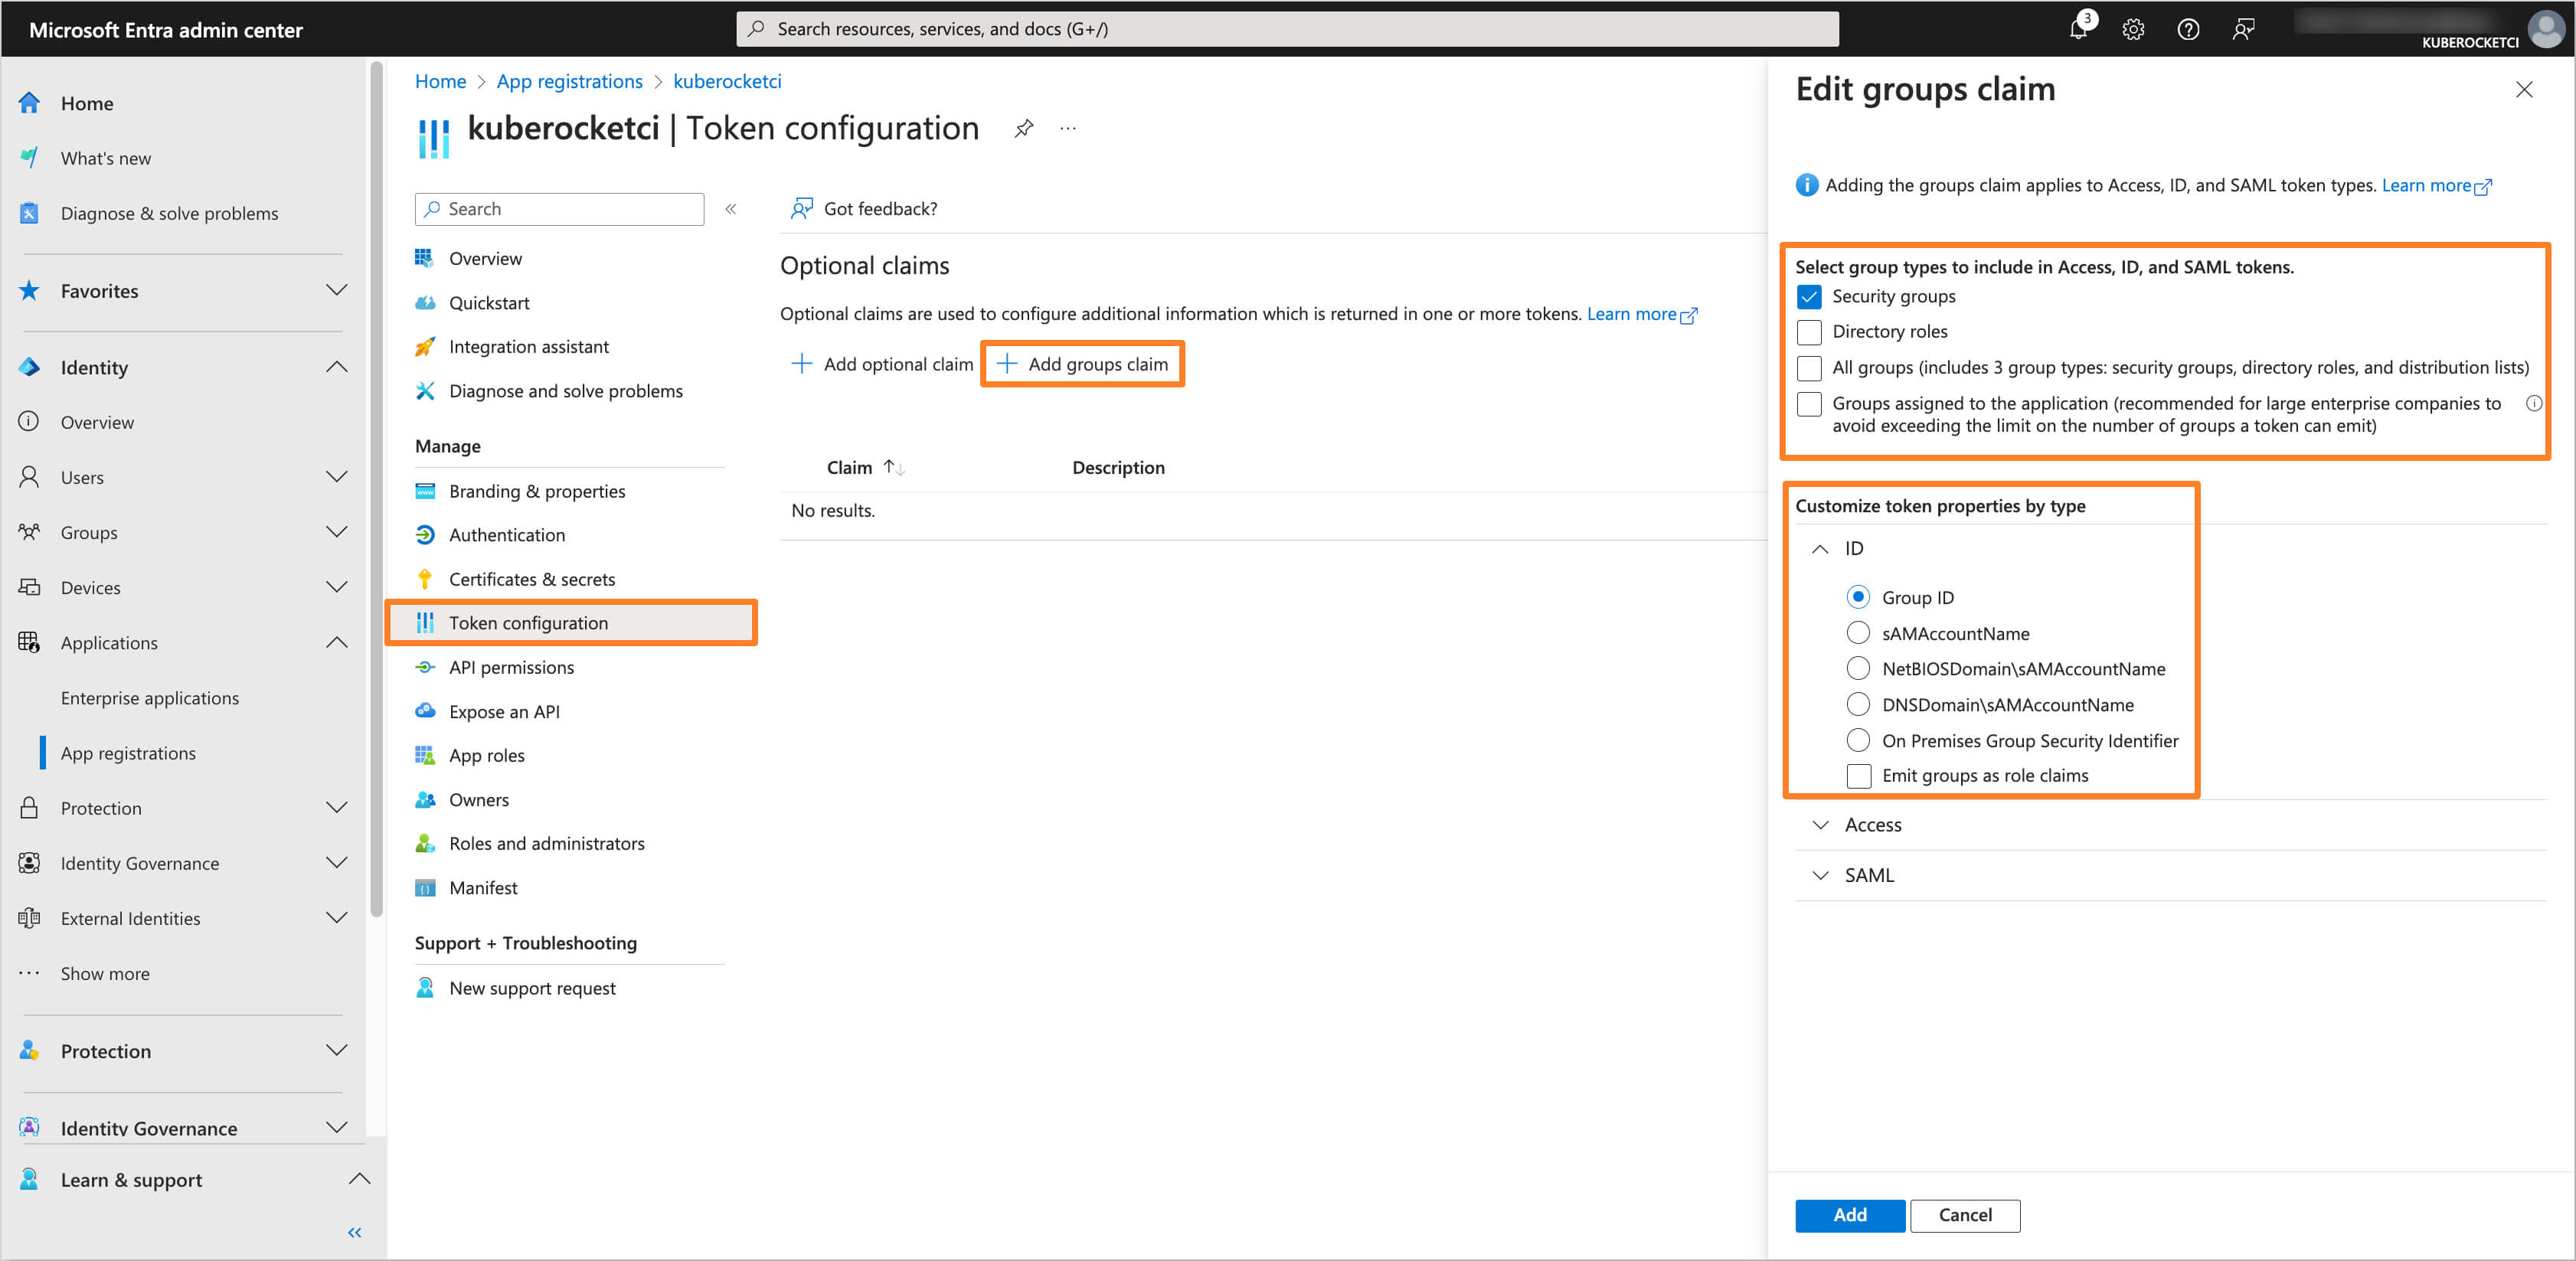
<p>Navigate to the <strong>Token configuration</strong> section and click on <strong>Add group claim</strong> button. Choose the group type as <strong>Security Groups</strong> and for the ID token type, select <strong>Group ID</strong>.</p>
<p><img decoding="async" loading="lazy" alt="Token Configuration" src="https://docs.kuberocketci.io/assets/images/token-configuration-0fa9c3f0e471ac1b1ffcf11f69bee22c.png" width="3364" height="1647" class="img_ev3q"></p>
</li>
<li class="">
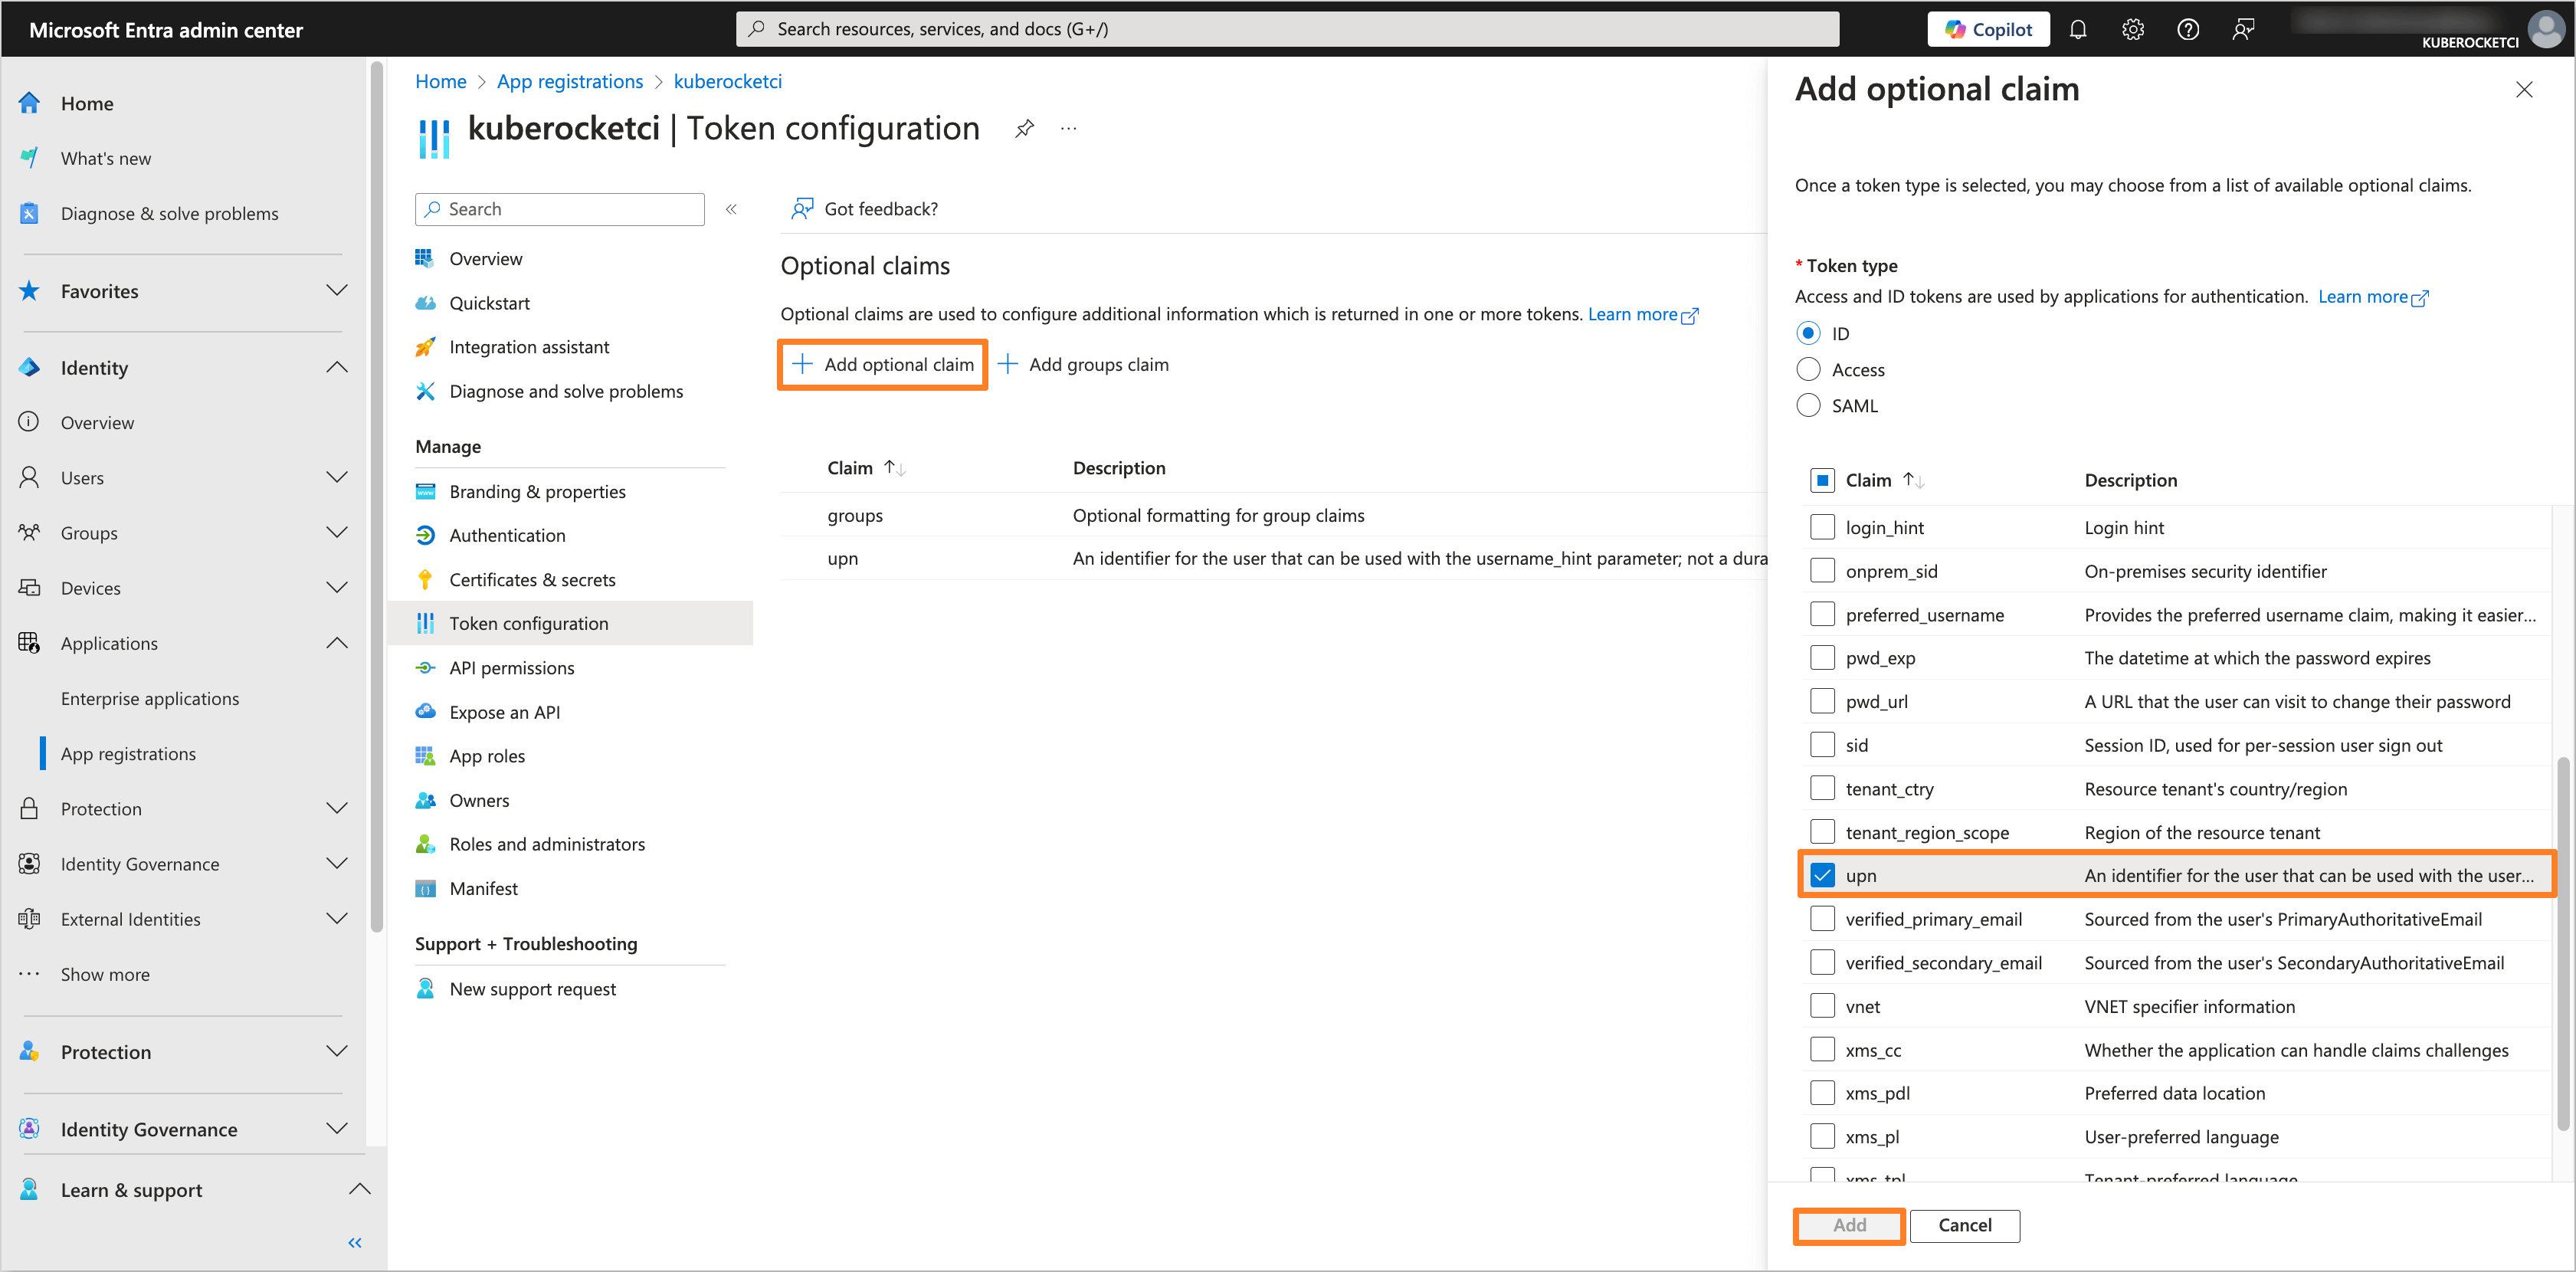
<p>(Optional) Additionally, add an optional <strong>upn</strong> claim in the <strong>Token configuration</strong> section.</p>
<div class="theme-admonition theme-admonition-note admonition_xJq3 alert alert--secondary"><div class="admonitionHeading_Gvgb"><span class="admonitionIcon_Rf37"><svg viewBox="0 0 14 16"><path fill-rule="evenodd" d="M6.3 5.69a.942.942 0 0 1-.28-.7c0-.28.09-.52.28-.7.19-.18.42-.28.7-.28.28 0 .52.09.7.28.18.19.28.42.28.7 0 .28-.09.52-.28.7a1 1 0 0 1-.7.3c-.28 0-.52-.11-.7-.3zM8 7.99c-.02-.25-.11-.48-.31-.69-.2-.19-.42-.3-.69-.31H6c-.27.02-.48.13-.69.31-.2.2-.3.44-.31.69h1v3c.02.27.11.5.31.69.2.2.42.31.69.31h1c.27 0 .48-.11.69-.31.2-.19.3-.42.31-.69H8V7.98v.01zM7 2.3c-3.14 0-5.7 2.54-5.7 5.68 0 3.14 2.56 5.7 5.7 5.7s5.7-2.55 5.7-5.7c0-3.15-2.56-5.69-5.7-5.69v.01zM7 .98c3.86 0 7 3.14 7 7s-3.14 7-7 7-7-3.12-7-7 3.14-7 7-7z"></path></svg></span>note</div><div class="admonitionContent_BuS1"><p>This step is optional and should only be performed if external users (i.e., users with <strong>User type: Guest</strong>) will be added to the Microsoft Entra Tenant and require access to the Application.</p></div></div>
<p><img decoding="async" loading="lazy" alt="upn Claim" src="https://docs.kuberocketci.io/assets/images/upn-claim-0ae2415ae51d8eab1bfce10492cbf021.png" width="3362" height="1660" class="img_ev3q"></p>
</li>
<li class="">
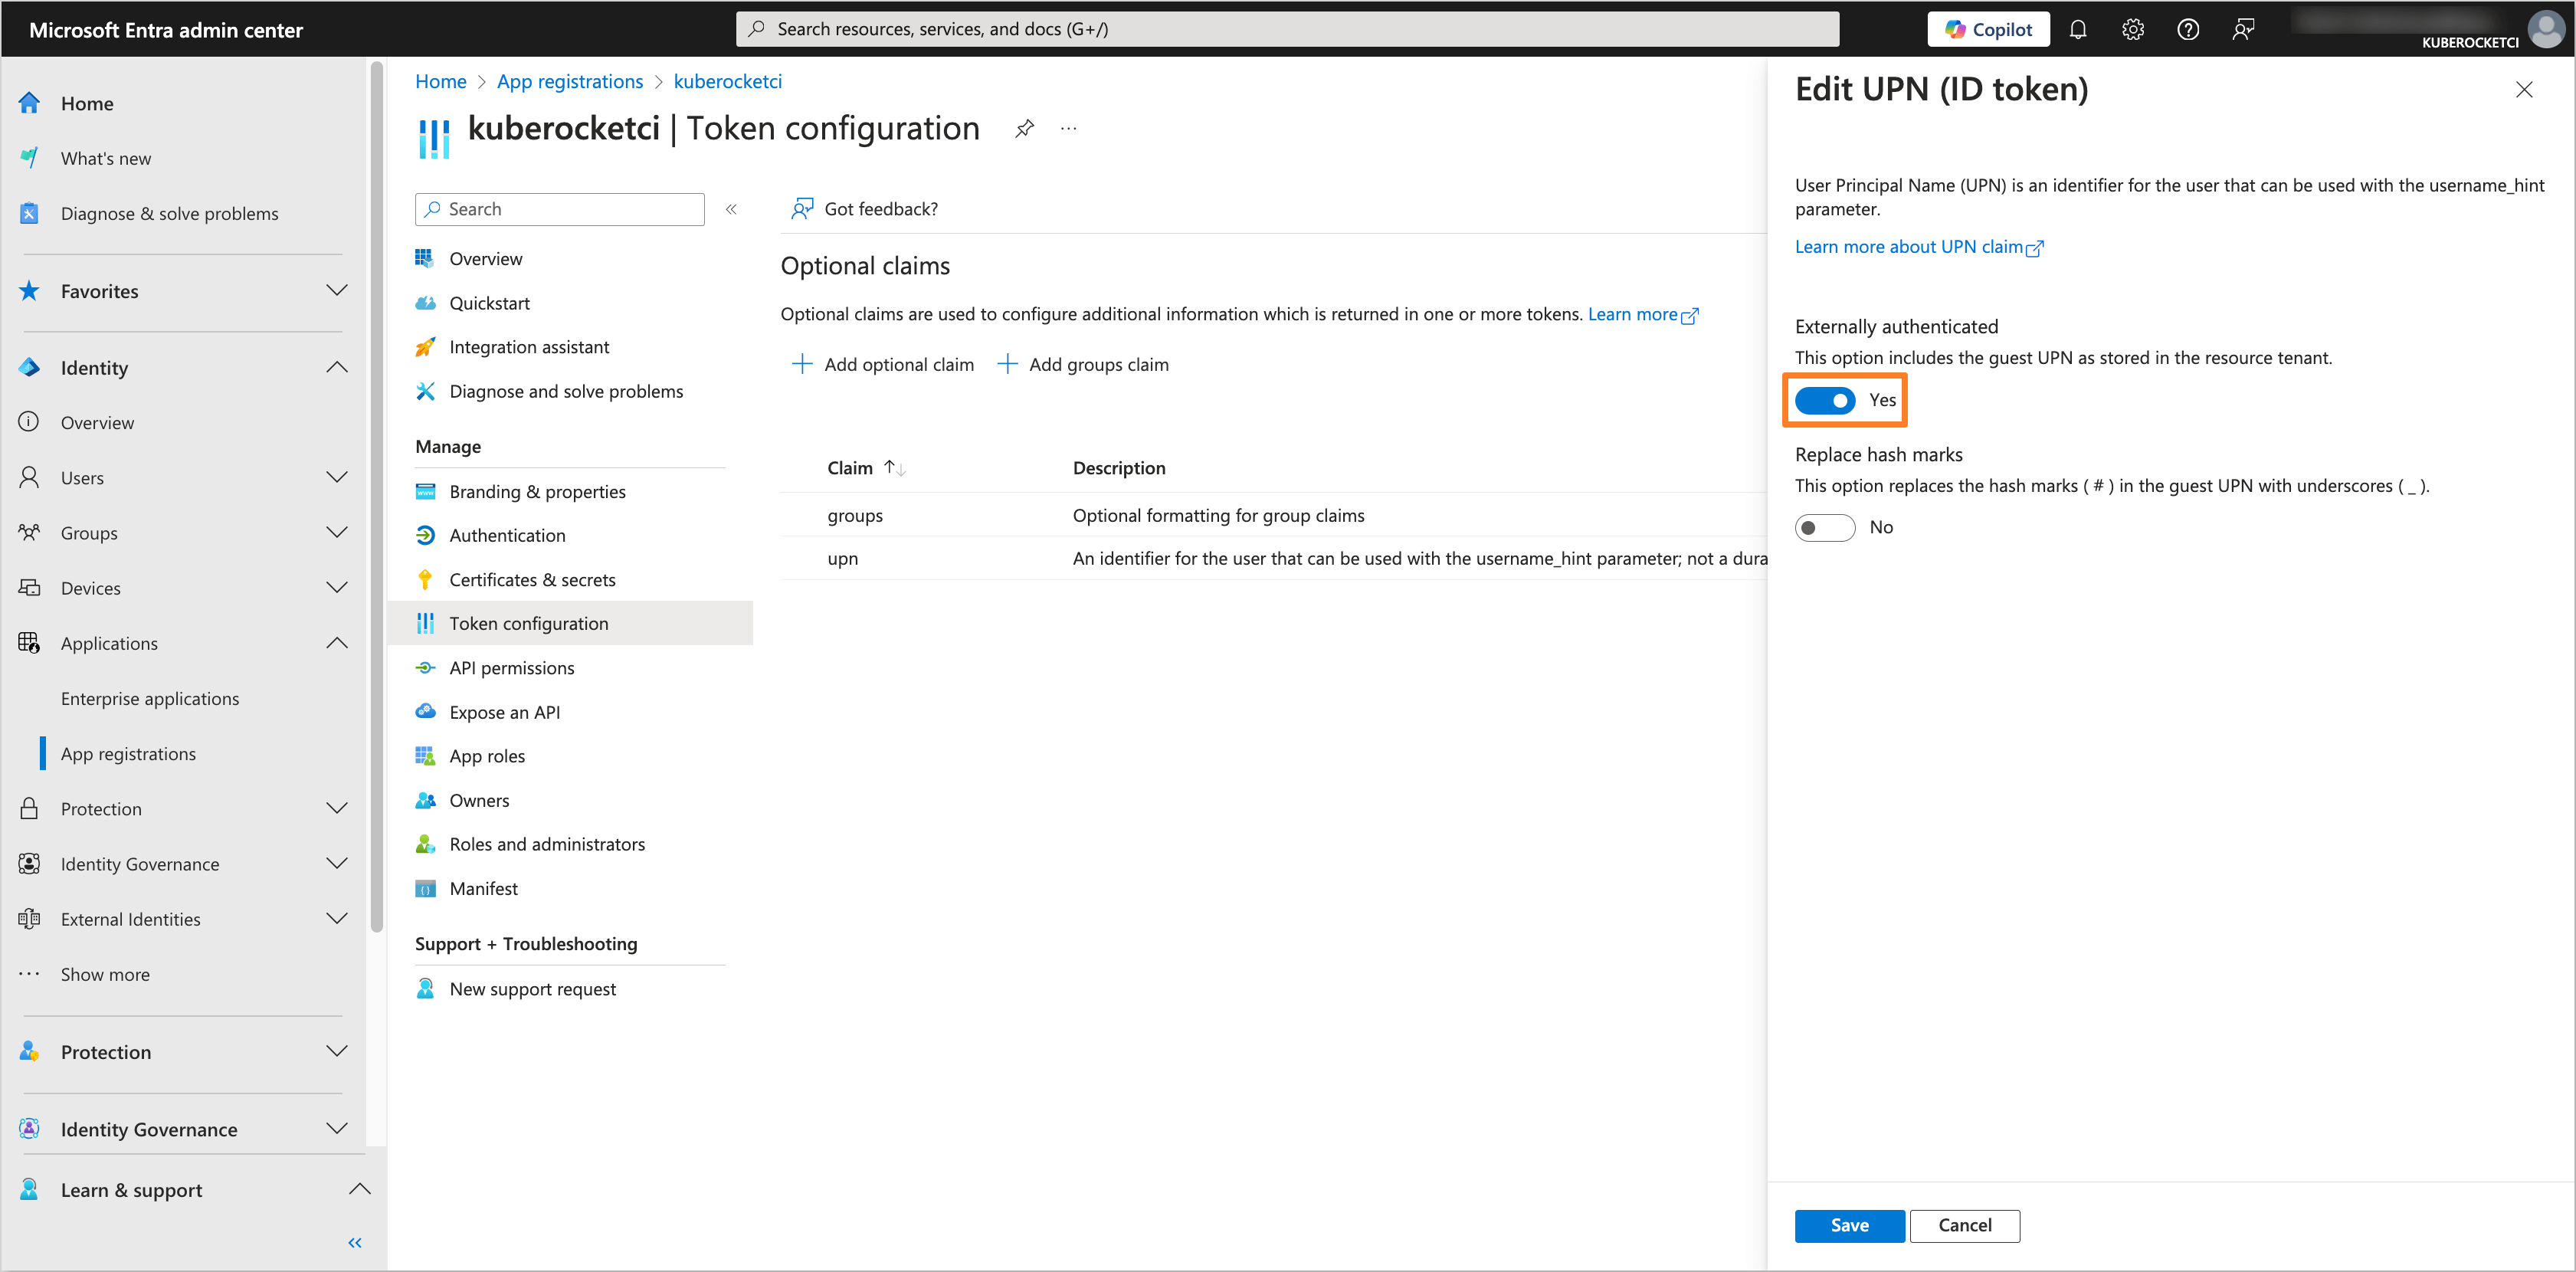
<p>(Optional) After adding the <strong>upn</strong> claim, click on the three dots next to it, select <strong>Edit</strong>, and turn on the <strong>Externally authenticated</strong> toggle to <strong>Yes</strong> value.</p>
<div class="theme-admonition theme-admonition-note admonition_xJq3 alert alert--secondary"><div class="admonitionHeading_Gvgb"><span class="admonitionIcon_Rf37"><svg viewBox="0 0 14 16"><path fill-rule="evenodd" d="M6.3 5.69a.942.942 0 0 1-.28-.7c0-.28.09-.52.28-.7.19-.18.42-.28.7-.28.28 0 .52.09.7.28.18.19.28.42.28.7 0 .28-.09.52-.28.7a1 1 0 0 1-.7.3c-.28 0-.52-.11-.7-.3zM8 7.99c-.02-.25-.11-.48-.31-.69-.2-.19-.42-.3-.69-.31H6c-.27.02-.48.13-.69.31-.2.2-.3.44-.31.69h1v3c.02.27.11.5.31.69.2.2.42.31.69.31h1c.27 0 .48-.11.69-.31.2-.19.3-.42.31-.69H8V7.98v.01zM7 2.3c-3.14 0-5.7 2.54-5.7 5.68 0 3.14 2.56 5.7 5.7 5.7s5.7-2.55 5.7-5.7c0-3.15-2.56-5.69-5.7-5.69v.01zM7 .98c3.86 0 7 3.14 7 7s-3.14 7-7 7-7-3.12-7-7 3.14-7 7-7z"></path></svg></span>note</div><div class="admonitionContent_BuS1"><p>This step is optional and should only be performed if external users (i.e., users with <strong>User type: Guest</strong>) will be added to the Microsoft Entra Tenant and require access to the Application.</p></div></div>
<p><img decoding="async" loading="lazy" alt="Externally Authenticated" src="https://docs.kuberocketci.io/assets/images/externally-authenticated-1bfd6efbb519c1633eb00d846fd99dc6.png" width="3362" height="1660" class="img_ev3q"></p>
</li>
<li class="">
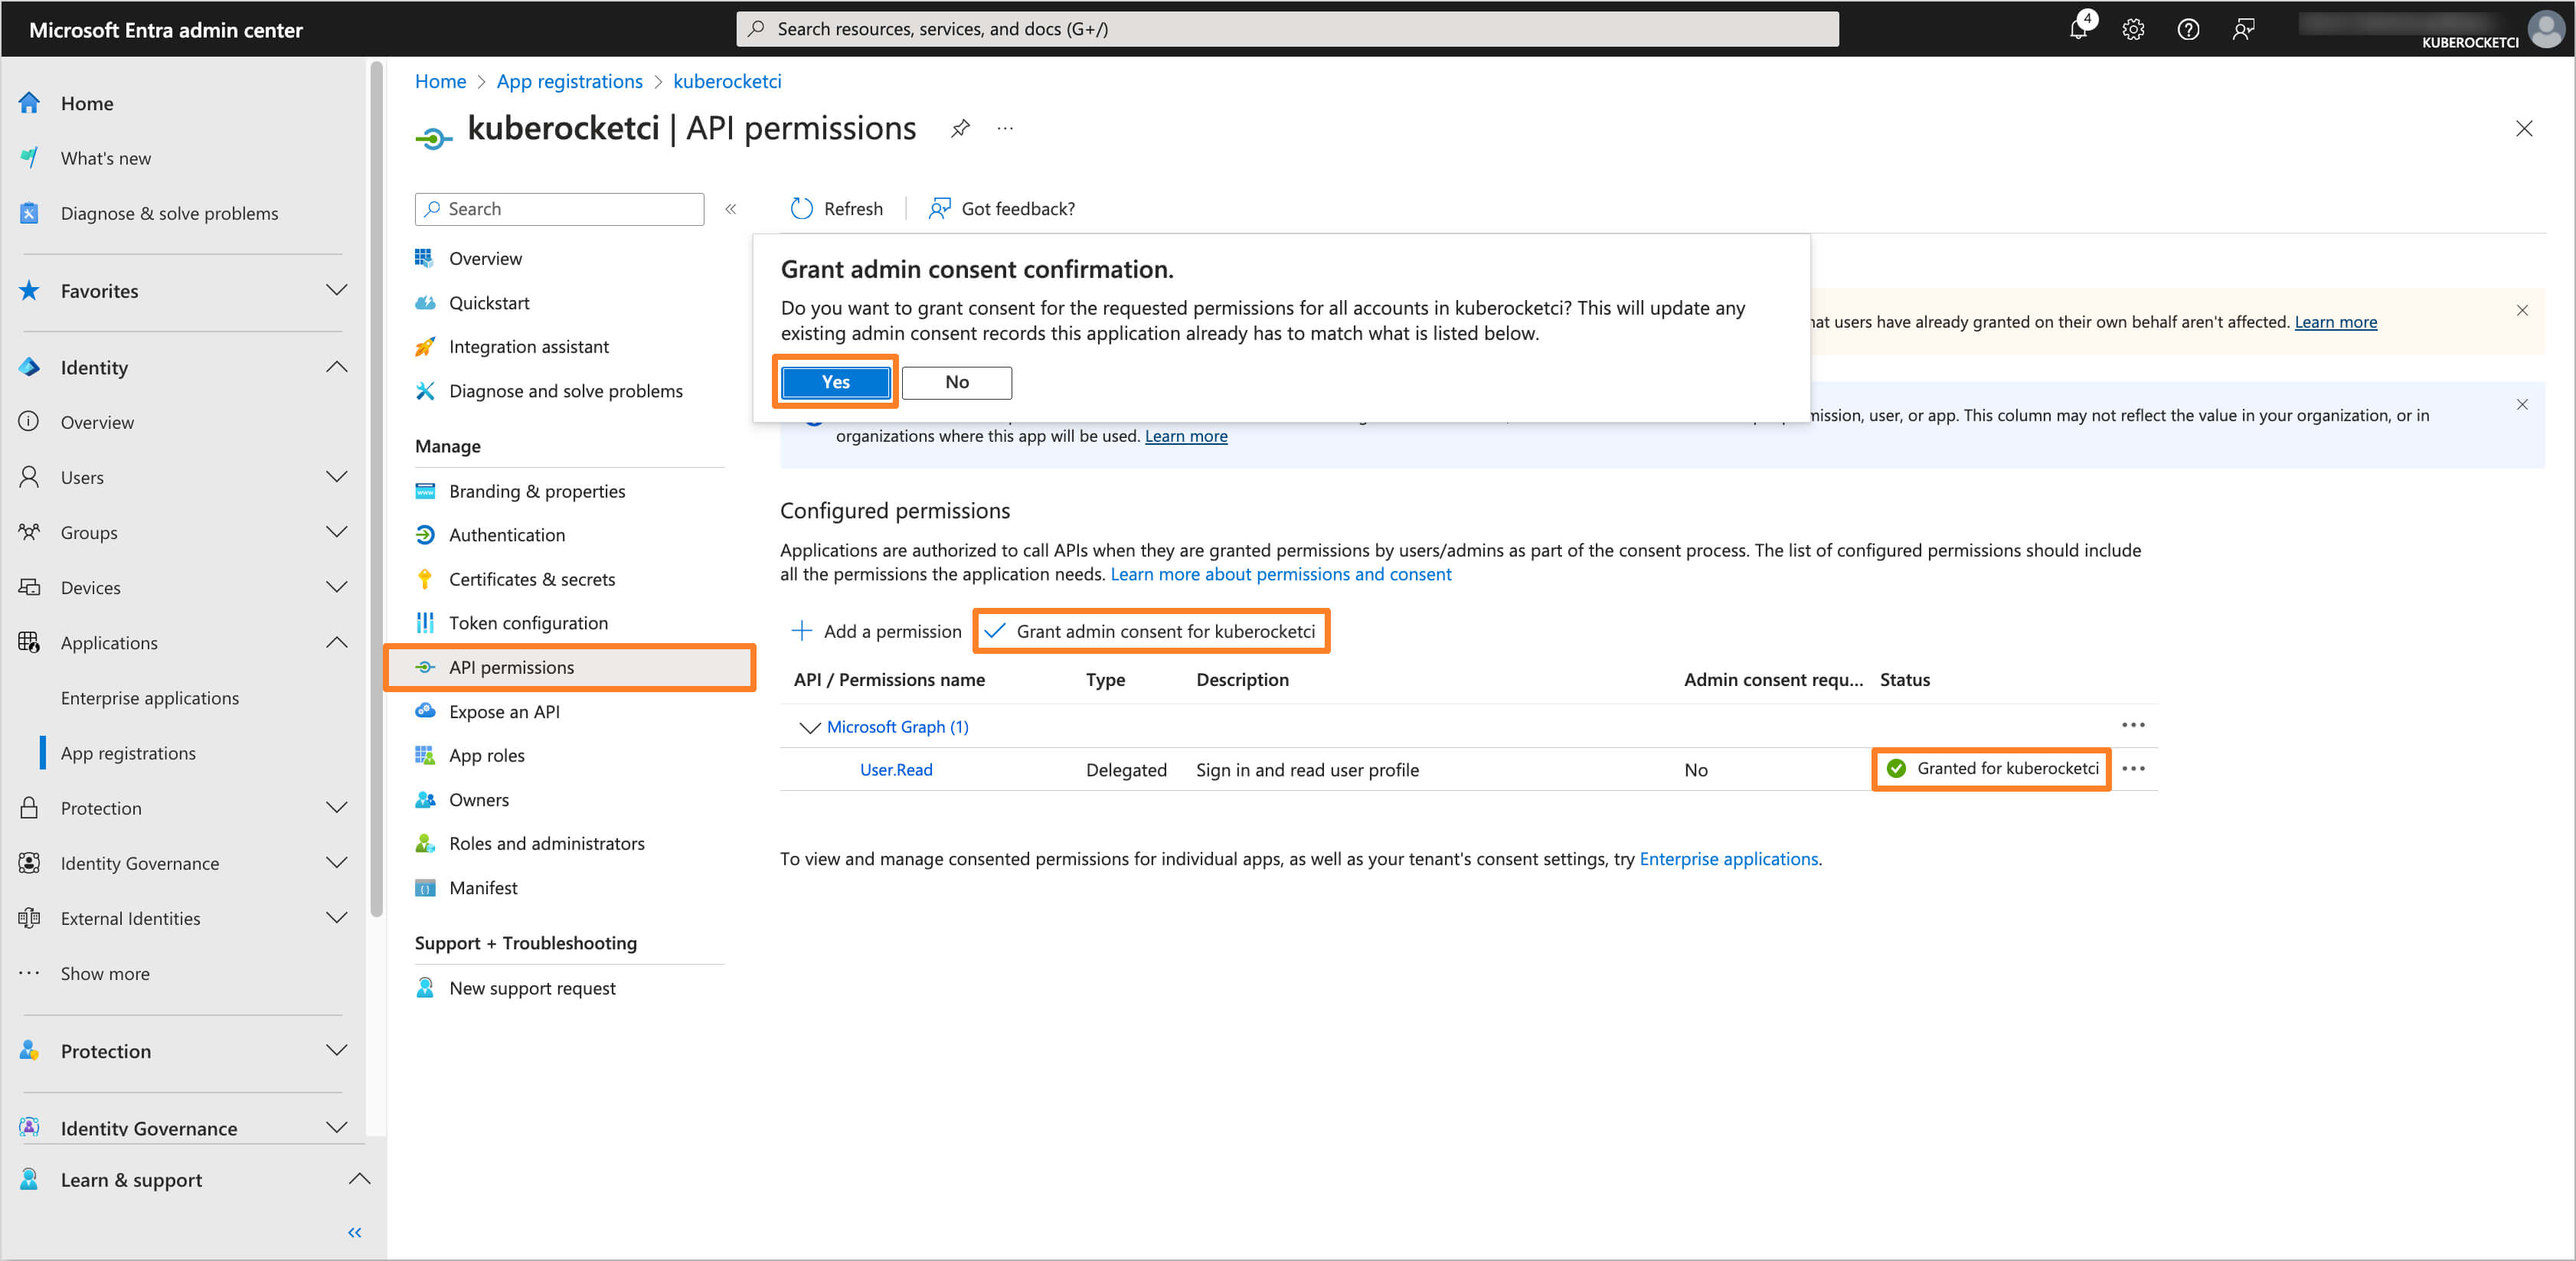
<p>Navigate to the <strong>API permissions</strong> section. Ensure that the <strong>User.Read</strong> permission is added under the <strong>Microsoft Graph</strong> API. If not, click on the <strong>Add a permission</strong> button, select <strong>Microsoft Graph</strong>, and add the <strong>User.Read</strong> permission. After adding the permission, click on the <strong>Grant admin consent for 'Tenant name'</strong> button to grant the required permissions.</p>
<p><img decoding="async" loading="lazy" alt="API Permissions" src="https://docs.kuberocketci.io/assets/images/api-permissions-ec305b38ce662e114e3e614ceabca58a.png" width="3364" height="1647" class="img_ev3q"></p>
</li>
<li class="">
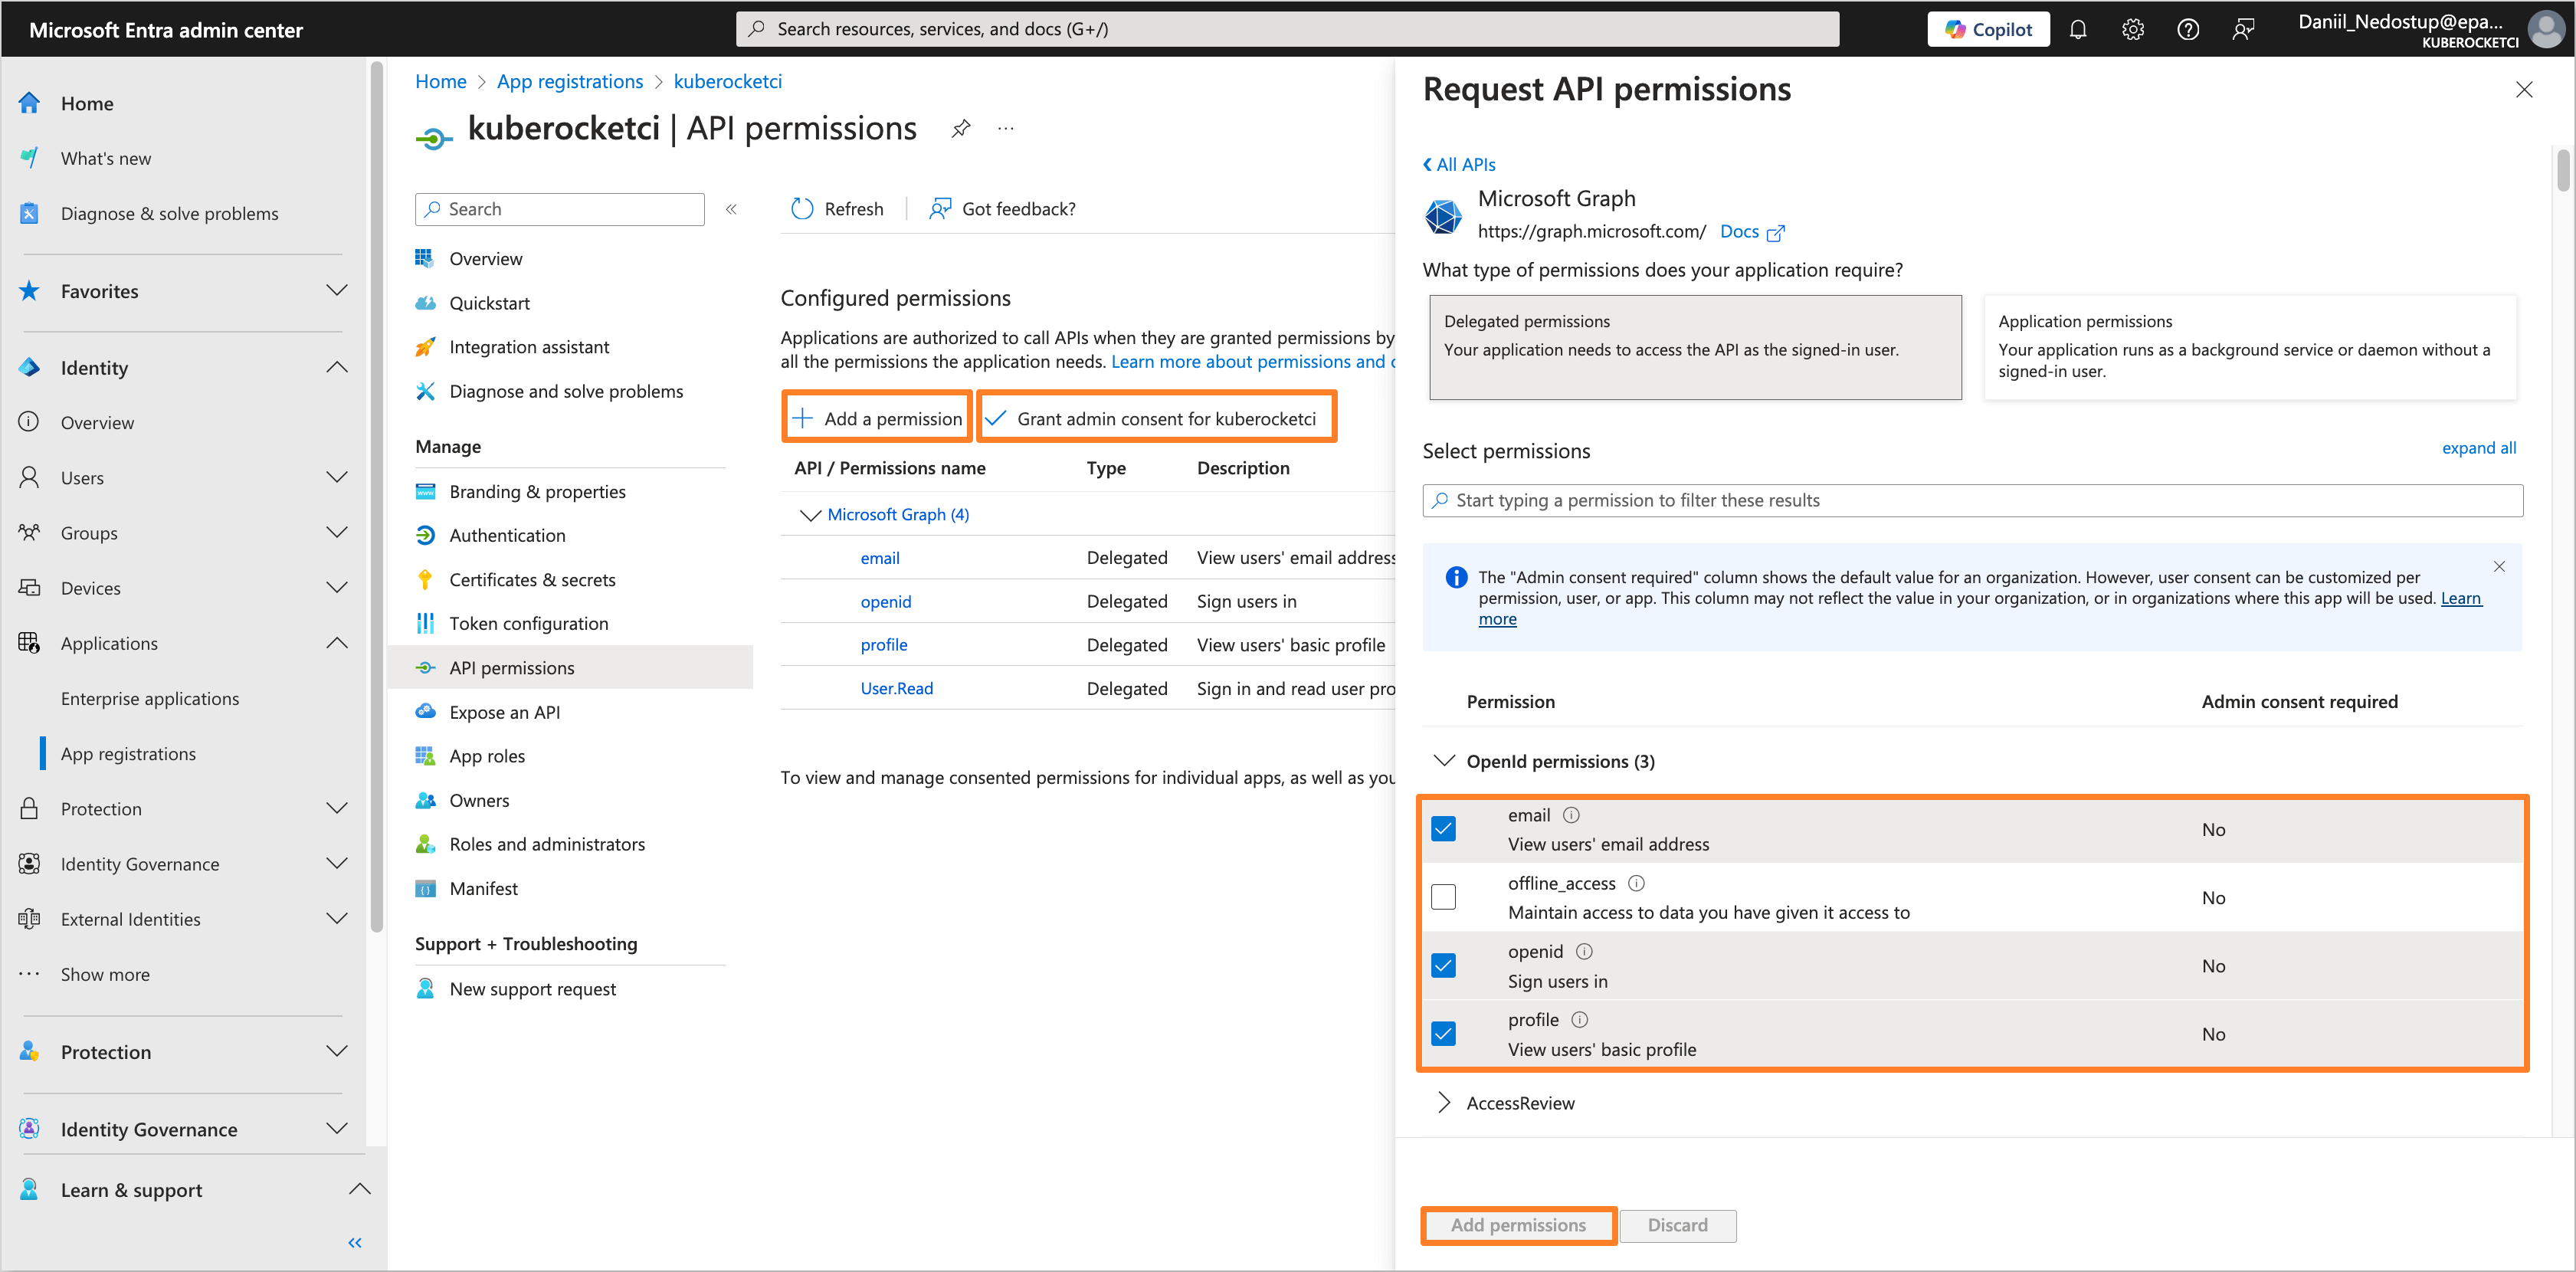
<p>(Optional) Additionally, for <strong>Microsoft Graph</strong> API, add the <strong>OpenId</strong> permissions, such as <strong>openid</strong>, <strong>email</strong>, and <strong>profile</strong>.</p>
<div class="theme-admonition theme-admonition-note admonition_xJq3 alert alert--secondary"><div class="admonitionHeading_Gvgb"><span class="admonitionIcon_Rf37"><svg viewBox="0 0 14 16"><path fill-rule="evenodd" d="M6.3 5.69a.942.942 0 0 1-.28-.7c0-.28.09-.52.28-.7.19-.18.42-.28.7-.28.28 0 .52.09.7.28.18.19.28.42.28.7 0 .28-.09.52-.28.7a1 1 0 0 1-.7.3c-.28 0-.52-.11-.7-.3zM8 7.99c-.02-.25-.11-.48-.31-.69-.2-.19-.42-.3-.69-.31H6c-.27.02-.48.13-.69.31-.2.2-.3.44-.31.69h1v3c.02.27.11.5.31.69.2.2.42.31.69.31h1c.27 0 .48-.11.69-.31.2-.19.3-.42.31-.69H8V7.98v.01zM7 2.3c-3.14 0-5.7 2.54-5.7 5.68 0 3.14 2.56 5.7 5.7 5.7s5.7-2.55 5.7-5.7c0-3.15-2.56-5.69-5.7-5.69v.01zM7 .98c3.86 0 7 3.14 7 7s-3.14 7-7 7-7-3.12-7-7 3.14-7 7-7z"></path></svg></span>note</div><div class="admonitionContent_BuS1"><p>This step is optional and should only be performed if external users (i.e., users with <strong>User type: Guest</strong>) will be added to the Microsoft Entra Tenant and require access to the Application.</p></div></div>
<p><img decoding="async" loading="lazy" alt="OpenID Permissions" src="https://docs.kuberocketci.io/assets/images/openid-permissions-f130d9bd007be3509b7f33b48e6e488d.png" width="3362" height="1660" class="img_ev3q"></p>
</li>
<li class="">
<p>The OIDC Application in Microsoft Entra is now configured and ready for integration with AWS EKS.</p>
</li>
</ol>
<h2 class="anchor anchorTargetStickyNavbar_Vzrq" id="creating-users-and-groups-in-microsoft-entra">Creating Users and Groups in Microsoft Entra<a href="https://docs.kuberocketci.io/blog/integrating-oidc-authentication-microsoft-entra-aws-eks#creating-users-and-groups-in-microsoft-entra" class="hash-link" aria-label="Direct link to Creating Users and Groups in Microsoft Entra" title="Direct link to Creating Users and Groups in Microsoft Entra" translate="no">​</a></h2>
<div class="theme-admonition theme-admonition-note admonition_xJq3 alert alert--secondary"><div class="admonitionHeading_Gvgb"><span class="admonitionIcon_Rf37"><svg viewBox="0 0 14 16"><path fill-rule="evenodd" d="M6.3 5.69a.942.942 0 0 1-.28-.7c0-.28.09-.52.28-.7.19-.18.42-.28.7-.28.28 0 .52.09.7.28.18.19.28.42.28.7 0 .28-.09.52-.28.7a1 1 0 0 1-.7.3c-.28 0-.52-.11-.7-.3zM8 7.99c-.02-.25-.11-.48-.31-.69-.2-.19-.42-.3-.69-.31H6c-.27.02-.48.13-.69.31-.2.2-.3.44-.31.69h1v3c.02.27.11.5.31.69.2.2.42.31.69.31h1c.27 0 .48-.11.69-.31.2-.19.3-.42.31-.69H8V7.98v.01zM7 2.3c-3.14 0-5.7 2.54-5.7 5.68 0 3.14 2.56 5.7 5.7 5.7s5.7-2.55 5.7-5.7c0-3.15-2.56-5.69-5.7-5.69v.01zM7 .98c3.86 0 7 3.14 7 7s-3.14 7-7 7-7-3.12-7-7 3.14-7 7-7z"></path></svg></span>note</div><div class="admonitionContent_BuS1"><p>Only users who are part of the groups configured in the Microsoft Entra Admin Center will be able to authenticate to the AWS EKS cluster using OIDC.</p></div></div>
<p>To create users and groups in Microsoft Entra, follow these steps:</p>
<h3 class="anchor anchorTargetStickyNavbar_Vzrq" id="creating-a-group">Creating a Group<a href="https://docs.kuberocketci.io/blog/integrating-oidc-authentication-microsoft-entra-aws-eks#creating-a-group" class="hash-link" aria-label="Direct link to Creating a Group" title="Direct link to Creating a Group" translate="no">​</a></h3>
<ol>
<li class="">
<p>In the Microsoft Entra Admin Center, in the left sidebar menu, select <strong>Groups</strong> and then <strong>All groups</strong>. Click on <strong>New group</strong> button to create a new group(s) for users who will have access to the AWS EKS cluster.</p>
<p><img decoding="async" loading="lazy" alt="New Group" src="https://docs.kuberocketci.io/assets/images/new-group-057769fdc60e88276e453cfe1d13520a.png" width="3364" height="1647" class="img_ev3q"></p>
</li>
<li class="">
<p>Fill in the details for the group, such as <strong>Group type</strong> and <strong>Group name</strong>. Click on the <strong>Create</strong> button to create the group.</p>
<p><img decoding="async" loading="lazy" alt="Group Details" src="https://docs.kuberocketci.io/assets/images/group-details-f699a47eca753f3e4f7fed9bd27ac86d.png" width="3364" height="1647" class="img_ev3q"></p>
</li>
<li class="">
<p>The group will be created, and you can start adding users to it.</p>
</li>
</ol>
<h3 class="anchor anchorTargetStickyNavbar_Vzrq" id="adding-users-to-the-group">Adding Users to the Group<a href="https://docs.kuberocketci.io/blog/integrating-oidc-authentication-microsoft-entra-aws-eks#adding-users-to-the-group" class="hash-link" aria-label="Direct link to Adding Users to the Group" title="Direct link to Adding Users to the Group" translate="no">​</a></h3>
<ol>
<li class="">
<p>In the Microsoft Entra Admin Center, in the left sidebar menu, select <strong>Users</strong> and then click on <strong>All users</strong>. In the <strong>New user</strong> tab, click on the <strong>Create new user</strong> button to create a new user.</p>
<p><img decoding="async" loading="lazy" alt="New User" src="https://docs.kuberocketci.io/assets/images/new-user-8d00fa515a4025b42a98f013a37d9a8f.png" width="3364" height="1648" class="img_ev3q"></p>
</li>
<li class="">
<p>Fill in the details for the user, such as <strong>User principal name</strong>, <strong>Mail nickname</strong>, <strong>Display name</strong>, and temporary password. In the <strong>Properties</strong> tab you can set the <strong>First name</strong>, <strong>Last name</strong>, and other details.</p>
<p><img decoding="async" loading="lazy" alt="User Details" src="https://docs.kuberocketci.io/assets/images/user-details-b5f580cd6fe8db3a519fd95a7d42fdc5.png" width="3364" height="1647" class="img_ev3q"></p>
</li>
<li class="">
<p>In the <strong>Assignment</strong> tab, click on the <strong>Add group</strong> button. In the <strong>Select Group</strong> window, choose the group(s) you created earlier (e.g., <code>oidc-cluster-admins</code>) and click on the <strong>Select</strong> button.</p>
<p><img decoding="async" loading="lazy" alt="Add Group" src="https://docs.kuberocketci.io/assets/images/add-group-ad90704de9b5399c8ce85605ca530a7d.png" width="3364" height="1647" class="img_ev3q"></p>
</li>
<li class="">
<p>Click on the <strong>Review + create</strong> button to create the user. The user will be created and added to the group(s) you selected.</p>
</li>
</ol>
<h2 class="anchor anchorTargetStickyNavbar_Vzrq" id="configuring-microsoft-entra-as-an-identity-provider-in-aws-eks">Configuring Microsoft Entra as an Identity Provider in AWS EKS<a href="https://docs.kuberocketci.io/blog/integrating-oidc-authentication-microsoft-entra-aws-eks#configuring-microsoft-entra-as-an-identity-provider-in-aws-eks" class="hash-link" aria-label="Direct link to Configuring Microsoft Entra as an Identity Provider in AWS EKS" title="Direct link to Configuring Microsoft Entra as an Identity Provider in AWS EKS" translate="no">​</a></h2>
<p>There are two methods to configure Microsoft Entra as an Identity Provider in AWS EKS: through the AWS Management Console and using Terraform.</p>
<div class="theme-admonition theme-admonition-note admonition_xJq3 alert alert--secondary"><div class="admonitionHeading_Gvgb"><span class="admonitionIcon_Rf37"><svg viewBox="0 0 14 16"><path fill-rule="evenodd" d="M6.3 5.69a.942.942 0 0 1-.28-.7c0-.28.09-.52.28-.7.19-.18.42-.28.7-.28.28 0 .52.09.7.28.18.19.28.42.28.7 0 .28-.09.52-.28.7a1 1 0 0 1-.7.3c-.28 0-.52-.11-.7-.3zM8 7.99c-.02-.25-.11-.48-.31-.69-.2-.19-.42-.3-.69-.31H6c-.27.02-.48.13-.69.31-.2.2-.3.44-.31.69h1v3c.02.27.11.5.31.69.2.2.42.31.69.31h1c.27 0 .48-.11.69-.31.2-.19.3-.42.31-.69H8V7.98v.01zM7 2.3c-3.14 0-5.7 2.54-5.7 5.68 0 3.14 2.56 5.7 5.7 5.7s5.7-2.55 5.7-5.7c0-3.15-2.56-5.69-5.7-5.69v.01zM7 .98c3.86 0 7 3.14 7 7s-3.14 7-7 7-7-3.12-7-7 3.14-7 7-7z"></path></svg></span>note</div><div class="admonitionContent_BuS1"><p>The Application data, such as <strong>Directory (tenant) ID</strong>, <strong>Application (client) ID</strong>, and <strong>Issuer URL</strong>, can be found in the <strong>Overview</strong> section of the OIDC Application in the Microsoft Entra Admin Center.
<img decoding="async" loading="lazy" alt="Application Data" src="https://docs.kuberocketci.io/assets/images/application-data-79ef843fc1e677bbbc0597ce1b9c2f50.png" width="1306" height="664" class="img_ev3q"></p></div></div>
<h3 class="anchor anchorTargetStickyNavbar_Vzrq" id="method-1-using-the-aws-management-console">Method 1: Using the AWS Management Console<a href="https://docs.kuberocketci.io/blog/integrating-oidc-authentication-microsoft-entra-aws-eks#method-1-using-the-aws-management-console" class="hash-link" aria-label="Direct link to Method 1: Using the AWS Management Console" title="Direct link to Method 1: Using the AWS Management Console" translate="no">​</a></h3>
<ol>
<li class="">
<p>Log in to the <a href="https://aws.amazon.com/console/" target="_blank" rel="noopener noreferrer" class="">AWS Management Console</a> and navigate to the <a href="https://console.aws.amazon.com/eks/" target="_blank" rel="noopener noreferrer" class="">Amazon EKS console</a>. Select the EKS cluster you want to configure and click on the <strong>Access</strong> tab.</p>
<p><img decoding="async" loading="lazy" alt="EKS Cluster Access Tab" src="https://docs.kuberocketci.io/assets/images/eks-cluster-access-tab-707d67886863028877f32b1630411b4e.png" width="3356" height="1180" class="img_ev3q"></p>
</li>
<li class="">
<p>In the <strong>OIDC identity providers</strong> section, click on the <strong>Associate identity provider</strong> button.</p>
<p><img decoding="async" loading="lazy" alt="Associate Identity Provider" src="https://docs.kuberocketci.io/assets/images/associate-identity-provider-8d81c9b345b76eb0bf49961342edde54.png" width="3356" height="1642" class="img_ev3q"></p>
</li>
<li class="">
<p>Fill in the following details:</p>
<ul>
<li class="">
<p><strong>Name</strong>: <code>Entra</code></p>
</li>
<li class="">
<p><strong>Issuer URL</strong>: <code>https://login.microsoftonline.com/&lt;Tenant-ID&gt;/</code>, where <code>&lt;Tenant-ID&gt;</code> is the <strong>Directory</strong> (tenant) <strong>ID</strong>. Ensure that the URL ends with <code>/</code>.</p>
</li>
<li class="">
<p><strong>Client ID</strong>: <code>&lt;Application (client) ID&gt;</code>, which corresponds to the <strong>Application</strong> (client) <strong>ID</strong> of the OIDC Application.</p>
</li>
<li class="">
<p><strong>Username Claim</strong>: <code>upn</code>.</p>
</li>
<li class="">
<p><strong>Groups Claim</strong>: <code>groups</code>.</p>
<p><img decoding="async" loading="lazy" alt="Identity Provider Details" src="https://docs.kuberocketci.io/assets/images/identity-provider-details-43942f4911d1c02742267b8b19d106cb.png" width="1506" height="1022" class="img_ev3q"></p>
</li>
</ul>
</li>
<li class="">
<p>The process of applying the changes may take a few minutes. Once completed, the Microsoft Entra OIDC identity provider will be associated with the AWS EKS cluster.</p>
</li>
</ol>
<h3 class="anchor anchorTargetStickyNavbar_Vzrq" id="method-2-using-terraform">Method 2: Using Terraform<a href="https://docs.kuberocketci.io/blog/integrating-oidc-authentication-microsoft-entra-aws-eks#method-2-using-terraform" class="hash-link" aria-label="Direct link to Method 2: Using Terraform" title="Direct link to Method 2: Using Terraform" translate="no">​</a></h3>
<p>To configure Microsoft Entra as an Identity Provider in AWS EKS using Terraform, you can use <a href="https://registry.terraform.io/modules/terraform-aws-modules/eks/aws/20.30.1" target="_blank" rel="noopener noreferrer" class="">AWS EKS Terraform module</a>. Here's an example of how you can do it:</p>
<ul>
<li class=""><strong>variables.tf</strong>:</li>
</ul>
<div class="language-hcl codeBlockContainer_Ckt0 theme-code-block" style="--prism-color:#393A34;--prism-background-color:#f6f8fa"><div class="codeBlockContent_QJqH"><pre tabindex="0" class="prism-code language-hcl codeBlock_bY9V thin-scrollbar" style="color:#393A34;background-color:#f6f8fa"><code class="codeBlockLines_e6Vv"><div class="token-line" style="color:#393A34"><span class="token keyword" style="color:#00009f">variable</span><span class="token keyword type variable" style="color:#36acaa"> "cluster_identity_providers" </span><span class="token punctuation" style="color:#393A34">{</span><span class="token plain"></span><br></div><div class="token-line" style="color:#393A34"><span class="token plain">  </span><span class="token property" style="color:#36acaa">description</span><span class="token plain"> </span><span class="token punctuation" style="color:#393A34">=</span><span class="token plain"> </span><span class="token string" style="color:#e3116c">"Configuration for OIDC identity provider"</span><span class="token plain"></span><br></div><div class="token-line" style="color:#393A34"><span class="token plain">  </span><span class="token property" style="color:#36acaa">type</span><span class="token plain">        </span><span class="token punctuation" style="color:#393A34">=</span><span class="token plain"> any</span><br></div><div class="token-line" style="color:#393A34"><span class="token plain">  </span><span class="token property" style="color:#36acaa">default</span><span class="token plain">     </span><span class="token punctuation" style="color:#393A34">=</span><span class="token plain"> </span><span class="token punctuation" style="color:#393A34">{</span><span class="token punctuation" style="color:#393A34">}</span><span class="token plain"></span><br></div><div class="token-line" style="color:#393A34"><span class="token plain"></span><span class="token punctuation" style="color:#393A34">}</span><br></div></code></pre></div></div>
<ul>
<li class=""><strong>terraform.tfvars</strong>:</li>
</ul>
<div class="language-hcl codeBlockContainer_Ckt0 theme-code-block" style="--prism-color:#393A34;--prism-background-color:#f6f8fa"><div class="codeBlockContent_QJqH"><pre tabindex="0" class="prism-code language-hcl codeBlock_bY9V thin-scrollbar" style="color:#393A34;background-color:#f6f8fa"><code class="codeBlockLines_e6Vv"><div class="token-line" style="color:#393A34"><span class="token property" style="color:#36acaa">cluster_identity_providers</span><span class="token plain"> </span><span class="token punctuation" style="color:#393A34">=</span><span class="token plain"> </span><span class="token punctuation" style="color:#393A34">{</span><span class="token plain"></span><br></div><div class="token-line" style="color:#393A34"><span class="token plain">  </span><span class="token property" style="color:#36acaa">entra</span><span class="token plain"> </span><span class="token punctuation" style="color:#393A34">=</span><span class="token plain"> </span><span class="token punctuation" style="color:#393A34">{</span><span class="token plain"></span><br></div><div class="token-line" style="color:#393A34"><span class="token plain">    </span><span class="token property" style="color:#36acaa">client_id</span><span class="token plain">    </span><span class="token punctuation" style="color:#393A34">=</span><span class="token plain"> </span><span class="token string" style="color:#e3116c">"&lt;Application (client) ID&gt;"</span><span class="token plain"></span><br></div><div class="token-line" style="color:#393A34"><span class="token plain">    </span><span class="token property" style="color:#36acaa">issuer_url</span><span class="token plain">   </span><span class="token punctuation" style="color:#393A34">=</span><span class="token plain"> </span><span class="token string" style="color:#e3116c">"https://sts.windows.net/&lt;Tenant ID&gt;/"</span><span class="token plain"></span><br></div><div class="token-line" style="color:#393A34"><span class="token plain">    </span><span class="token property" style="color:#36acaa">groups_claim</span><span class="token plain"> </span><span class="token punctuation" style="color:#393A34">=</span><span class="token plain"> </span><span class="token string" style="color:#e3116c">"groups"</span><span class="token plain"></span><br></div><div class="token-line" style="color:#393A34"><span class="token plain">    </span><span class="token property" style="color:#36acaa">username_claim</span><span class="token plain">  </span><span class="token punctuation" style="color:#393A34">=</span><span class="token plain"> </span><span class="token string" style="color:#e3116c">"upn"</span><span class="token plain"></span><br></div><div class="token-line" style="color:#393A34"><span class="token plain">  </span><span class="token punctuation" style="color:#393A34">}</span><span class="token plain"></span><br></div><div class="token-line" style="color:#393A34"><span class="token plain"></span><span class="token punctuation" style="color:#393A34">}</span><br></div></code></pre></div></div>
<ul>
<li class=""><strong>main.tf</strong>:</li>
</ul>
<div class="language-hcl codeBlockContainer_Ckt0 theme-code-block" style="--prism-color:#393A34;--prism-background-color:#f6f8fa"><div class="codeBlockContent_QJqH"><pre tabindex="0" class="prism-code language-hcl codeBlock_bY9V thin-scrollbar" style="color:#393A34;background-color:#f6f8fa"><code class="codeBlockLines_e6Vv"><div class="token-line" style="color:#393A34"><span class="token keyword" style="color:#00009f">module</span><span class="token keyword type variable" style="color:#36acaa"> "eks" </span><span class="token punctuation" style="color:#393A34">{</span><span class="token plain"></span><br></div><div class="token-line" style="color:#393A34"><span class="token plain">  </span><span class="token property" style="color:#36acaa">source</span><span class="token plain">  </span><span class="token punctuation" style="color:#393A34">=</span><span class="token plain"> </span><span class="token string" style="color:#e3116c">"terraform-aws-modules/eks/aws"</span><span class="token plain"></span><br></div><div class="token-line" style="color:#393A34"><span class="token plain">  </span><span class="token property" style="color:#36acaa">version</span><span class="token plain"> </span><span class="token punctuation" style="color:#393A34">=</span><span class="token plain"> </span><span class="token string" style="color:#e3116c">"20.14.0"</span><span class="token plain"></span><br></div><div class="token-line" style="color:#393A34"><span class="token plain">  ...</span><br></div><div class="token-line" style="color:#393A34"><span class="token plain">  </span><span class="token comment" style="color:#999988;font-style:italic"># OIDC Identity provider</span><span class="token plain"></span><br></div><div class="token-line" style="color:#393A34"><span class="token plain">  </span><span class="token property" style="color:#36acaa">cluster_identity_providers</span><span class="token plain"> </span><span class="token punctuation" style="color:#393A34">=</span><span class="token plain"> var.cluster_identity_providers</span><br></div><div class="token-line" style="color:#393A34"><span class="token plain"></span><span class="token punctuation" style="color:#393A34">}</span><br></div></code></pre></div></div>
<p>After applying the Terraform configuration, the Microsoft Entra OIDC identity provider will be associated with the AWS EKS cluster.</p>
<h2 class="anchor anchorTargetStickyNavbar_Vzrq" id="configuring-rbac-resources-in-aws-eks-cluster-for-microsoft-entra-user-groups">Configuring RBAC Resources in AWS EKS cluster for Microsoft Entra User Groups<a href="https://docs.kuberocketci.io/blog/integrating-oidc-authentication-microsoft-entra-aws-eks#configuring-rbac-resources-in-aws-eks-cluster-for-microsoft-entra-user-groups" class="hash-link" aria-label="Direct link to Configuring RBAC Resources in AWS EKS cluster for Microsoft Entra User Groups" title="Direct link to Configuring RBAC Resources in AWS EKS cluster for Microsoft Entra User Groups" translate="no">​</a></h2>
<p>In this section, user authorization will be configured using Kubernetes Role-Based Access Control (RBAC). Microsoft Entra groups will be linked to Kubernetes ClusterRoles through ClusterRoleBinding resources, enabling precise control over resource access within the EKS cluster. Additionally, Roles and RoleBindings can be used for more granular access control within specific namespaces.</p>
<div class="theme-admonition theme-admonition-note admonition_xJq3 alert alert--secondary"><div class="admonitionHeading_Gvgb"><span class="admonitionIcon_Rf37"><svg viewBox="0 0 14 16"><path fill-rule="evenodd" d="M6.3 5.69a.942.942 0 0 1-.28-.7c0-.28.09-.52.28-.7.19-.18.42-.28.7-.28.28 0 .52.09.7.28.18.19.28.42.28.7 0 .28-.09.52-.28.7a1 1 0 0 1-.7.3c-.28 0-.52-.11-.7-.3zM8 7.99c-.02-.25-.11-.48-.31-.69-.2-.19-.42-.3-.69-.31H6c-.27.02-.48.13-.69.31-.2.2-.3.44-.31.69h1v3c.02.27.11.5.31.69.2.2.42.31.69.31h1c.27 0 .48-.11.69-.31.2-.19.3-.42.31-.69H8V7.98v.01zM7 2.3c-3.14 0-5.7 2.54-5.7 5.68 0 3.14 2.56 5.7 5.7 5.7s5.7-2.55 5.7-5.7c0-3.15-2.56-5.69-5.7-5.69v.01zM7 .98c3.86 0 7 3.14 7 7s-3.14 7-7 7-7-3.12-7-7 3.14-7 7-7z"></path></svg></span>note</div><div class="admonitionContent_BuS1"><p>The <strong>Object ID</strong> of the Microsoft Entra group can be found in the <strong>Overview</strong> section of the group in the Microsoft Entra Admin Center.
<img decoding="async" loading="lazy" alt="Group Object ID" src="https://docs.kuberocketci.io/assets/images/group-object-id-074d9c1a6ef1ebdd351442b25e07f37d.png" width="1504" height="1090" class="img_ev3q"></p></div></div>
<ol>
<li class="">
<p>Log in to the AWS EKS cluster and create the following <strong>ClusterRoleBinding</strong> resource, which associates the Microsoft Entra group <code>oidc-cluster-admins</code> with the <code>cluster-admin</code> Kubernetes Cluster Role. Replace <code>&lt;your-microsoft-entra-admin-group-object-id&gt;</code> with the Object ID of the <code>oidc-cluster-admins</code> group, which can be found on the <code>Group</code> overview page in the Microsoft Entra admin center.</p>
<div class="language-yaml codeBlockContainer_Ckt0 theme-code-block" style="--prism-color:#393A34;--prism-background-color:#f6f8fa"><div class="codeBlockContent_QJqH"><pre tabindex="0" class="prism-code language-yaml codeBlock_bY9V thin-scrollbar" style="color:#393A34;background-color:#f6f8fa"><code class="codeBlockLines_e6Vv"><div class="token-line" style="color:#393A34"><span class="token key atrule" style="color:#00a4db">apiVersion</span><span class="token punctuation" style="color:#393A34">:</span><span class="token plain"> rbac.authorization.k8s.io/v1</span><br></div><div class="token-line" style="color:#393A34"><span class="token plain"></span><span class="token key atrule" style="color:#00a4db">kind</span><span class="token punctuation" style="color:#393A34">:</span><span class="token plain"> ClusterRoleBinding</span><br></div><div class="token-line" style="color:#393A34"><span class="token plain"></span><span class="token key atrule" style="color:#00a4db">metadata</span><span class="token punctuation" style="color:#393A34">:</span><span class="token plain"></span><br></div><div class="token-line" style="color:#393A34"><span class="token plain">  </span><span class="token key atrule" style="color:#00a4db">name</span><span class="token punctuation" style="color:#393A34">:</span><span class="token plain"> oidc</span><span class="token punctuation" style="color:#393A34">-</span><span class="token plain">cluster</span><span class="token punctuation" style="color:#393A34">-</span><span class="token plain">admins</span><br></div><div class="token-line" style="color:#393A34"><span class="token plain"></span><span class="token key atrule" style="color:#00a4db">roleRef</span><span class="token punctuation" style="color:#393A34">:</span><span class="token plain"></span><br></div><div class="token-line" style="color:#393A34"><span class="token plain">  </span><span class="token key atrule" style="color:#00a4db">apiGroup</span><span class="token punctuation" style="color:#393A34">:</span><span class="token plain"> rbac.authorization.k8s.io</span><br></div><div class="token-line" style="color:#393A34"><span class="token plain">  </span><span class="token key atrule" style="color:#00a4db">kind</span><span class="token punctuation" style="color:#393A34">:</span><span class="token plain"> ClusterRole</span><br></div><div class="token-line" style="color:#393A34"><span class="token plain">  </span><span class="token key atrule" style="color:#00a4db">name</span><span class="token punctuation" style="color:#393A34">:</span><span class="token plain"> cluster</span><span class="token punctuation" style="color:#393A34">-</span><span class="token plain">admin</span><br></div><div class="token-line" style="color:#393A34"><span class="token plain"></span><span class="token key atrule" style="color:#00a4db">subjects</span><span class="token punctuation" style="color:#393A34">:</span><span class="token plain"></span><br></div><div class="token-line" style="color:#393A34"><span class="token plain">  </span><span class="token punctuation" style="color:#393A34">-</span><span class="token plain"> </span><span class="token key atrule" style="color:#00a4db">kind</span><span class="token punctuation" style="color:#393A34">:</span><span class="token plain"> Group</span><br></div><div class="token-line" style="color:#393A34"><span class="token plain">    </span><span class="token key atrule" style="color:#00a4db">name</span><span class="token punctuation" style="color:#393A34">:</span><span class="token plain"> &lt;your</span><span class="token punctuation" style="color:#393A34">-</span><span class="token plain">microsoft</span><span class="token punctuation" style="color:#393A34">-</span><span class="token plain">entra</span><span class="token punctuation" style="color:#393A34">-</span><span class="token plain">admin</span><span class="token punctuation" style="color:#393A34">-</span><span class="token plain">group</span><span class="token punctuation" style="color:#393A34">-</span><span class="token plain">object</span><span class="token punctuation" style="color:#393A34">-</span><span class="token plain">id</span><span class="token punctuation" style="color:#393A34">&gt;</span><span class="token plain"></span><br></div><div class="token-line" style="color:#393A34"><span class="token plain">    </span><span class="token key atrule" style="color:#00a4db">apiGroup</span><span class="token punctuation" style="color:#393A34">:</span><span class="token plain"> rbac.authorization.k8s.io</span><br></div></code></pre></div></div>
<p>Save the above YAML to a file, for example, <code>clusterrolebinding.yaml</code>, and apply it to the EKS cluster using the following command:</p>
<div class="language-bash codeBlockContainer_Ckt0 theme-code-block" style="--prism-color:#393A34;--prism-background-color:#f6f8fa"><div class="codeBlockContent_QJqH"><pre tabindex="0" class="prism-code language-bash codeBlock_bY9V thin-scrollbar" style="color:#393A34;background-color:#f6f8fa"><code class="codeBlockLines_e6Vv"><div class="token-line" style="color:#393A34"><span class="token plain">kubectl apply </span><span class="token parameter variable" style="color:#36acaa">-f</span><span class="token plain"> clusterrolebinding.yaml</span><br></div></code></pre></div></div>
<p>The <code>oidc-cluster-admins</code> group will now have <code>cluster-admin</code> permissions within the EKS cluster.</p>
</li>
</ol>
<h2 class="anchor anchorTargetStickyNavbar_Vzrq" id="authenticating-to-aws-eks-using-microsoft-entra-with-kubectl">Authenticating to AWS EKS using Microsoft Entra with kubectl<a href="https://docs.kuberocketci.io/blog/integrating-oidc-authentication-microsoft-entra-aws-eks#authenticating-to-aws-eks-using-microsoft-entra-with-kubectl" class="hash-link" aria-label="Direct link to Authenticating to AWS EKS using Microsoft Entra with kubectl" title="Direct link to Authenticating to AWS EKS using Microsoft Entra with kubectl" translate="no">​</a></h2>
<p>To authenticate to the AWS EKS cluster using Microsoft Entra, you can use the <code>kubectl</code> CLI tool with the <code>kubelogin</code> plugin. The <code>kubelogin</code> plugin simplifies the OIDC authentication process by handling the token exchange and session management. Here's how you can authenticate to the EKS cluster:</p>
<ol>
<li class="">
<p>Create or update the kubeconfig file with the OIDC configuration. Replace <code>&lt;cluster-name&gt;</code> with the name of your EKS cluster and <code>&lt;region-code&gt;</code> with the AWS region code where the cluster is located.</p>
<div class="language-bash codeBlockContainer_Ckt0 theme-code-block" style="--prism-color:#393A34;--prism-background-color:#f6f8fa"><div class="codeBlockContent_QJqH"><pre tabindex="0" class="prism-code language-bash codeBlock_bY9V thin-scrollbar" style="color:#393A34;background-color:#f6f8fa"><code class="codeBlockLines_e6Vv"><div class="token-line" style="color:#393A34"><span class="token plain">aws eks update-kubeconfig </span><span class="token parameter variable" style="color:#36acaa">--region</span><span class="token plain"> </span><span class="token operator" style="color:#393A34">&lt;</span><span class="token plain">region-code</span><span class="token operator" style="color:#393A34">&gt;</span><span class="token plain"> </span><span class="token parameter variable" style="color:#36acaa">--name</span><span class="token plain"> </span><span class="token operator" style="color:#393A34">&lt;</span><span class="token plain">cluster-name</span><span class="token operator" style="color:#393A34">&gt;</span><br></div></code></pre></div></div>
</li>
<li class="">
<p>Execute the following command to create a new kubeconfig context using the <code>kubelogin</code> plugin. Replace <code>&lt;cluster-name&gt;</code> with the name of your EKS cluster.</p>
<div class="language-bash codeBlockContainer_Ckt0 theme-code-block" style="--prism-color:#393A34;--prism-background-color:#f6f8fa"><div class="codeBlockContent_QJqH"><pre tabindex="0" class="prism-code language-bash codeBlock_bY9V thin-scrollbar" style="color:#393A34;background-color:#f6f8fa"><code class="codeBlockLines_e6Vv"><div class="token-line" style="color:#393A34"><span class="token plain">kubectl config set-credentials </span><span class="token string" style="color:#e3116c">"eks"</span><span class="token plain"> </span><span class="token punctuation" style="color:#393A34">\</span><span class="token plain"></span><br></div><div class="token-line" style="color:#393A34"><span class="token plain">  --exec-api-version</span><span class="token operator" style="color:#393A34">=</span><span class="token plain">client.authentication.k8s.io/v1beta1 </span><span class="token punctuation" style="color:#393A34">\</span><span class="token plain"></span><br></div><div class="token-line" style="color:#393A34"><span class="token plain">  --exec-command</span><span class="token operator" style="color:#393A34">=</span><span class="token plain">kubelogin </span><span class="token punctuation" style="color:#393A34">\</span><span class="token plain"></span><br></div><div class="token-line" style="color:#393A34"><span class="token plain">  --exec-arg</span><span class="token operator" style="color:#393A34">=</span><span class="token plain">get-token </span><span class="token punctuation" style="color:#393A34">\</span><span class="token plain"></span><br></div><div class="token-line" style="color:#393A34"><span class="token plain">  --exec-arg</span><span class="token operator" style="color:#393A34">=</span><span class="token plain">--oidc-issuer-url </span><span class="token punctuation" style="color:#393A34">\</span><span class="token plain"></span><br></div><div class="token-line" style="color:#393A34"><span class="token plain">  --exec-arg</span><span class="token operator" style="color:#393A34">=</span><span class="token plain">https://sts.windows.net/</span><span class="token operator" style="color:#393A34">&lt;</span><span class="token plain">Tenant ID</span><span class="token operator" style="color:#393A34">&gt;</span><span class="token plain">/ </span><span class="token punctuation" style="color:#393A34">\</span><span class="token plain"></span><br></div><div class="token-line" style="color:#393A34"><span class="token plain">  --exec-arg</span><span class="token operator" style="color:#393A34">=</span><span class="token plain">--oidc-client-id </span><span class="token punctuation" style="color:#393A34">\</span><span class="token plain"></span><br></div><div class="token-line" style="color:#393A34"><span class="token plain">  --exec-arg</span><span class="token operator" style="color:#393A34">=</span><span class="token operator" style="color:#393A34">&lt;</span><span class="token plain">Application </span><span class="token punctuation" style="color:#393A34">(</span><span class="token plain">client</span><span class="token punctuation" style="color:#393A34">)</span><span class="token plain"> ID</span><span class="token operator" style="color:#393A34">&gt;</span><span class="token plain"> </span><span class="token punctuation" style="color:#393A34">\</span><span class="token plain"></span><br></div><div class="token-line" style="color:#393A34"><span class="token plain">  --exec-arg</span><span class="token operator" style="color:#393A34">=</span><span class="token plain">--oidc-client-secret </span><span class="token punctuation" style="color:#393A34">\</span><span class="token plain"></span><br></div><div class="token-line" style="color:#393A34"><span class="token plain">  --exec-arg</span><span class="token operator" style="color:#393A34">=</span><span class="token operator" style="color:#393A34">&lt;</span><span class="token plain">Application </span><span class="token punctuation" style="color:#393A34">(</span><span class="token plain">client</span><span class="token punctuation" style="color:#393A34">)</span><span class="token plain"> Secret</span><span class="token operator" style="color:#393A34">&gt;</span><br></div></code></pre></div></div>
<p>Replace <code>&lt;Tenant ID&gt;</code>, <code>&lt;Application (client) ID&gt;</code>, and <code>&lt;Application (client) Secret&gt;</code> with the corresponding values from the OIDC Application in the Microsoft Entra Admin Center.</p>
<div class="theme-admonition theme-admonition-note admonition_xJq3 alert alert--secondary"><div class="admonitionHeading_Gvgb"><span class="admonitionIcon_Rf37"><svg viewBox="0 0 14 16"><path fill-rule="evenodd" d="M6.3 5.69a.942.942 0 0 1-.28-.7c0-.28.09-.52.28-.7.19-.18.42-.28.7-.28.28 0 .52.09.7.28.18.19.28.42.28.7 0 .28-.09.52-.28.7a1 1 0 0 1-.7.3c-.28 0-.52-.11-.7-.3zM8 7.99c-.02-.25-.11-.48-.31-.69-.2-.19-.42-.3-.69-.31H6c-.27.02-.48.13-.69.31-.2.2-.3.44-.31.69h1v3c.02.27.11.5.31.69.2.2.42.31.69.31h1c.27 0 .48-.11.69-.31.2-.19.3-.42.31-.69H8V7.98v.01zM7 2.3c-3.14 0-5.7 2.54-5.7 5.68 0 3.14 2.56 5.7 5.7 5.7s5.7-2.55 5.7-5.7c0-3.15-2.56-5.69-5.7-5.69v.01zM7 .98c3.86 0 7 3.14 7 7s-3.14 7-7 7-7-3.12-7-7 3.14-7 7-7z"></path></svg></span>note</div><div class="admonitionContent_BuS1"><p>You can test the authentication to the EKS cluster immediately by running the following command:</p><div class="language-bash codeBlockContainer_Ckt0 theme-code-block" style="--prism-color:#393A34;--prism-background-color:#f6f8fa"><div class="codeBlockContent_QJqH"><pre tabindex="0" class="prism-code language-bash codeBlock_bY9V thin-scrollbar" style="color:#393A34;background-color:#f6f8fa"><code class="codeBlockLines_e6Vv"><div class="token-line" style="color:#393A34"><span class="token plain">kubectl </span><span class="token parameter variable" style="color:#36acaa">--user</span><span class="token operator" style="color:#393A34">=</span><span class="token plain">eks get nodes</span><br></div></code></pre></div></div></div></div>
</li>
<li class="">
<p>Set the context for the kubeconfig file to use the <code>eks</code> user and the OIDC configuration. Replace <code>&lt;cluster-name&gt;</code> with the name of your EKS cluster.</p>
<div class="language-bash codeBlockContainer_Ckt0 theme-code-block" style="--prism-color:#393A34;--prism-background-color:#f6f8fa"><div class="codeBlockContent_QJqH"><pre tabindex="0" class="prism-code language-bash codeBlock_bY9V thin-scrollbar" style="color:#393A34;background-color:#f6f8fa"><code class="codeBlockLines_e6Vv"><div class="token-line" style="color:#393A34"><span class="token plain">kubectl config set-context eks </span><span class="token parameter variable" style="color:#36acaa">--user</span><span class="token operator" style="color:#393A34">=</span><span class="token plain">eks </span><span class="token parameter variable" style="color:#36acaa">--cluster</span><span class="token operator" style="color:#393A34">=</span><span class="token operator" style="color:#393A34">&lt;</span><span class="token plain">cluster-name</span><span class="token operator" style="color:#393A34">&gt;</span><br></div></code></pre></div></div>
<p>To switch to the <code>eks</code> context, execute the following command:</p>
<div class="language-bash codeBlockContainer_Ckt0 theme-code-block" style="--prism-color:#393A34;--prism-background-color:#f6f8fa"><div class="codeBlockContent_QJqH"><pre tabindex="0" class="prism-code language-bash codeBlock_bY9V thin-scrollbar" style="color:#393A34;background-color:#f6f8fa"><code class="codeBlockLines_e6Vv"><div class="token-line" style="color:#393A34"><span class="token plain">kubectl config use-context eks</span><br></div></code></pre></div></div>
<p>Test the authentication by running the following command:</p>
<div class="language-bash codeBlockContainer_Ckt0 theme-code-block" style="--prism-color:#393A34;--prism-background-color:#f6f8fa"><div class="codeBlockContent_QJqH"><pre tabindex="0" class="prism-code language-bash codeBlock_bY9V thin-scrollbar" style="color:#393A34;background-color:#f6f8fa"><code class="codeBlockLines_e6Vv"><div class="token-line" style="color:#393A34"><span class="token plain">kubectl get nodes</span><br></div></code></pre></div></div>
</li>
</ol>
<h2 class="anchor anchorTargetStickyNavbar_Vzrq" id="configuring-kuberocketci-portal-with-microsoft-entra-oidc-authentication">Configuring KubeRocketCI Portal with Microsoft Entra OIDC Authentication<a href="https://docs.kuberocketci.io/blog/integrating-oidc-authentication-microsoft-entra-aws-eks#configuring-kuberocketci-portal-with-microsoft-entra-oidc-authentication" class="hash-link" aria-label="Direct link to Configuring KubeRocketCI Portal with Microsoft Entra OIDC Authentication" title="Direct link to Configuring KubeRocketCI Portal with Microsoft Entra OIDC Authentication" translate="no">​</a></h2>
<ol>
<li class="">
<p>Starting from version 3.10, KubeRocketCI platform supports Microsoft Entra as an Identity Provider for OIDC authentication in the Portal UI. To configure Microsoft Entra OIDC authentication, navigate to the <a href="https://github.com/epam/edp-install" target="_blank" rel="noopener noreferrer" class="">edp-install</a> Helm chart repository and set the following values in the <code>values.yaml</code> file:</p>
<div class="language-yaml codeBlockContainer_Ckt0 theme-code-block" style="--prism-color:#393A34;--prism-background-color:#f6f8fa"><div class="codeBlockContent_QJqH"><pre tabindex="0" class="prism-code language-yaml codeBlock_bY9V thin-scrollbar" style="color:#393A34;background-color:#f6f8fa"><code class="codeBlockLines_e6Vv"><div class="token-line" style="color:#393A34"><span class="token punctuation" style="color:#393A34">...</span><span class="token plain"></span><br></div><div class="token-line" style="color:#393A34"><span class="token plain"></span><span class="token key atrule" style="color:#00a4db">edp-headlamp</span><span class="token punctuation" style="color:#393A34">:</span><span class="token plain"></span><br></div><div class="token-line" style="color:#393A34"><span class="token plain">  </span><span class="token key atrule" style="color:#00a4db">enabled</span><span class="token punctuation" style="color:#393A34">:</span><span class="token plain"> </span><span class="token boolean important" style="color:#36acaa">true</span><span class="token plain"></span><br></div><div class="token-line" style="color:#393A34"><span class="token plain">  </span><span class="token key atrule" style="color:#00a4db">config</span><span class="token punctuation" style="color:#393A34">:</span><span class="token plain"></span><br></div><div class="token-line" style="color:#393A34"><span class="token plain">    </span><span class="token key atrule" style="color:#00a4db">oidc</span><span class="token punctuation" style="color:#393A34">:</span><span class="token plain"></span><br></div><div class="token-line" style="color:#393A34"><span class="token plain">      </span><span class="token key atrule" style="color:#00a4db">enabled</span><span class="token punctuation" style="color:#393A34">:</span><span class="token plain"> </span><span class="token boolean important" style="color:#36acaa">true</span><span class="token plain"></span><br></div><div class="token-line" style="color:#393A34"><span class="token plain">      </span><span class="token key atrule" style="color:#00a4db">issuerUrl</span><span class="token punctuation" style="color:#393A34">:</span><span class="token plain"> </span><span class="token string" style="color:#e3116c">"https://sts.windows.net/&lt;Tenant ID&gt;/"</span><span class="token plain"></span><br></div><div class="token-line" style="color:#393A34"><span class="token plain">      </span><span class="token key atrule" style="color:#00a4db">clientID</span><span class="token punctuation" style="color:#393A34">:</span><span class="token plain"> </span><span class="token string" style="color:#e3116c">"&lt;Application (client) ID&gt;"</span><span class="token plain"></span><br></div><div class="token-line" style="color:#393A34"><span class="token plain">      </span><span class="token key atrule" style="color:#00a4db">clientSecretName</span><span class="token punctuation" style="color:#393A34">:</span><span class="token plain"> </span><span class="token string" style="color:#e3116c">"&lt;name of the secret containing the client-secret value&gt;"</span><span class="token plain"></span><br></div><div class="token-line" style="color:#393A34"><span class="token plain">      </span><span class="token key atrule" style="color:#00a4db">clientSecretKey</span><span class="token punctuation" style="color:#393A34">:</span><span class="token plain"> </span><span class="token string" style="color:#e3116c">"clientSecret"</span><span class="token plain"></span><br></div><div class="token-line" style="color:#393A34"><span class="token plain"></span><span class="token punctuation" style="color:#393A34">...</span><br></div></code></pre></div></div>
<p>Replace <code>&lt;Tenant ID&gt;</code> and <code>&lt;Application (client) ID&gt;</code> with the corresponding values from the OIDC Application in the Microsoft Entra Admin Center. Also, specify the name of the Kubernetes Secret containing the Application <strong>Client secret</strong> value in the <code>clientSecretName</code> field.</p>
</li>
<li class="">
<p>In the Microsoft Entra Admin Center, navigate to the created OIDC Application and select the <strong>Authentication</strong> section. In the <strong>Redirect URIs</strong> field, add the URL of the KubeRocketCI Portal, for example, <code>https://portal-&lt;krci-namespace&gt;.&lt;dns-wildcard&gt;/oidc-callback</code>.</p>
<p><img decoding="async" loading="lazy" alt="Redirect URIs" src="https://docs.kuberocketci.io/assets/images/redirect-uris-7fdaed8d83ca7e79234435a232fce0ec.png" width="3364" height="1660" class="img_ev3q"></p>
</li>
<li class="">
<p>After applying the changes, the KubeRocketCI Portal will be configured to use Microsoft Entra OIDC authentication. Users will be able to log in to the Portal using <strong>Sign In</strong> option.</p>
<p><img decoding="async" loading="lazy" alt="Sign In" src="https://docs.kuberocketci.io/assets/images/sign-in-61897514acf347a032e4a3eaa2582c2d.png" width="3364" height="1660" class="img_ev3q"></p>
</li>
</ol>
<h2 class="anchor anchorTargetStickyNavbar_Vzrq" id="conclusion">Conclusion<a href="https://docs.kuberocketci.io/blog/integrating-oidc-authentication-microsoft-entra-aws-eks#conclusion" class="hash-link" aria-label="Direct link to Conclusion" title="Direct link to Conclusion" translate="no">​</a></h2>
<p>Integrating OpenID Connect (OIDC) authentication with Microsoft Entra in AWS EKS is a powerful way to enhance security and streamline user access management. By leveraging the capabilities of SSO, OIDC, and Microsoft Entra, organizations can simplify authentication processes, enforce access controls, and ensure secure navigation across cloud-native environments. Whether you're managing user identities, enhancing compliance, or improving user experience, this integration provides a robust solution to meet your identity and access management needs. By following the steps outlined in this guide, you can configure Microsoft Entra as an Identity Provider in AWS EKS, authenticate users using OIDC, and secure access to your EKS clusters and KubeRocketCI Portal effectively.</p>]]></content>
        <author>
            <name>Daniil Nedostup</name>
            <uri>https://github.com/daniil-nedostup</uri>
        </author>
        <category label="KubeRocketCI" term="KubeRocketCI"/>
        <category label="AWS EKS" term="AWS EKS"/>
        <category label="SSO" term="SSO"/>
        <category label="Microsoft Entra" term="Microsoft Entra"/>
        <category label="OIDC" term="OIDC"/>
        <category label="Kubernetes" term="Kubernetes"/>
        <category label="Security" term="Security"/>
    </entry>
    <entry>
        <title type="html"><![CDATA[Advanced AWS EKS Management: Implementing SSO via OIDC and Keycloak]]></title>
        <id>https://docs.kuberocketci.io/blog/advanced-aws-eks-management-oidc-keycloak</id>
        <link href="https://docs.kuberocketci.io/blog/advanced-aws-eks-management-oidc-keycloak"/>
        <updated>2024-10-04T00:00:00.000Z</updated>
        <summary type="html"><![CDATA[Learn how to implement Single Sign-On (SSO) using OpenID Connect (OIDC) and Keycloak to boost security and streamline authentication processes in Amazon Elastic Kubernetes Service (AWS EKS).]]></summary>
        <content type="html"><![CDATA[<p>In today's cloud-first world, ensuring seamless and secure access to Amazon Elastic Kubernetes Service (EKS) is essential for IT teams. Our guide helps you enhance EKS security by integrating Single Sign-On (SSO) with OpenID Connect (OIDC) and Keycloak. This integration simplifies authentication and strengthens security measures. We aim to provide you with effective strategies to implement a robust SSO solution that meets your organization's standards, making your EKS environment more secure and compliant. KubeRocketCI leverages this integration to provide Role-Based Access Control (RBAC) for your EKS clusters, ensuring that only authorized users can access platform resources.</p>
<h2 class="anchor anchorTargetStickyNavbar_Vzrq" id="prerequisites">Prerequisites<a href="https://docs.kuberocketci.io/blog/advanced-aws-eks-management-oidc-keycloak#prerequisites" class="hash-link" aria-label="Direct link to Prerequisites" title="Direct link to Prerequisites" translate="no">​</a></h2>
<p>Before you begin, ensure you have the following:</p>
<ul>
<li class="">A running <a href="https://docs.aws.amazon.com/eks/latest/userguide/create-cluster.html" target="_blank" rel="noopener noreferrer" class="">AWS EKS</a> cluster with the necessary permissions for access and management.</li>
<li class="">Forked and cloned the <a href="https://github.com/epam/edp-cluster-add-ons" target="_blank" rel="noopener noreferrer" class="">edp-cluster-add-ons</a> repository.</li>
<li class="">The <a href="https://github.com/int128/kubelogin" target="_blank" rel="noopener noreferrer" class="">kubelogin</a> plugin installed for authenticating to the EKS cluster using OIDC.</li>
<li class="">The <a href="https://kubernetes.io/docs/tasks/tools/#kubectl" target="_blank" rel="noopener noreferrer" class="">kubectl</a> cli tool installed.</li>
<li class="">The <a href="https://aws.amazon.com/cli/" target="_blank" rel="noopener noreferrer" class="">aws cli</a> tool installed.</li>
<li class=""><a class="" href="https://docs.kuberocketci.io/docs/operator-guide/auth/keycloak">Keycloak</a> installed and configured with the <a href="https://github.com/epam/edp-cluster-add-ons/tree/main/clusters/core/addons/kuberocketci-rbac" target="_blank" rel="noopener noreferrer" class="">kuberocketci-rbac</a> Helm chart, which can be found in the <a href="https://github.com/epam/edp-cluster-add-ons" target="_blank" rel="noopener noreferrer" class="">add-ons repository</a>.</li>
<li class="">The <a href="https://github.com/epam/edp-keycloak-operator" target="_blank" rel="noopener noreferrer" class="">Keycloak-operator</a> installed.</li>
</ul>
<h2 class="anchor anchorTargetStickyNavbar_Vzrq" id="understanding-sso-oidc-and-keycloak">Understanding SSO, OIDC, and Keycloak<a href="https://docs.kuberocketci.io/blog/advanced-aws-eks-management-oidc-keycloak#understanding-sso-oidc-and-keycloak" class="hash-link" aria-label="Direct link to Understanding SSO, OIDC, and Keycloak" title="Direct link to Understanding SSO, OIDC, and Keycloak" translate="no">​</a></h2>
<p>In the context of enhancing digital security and user experience, we prioritize the integration of three key elements: Single Sign-On (SSO), OpenID Connect (OIDC), and the Keycloak solution. Here’s how they connect:</p>
<ul>
<li class="">
<p><strong>Single Sign-On (SSO)</strong> serves as the foundation, enabling users to access multiple applications with one set of login credentials, significantly simplifying the authentication process.</p>
</li>
<li class="">
<p><strong>OpenID Connect (OIDC)</strong> builds on the SSO framework by providing an authentication layer, which uses straightforward identity verification to ensure secure and seamless access across services.</p>
</li>
<li class="">
<p><strong>Keycloak</strong> acts as the orchestrator, implementing both SSO and OIDC to manage user identities and security protocols efficiently. It provides a comprehensive platform for securing applications and services with minimal hassle for end-users.</p>
</li>
</ul>
<p>Together, these technologies streamline the login process, reinforce security, and enhance the user experience by allowing secure, seamless navigation across our digital ecosystem.</p>
<h3 class="anchor anchorTargetStickyNavbar_Vzrq" id="what-is-sso">What is SSO?<a href="https://docs.kuberocketci.io/blog/advanced-aws-eks-management-oidc-keycloak#what-is-sso" class="hash-link" aria-label="Direct link to What is SSO?" title="Direct link to What is SSO?" translate="no">​</a></h3>
<p>Single sign-on (SSO) is a user authentication method that lets you use one set of login credentials (such as a username and password) to access multiple applications. The primary benefits of SSO include an improved user experience by eliminating the need for multiple passwords and logins, and enhanced security through centralized management of user access. Organizations widely adopt SSO to streamline their authentication processes and reduce the likelihood of password fatigue among users, thereby decreasing the risk of security breaches. For more information, see <a href="https://en.wikipedia.org/wiki/Single_sign-on" target="_blank" rel="noopener noreferrer" class="">Single sign-on on Wikipedia</a>.</p>
<!-- -->
<p>This diagram shows the following steps:</p>
<ol>
<li class="">User logs in once at the single sign-on (SSO) gateway by providing their credentials.</li>
<li class="">The SSO gateway authenticates the user, creates a session, and then allows the user to access multiple applications.</li>
<li class="">When the user attempts to access Application 1, the application verifies the user's session with the SSO gateway.</li>
<li class="">The SSO gateway confirms that the session is valid, and Application 1 grants the user access.</li>
</ol>
<p>The same process is repeated for Application 2 and Application 3. Since the user's session is already established with the SSO gateway, they do not need to log in again to access these applications.</p>
<h3 class="anchor anchorTargetStickyNavbar_Vzrq" id="understanding-oidc">Understanding OIDC<a href="https://docs.kuberocketci.io/blog/advanced-aws-eks-management-oidc-keycloak#understanding-oidc" class="hash-link" aria-label="Direct link to Understanding OIDC" title="Direct link to Understanding OIDC" translate="no">​</a></h3>
<p>OpenID Connect (OIDC) is an authentication layer on top of the OAuth 2.0 protocol. It lets clients verify the identity of the end user based on authentication by an authorization server and get basic profile information about the end user in an interoperable and REST-like manner. OIDC uses JSON Web Tokens (JWTs) to securely transmit information about an end user from the identity provider to the client. This protocol is essential for modern web applications, providing a more secure and streamlined method for user authentication and authorization. Reference: <a href="https://openid.net/specs/openid-connect-core-1_0.html" target="_blank" rel="noopener noreferrer" class="">OIDC Specification</a></p>
<p>OIDC enables single sign-on (SSO) functionality, simplifying the user experience by allowing individuals to use a single set of credentials across multiple applications. The protocol also supports robust security features, including token revocation and introspection, enhancing overall application security.</p>
<p>This diagram simplifies the OIDC flow into its core components:</p>
<!-- -->
<ol>
<li class=""><strong>User (U)</strong>: The end user who wants to access the client application.</li>
<li class=""><strong>Client Application (C)</strong>: The application requiring authentication from the user.</li>
<li class=""><strong>Authorization Server (AS)</strong>: The server that authenticates the user and issues tokens to the client application.</li>
<li class=""><strong>Resource Server (RS)</strong>: The server hosting protected resources that the client application wants to access on behalf of the user.</li>
</ol>
<p>The sequence starts with the user requesting access to the client application, moving through authentication with the authorization server, and ending with the client application accessing protected resources.</p>
<h3 class="anchor anchorTargetStickyNavbar_Vzrq" id="keycloak-overview">Keycloak Overview<a href="https://docs.kuberocketci.io/blog/advanced-aws-eks-management-oidc-keycloak#keycloak-overview" class="hash-link" aria-label="Direct link to Keycloak Overview" title="Direct link to Keycloak Overview" translate="no">​</a></h3>
<p>Keycloak is an open-source identity and access management solution for modern applications and services. It offers features like single sign-on (SSO), social login, and identity brokering, making it a comprehensive solution for managing user identities. Keycloak integrates seamlessly with LDAP (Lightweight Directory Access Protocol) and Active Directory and supports OpenID Connect (OIDC), OAuth 2.0, and Security Assertion Markup Language (SAML) 2.0. By using Keycloak, organizations can enhance their security and provide a better user experience without building complex identity management features from scratch. For more details, see the Keycloak <a href="https://www.keycloak.org/documentation.html" target="_blank" rel="noopener noreferrer" class="">official documentation</a>.</p>
<h2 class="anchor anchorTargetStickyNavbar_Vzrq" id="keycloak-configuration">Keycloak Configuration<a href="https://docs.kuberocketci.io/blog/advanced-aws-eks-management-oidc-keycloak#keycloak-configuration" class="hash-link" aria-label="Direct link to Keycloak Configuration" title="Direct link to Keycloak Configuration" translate="no">​</a></h2>
<p>The first step to enable OIDC authentication to the AWS EKS cluster using Keycloak is to set up Keycloak with the necessary configurations, such as realm, client, groups, and other settings. For this purpose, we will use the <a href="https://github.com/epam/edp-cluster-add-ons/tree/main/clusters/core/addons/kuberocketci-rbac" target="_blank" rel="noopener noreferrer" class="">kuberocketci-rbac</a> Helm chart available in the <a href="https://github.com/epam/edp-cluster-add-ons" target="_blank" rel="noopener noreferrer" class="">edp-cluster-add-ons</a> repository.</p>
<ol>
<li class="">
<p>Clone the forked <a href="https://github.com/epam/edp-cluster-add-ons" target="_blank" rel="noopener noreferrer" class="">edp-cluster-add-ons</a> repository and navigate to the <code>clusters/core/addons/kuberocketci-rbac</code> directory.</p>
</li>
<li class="">
<p>In the <code>values.yaml</code> file, set the <code>kubernetes.enabled</code> field to <code>true</code> to enable the creation of the necessary Keycloak resources:</p>
<div class="language-yaml codeBlockContainer_Ckt0 theme-code-block" style="--prism-color:#393A34;--prism-background-color:#f6f8fa"><div class="codeBlockTitle_OeMC">values.yaml</div><div class="codeBlockContent_QJqH"><pre tabindex="0" class="prism-code language-yaml codeBlock_bY9V thin-scrollbar" style="color:#393A34;background-color:#f6f8fa"><code class="codeBlockLines_e6Vv"><div class="token-line" style="color:#393A34"><span class="token key atrule" style="color:#00a4db">kubernetes</span><span class="token punctuation" style="color:#393A34">:</span><span class="token plain"></span><br></div><div class="token-line" style="color:#393A34"><span class="token plain">  </span><span class="token key atrule" style="color:#00a4db">enabled</span><span class="token punctuation" style="color:#393A34">:</span><span class="token plain"> </span><span class="token boolean important" style="color:#36acaa">true</span><br></div></code></pre></div></div>
</li>
<li class="">
<p>If you use the External Secrets Operator to manage secrets, ensure the AWS Parameter Store object contains the correct Client Secret value for the <strong>keycloak-client-eks-secret</strong> secret:</p>
<div class="language-json codeBlockContainer_Ckt0 theme-code-block" style="--prism-color:#393A34;--prism-background-color:#f6f8fa"><div class="codeBlockTitle_OeMC">AWS Parameter Store object</div><div class="codeBlockContent_QJqH"><pre tabindex="0" class="prism-code language-json codeBlock_bY9V thin-scrollbar" style="color:#393A34;background-color:#f6f8fa"><code class="codeBlockLines_e6Vv"><div class="token-line" style="color:#393A34"><span class="token punctuation" style="color:#393A34">{</span><span class="token plain"></span><br></div><div class="token-line" style="color:#393A34"><span class="token plain">  ...</span><br></div><div class="token-line" style="color:#393A34"><span class="token plain">  </span><span class="token property" style="color:#36acaa">"keycloak-client-eks-secret"</span><span class="token operator" style="color:#393A34">:</span><span class="token plain"> </span><span class="token punctuation" style="color:#393A34">{</span><span class="token plain"></span><br></div><div class="token-line" style="color:#393A34"><span class="token plain">    </span><span class="token property" style="color:#36acaa">"clientSecret"</span><span class="token operator" style="color:#393A34">:</span><span class="token plain"> </span><span class="token string" style="color:#e3116c">"&lt;Client_Secret_Value&gt;"</span><span class="token plain"></span><br></div><div class="token-line" style="color:#393A34"><span class="token plain">  </span><span class="token punctuation" style="color:#393A34">}</span><span class="token punctuation" style="color:#393A34">,</span><span class="token plain"></span><br></div><div class="token-line" style="color:#393A34"><span class="token plain">  ...</span><br></div><div class="token-line" style="color:#393A34"><span class="token plain"></span><span class="token punctuation" style="color:#393A34">}</span><br></div></code></pre></div></div>
<p>If you are not using the External Secrets Operator, you can create the <strong>keycloak-client-eks-secret</strong> secret manually:</p>
<div class="language-bash codeBlockContainer_Ckt0 theme-code-block" style="--prism-color:#393A34;--prism-background-color:#f6f8fa"><div class="codeBlockContent_QJqH"><pre tabindex="0" class="prism-code language-bash codeBlock_bY9V thin-scrollbar" style="color:#393A34;background-color:#f6f8fa"><code class="codeBlockLines_e6Vv"><div class="token-line" style="color:#393A34"><span class="token plain">kubectl create secret generic keycloak-client-eks-secret </span><span class="token punctuation" style="color:#393A34">\</span><span class="token plain"></span><br></div><div class="token-line" style="color:#393A34"><span class="token plain">  --from-literal</span><span class="token operator" style="color:#393A34">=</span><span class="token plain">clientSecret</span><span class="token operator" style="color:#393A34">=</span><span class="token operator" style="color:#393A34">&lt;</span><span class="token plain">Client_Secret_Value</span><span class="token operator" style="color:#393A34">&gt;</span><br></div></code></pre></div></div>
</li>
<li class="">
<p>Install the <strong>kuberocketci-rbac</strong> Helm chart. You can use the <strong>kubectl</strong> cli tool or <strong>Argo CD</strong> for this purpose.</p>
<ul>
<li class=""><strong>kubectl</strong></li>
</ul>
<p>Ensure you are in the <code>clusters/core/addons/kuberocketci-rbac</code> directory if you want to install the chart with the kubectl command. For example:</p>
<div class="language-bash codeBlockContainer_Ckt0 theme-code-block" style="--prism-color:#393A34;--prism-background-color:#f6f8fa"><div class="codeBlockContent_QJqH"><pre tabindex="0" class="prism-code language-bash codeBlock_bY9V thin-scrollbar" style="color:#393A34;background-color:#f6f8fa"><code class="codeBlockLines_e6Vv"><div class="token-line" style="color:#393A34"><span class="token plain">kubectl upgrade </span><span class="token parameter variable" style="color:#36acaa">--install</span><span class="token plain"> kuberocketci-rbac </span><span class="token parameter variable" style="color:#36acaa">-n</span><span class="token plain"> security </span><span class="token builtin class-name">.</span><br></div></code></pre></div></div>
<ul>
<li class=""><strong>Argo CD</strong></li>
</ul>
<p>If you are using Argo CD to deploy charts in the <strong>edp-cluster-add-ons</strong> repository, ensure that the following fields for the <strong>kuberocketci-rbac</strong> Helm chart are correctly set in the <code>values.yaml</code> file in the <code>clusters/core/apps</code> directory:</p>
<div class="language-yaml codeBlockContainer_Ckt0 theme-code-block" style="--prism-color:#393A34;--prism-background-color:#f6f8fa"><div class="codeBlockTitle_OeMC">values.yaml</div><div class="codeBlockContent_QJqH"><pre tabindex="0" class="prism-code language-yaml codeBlock_bY9V thin-scrollbar" style="color:#393A34;background-color:#f6f8fa"><code class="codeBlockLines_e6Vv"><div class="token-line" style="color:#393A34"><span class="token key atrule" style="color:#00a4db">kuberocketci-rbac</span><span class="token punctuation" style="color:#393A34">:</span><span class="token plain"></span><br></div><div class="token-line" style="color:#393A34"><span class="token plain">  </span><span class="token key atrule" style="color:#00a4db">createNamespace</span><span class="token punctuation" style="color:#393A34">:</span><span class="token plain"> </span><span class="token boolean important" style="color:#36acaa">false</span><span class="token plain"></span><br></div><div class="token-line" style="color:#393A34"><span class="token plain">  </span><span class="token key atrule" style="color:#00a4db">enable</span><span class="token punctuation" style="color:#393A34">:</span><span class="token plain"> </span><span class="token boolean important" style="color:#36acaa">true</span><br></div></code></pre></div></div>
<p>After the installation is complete, check that the Keycloak resources, such as the realm, client, and groups, have been created successfully.</p>
</li>
</ol>
<h2 class="anchor anchorTargetStickyNavbar_Vzrq" id="adding-users-to-groups-in-keycloak">Adding Users to Groups in Keycloak<a href="https://docs.kuberocketci.io/blog/advanced-aws-eks-management-oidc-keycloak#adding-users-to-groups-in-keycloak" class="hash-link" aria-label="Direct link to Adding Users to Groups in Keycloak" title="Direct link to Adding Users to Groups in Keycloak" translate="no">​</a></h2>
<p>To manage user access to the AWS EKS cluster, you need to assign users to specific groups in Keycloak. These groups will define the permissions for users accessing the AWS EKS cluster.</p>
<ol>
<li class="">
<p>Log in to the Keycloak admin console and navigate to the <strong>shared</strong> realm.</p>
</li>
<li class="">
<p>Select the <strong>Users</strong> section from the left sidebar menu and select the user you want to add to a group. Navigate to the <strong>Groups</strong> tab and click on the <strong>Join Group</strong> button to add the user to a group.</p>
<p><img decoding="async" loading="lazy" alt="Keycloak Add User to Group" src="https://docs.kuberocketci.io/assets/images/keycloak-add-user-to-group-c578b2c460fee04b308e5555c5c4aaa9.png" width="3362" height="1660" class="img_ev3q"></p>
</li>
<li class="">
<p>Select the group you want to add the user to (e.g., <strong>oidc-cluster-admins</strong>). Click on the <strong>Join</strong> button to add the user to the selected group.</p>
<p><img decoding="async" loading="lazy" alt="Keycloak Join Group" src="https://docs.kuberocketci.io/assets/images/keycloak-join-group-2bd628e00f93dec1d0611ab7d0ebbb38.png" width="3362" height="1660" class="img_ev3q"></p>
</li>
<li class="">
<p>Repeat the process of adding users to groups for all users who need access to the AWS EKS cluster.</p>
</li>
</ol>
<h2 class="anchor anchorTargetStickyNavbar_Vzrq" id="configuring-keycloak-as-an-identity-provider-in-aws-eks">Configuring Keycloak as an Identity Provider in AWS EKS<a href="https://docs.kuberocketci.io/blog/advanced-aws-eks-management-oidc-keycloak#configuring-keycloak-as-an-identity-provider-in-aws-eks" class="hash-link" aria-label="Direct link to Configuring Keycloak as an Identity Provider in AWS EKS" title="Direct link to Configuring Keycloak as an Identity Provider in AWS EKS" translate="no">​</a></h2>
<p>There are two methods to configure Keycloak as an identity provider in AWS EKS: using the AWS Management Console or Terraform.</p>
<h3 class="anchor anchorTargetStickyNavbar_Vzrq" id="method-1-using-the-aws-management-console">Method 1: Using the AWS Management Console<a href="https://docs.kuberocketci.io/blog/advanced-aws-eks-management-oidc-keycloak#method-1-using-the-aws-management-console" class="hash-link" aria-label="Direct link to Method 1: Using the AWS Management Console" title="Direct link to Method 1: Using the AWS Management Console" translate="no">​</a></h3>
<ol>
<li class="">
<p>Log in to the <a href="https://aws.amazon.com/console/" target="_blank" rel="noopener noreferrer" class="">AWS Management Console</a> and navigate to the Amazon EKS service. Select the EKS cluster you want to configure and click on the <strong>Access</strong> tab.</p>
<p><img decoding="async" loading="lazy" alt="EKS Cluster Access Tab" src="https://docs.kuberocketci.io/assets/images/eks-cluster-access-tab-707d67886863028877f32b1630411b4e.png" width="3356" height="1180" class="img_ev3q"></p>
</li>
<li class="">
<p>In the <strong>OIDC identity providers</strong> section, click on the <strong>Associate identity provider</strong> button.</p>
<p><img decoding="async" loading="lazy" alt="Associate Identity Provider" src="https://docs.kuberocketci.io/assets/images/associate-identity-provider-8d81c9b345b76eb0bf49961342edde54.png" width="3356" height="1642" class="img_ev3q"></p>
</li>
<li class="">
<p>Fill in the following details for the Keycloak Identity Provider:</p>
<ul>
<li class="">
<p><strong>Name</strong>: <code>Keycloak</code></p>
</li>
<li class="">
<p><strong>Issuer URL</strong>: <code>https://&lt;keycloak_url&gt;/auth/realms/shared</code>, where <code>&lt;keycloak_url&gt;</code> is the URL of your Keycloak instance.</p>
</li>
<li class="">
<p><strong>Client ID</strong>: <code>eks</code>.</p>
</li>
<li class="">
<p><strong>Groups Claim</strong>: <code>groups</code>.</p>
<p><img decoding="async" loading="lazy" alt="Identity Provider Details" src="https://docs.kuberocketci.io/assets/images/identity-provider-details-43942f4911d1c02742267b8b19d106cb.png" width="1506" height="1022" class="img_ev3q"></p>
</li>
</ul>
</li>
<li class="">
<p>The process of applying the changes may take a few minutes. Once completed, you will see the Keycloak Identity Provider associated with your EKS cluster.</p>
</li>
</ol>
<h3 class="anchor anchorTargetStickyNavbar_Vzrq" id="method-2-using-terraform">Method 2: Using Terraform<a href="https://docs.kuberocketci.io/blog/advanced-aws-eks-management-oidc-keycloak#method-2-using-terraform" class="hash-link" aria-label="Direct link to Method 2: Using Terraform" title="Direct link to Method 2: Using Terraform" translate="no">​</a></h3>
<p>To configure Keycloak as an Identity Provider in AWS EKS cluster using Terraform, you can use the <a href="https://registry.terraform.io/modules/terraform-aws-modules/eks/aws/20.30.1" target="_blank" rel="noopener noreferrer" class="">AWS EKS Terraform module</a>. Here's an example of how to define the Keycloak Identity Provider in Terraform configuration files:</p>
<ul>
<li class=""><strong>variables.tf</strong>:</li>
</ul>
<div class="language-hcl codeBlockContainer_Ckt0 theme-code-block" style="--prism-color:#393A34;--prism-background-color:#f6f8fa"><div class="codeBlockContent_QJqH"><pre tabindex="0" class="prism-code language-hcl codeBlock_bY9V thin-scrollbar" style="color:#393A34;background-color:#f6f8fa"><code class="codeBlockLines_e6Vv"><div class="token-line" style="color:#393A34"><span class="token keyword" style="color:#00009f">variable</span><span class="token keyword type variable" style="color:#36acaa"> "cluster_identity_providers" </span><span class="token punctuation" style="color:#393A34">{</span><span class="token plain"></span><br></div><div class="token-line" style="color:#393A34"><span class="token plain">  </span><span class="token property" style="color:#36acaa">description</span><span class="token plain"> </span><span class="token punctuation" style="color:#393A34">=</span><span class="token plain"> </span><span class="token string" style="color:#e3116c">"Configuration for OIDC identity provider"</span><span class="token plain"></span><br></div><div class="token-line" style="color:#393A34"><span class="token plain">  </span><span class="token property" style="color:#36acaa">type</span><span class="token plain">        </span><span class="token punctuation" style="color:#393A34">=</span><span class="token plain"> any</span><br></div><div class="token-line" style="color:#393A34"><span class="token plain">  </span><span class="token property" style="color:#36acaa">default</span><span class="token plain">     </span><span class="token punctuation" style="color:#393A34">=</span><span class="token plain"> </span><span class="token punctuation" style="color:#393A34">{</span><span class="token punctuation" style="color:#393A34">}</span><span class="token plain"></span><br></div><div class="token-line" style="color:#393A34"><span class="token plain"></span><span class="token punctuation" style="color:#393A34">}</span><br></div></code></pre></div></div>
<ul>
<li class=""><strong>terraform.tfvars</strong>:</li>
</ul>
<div class="language-hcl codeBlockContainer_Ckt0 theme-code-block" style="--prism-color:#393A34;--prism-background-color:#f6f8fa"><div class="codeBlockContent_QJqH"><pre tabindex="0" class="prism-code language-hcl codeBlock_bY9V thin-scrollbar" style="color:#393A34;background-color:#f6f8fa"><code class="codeBlockLines_e6Vv"><div class="token-line" style="color:#393A34"><span class="token property" style="color:#36acaa">cluster_identity_providers</span><span class="token plain"> </span><span class="token punctuation" style="color:#393A34">=</span><span class="token plain"> </span><span class="token punctuation" style="color:#393A34">{</span><span class="token plain"></span><br></div><div class="token-line" style="color:#393A34"><span class="token plain">  </span><span class="token property" style="color:#36acaa">keycloak</span><span class="token plain"> </span><span class="token punctuation" style="color:#393A34">=</span><span class="token plain"> </span><span class="token punctuation" style="color:#393A34">{</span><span class="token plain"></span><br></div><div class="token-line" style="color:#393A34"><span class="token plain">    </span><span class="token property" style="color:#36acaa">client_id</span><span class="token plain">    </span><span class="token punctuation" style="color:#393A34">=</span><span class="token plain"> </span><span class="token string" style="color:#e3116c">"eks"</span><span class="token plain"></span><br></div><div class="token-line" style="color:#393A34"><span class="token plain">    </span><span class="token property" style="color:#36acaa">issuer_url</span><span class="token plain">   </span><span class="token punctuation" style="color:#393A34">=</span><span class="token plain"> </span><span class="token string" style="color:#e3116c">"https://&lt;keycloak_url&gt;/auth/realms/shared"</span><span class="token plain"></span><br></div><div class="token-line" style="color:#393A34"><span class="token plain">    </span><span class="token property" style="color:#36acaa">groups_claim</span><span class="token plain"> </span><span class="token punctuation" style="color:#393A34">=</span><span class="token plain"> </span><span class="token string" style="color:#e3116c">"groups"</span><span class="token plain"></span><br></div><div class="token-line" style="color:#393A34"><span class="token plain">  </span><span class="token punctuation" style="color:#393A34">}</span><span class="token plain"></span><br></div><div class="token-line" style="color:#393A34"><span class="token plain"></span><span class="token punctuation" style="color:#393A34">}</span><br></div></code></pre></div></div>
<ul>
<li class=""><strong>main.tf</strong>:</li>
</ul>
<div class="language-hcl codeBlockContainer_Ckt0 theme-code-block" style="--prism-color:#393A34;--prism-background-color:#f6f8fa"><div class="codeBlockContent_QJqH"><pre tabindex="0" class="prism-code language-hcl codeBlock_bY9V thin-scrollbar" style="color:#393A34;background-color:#f6f8fa"><code class="codeBlockLines_e6Vv"><div class="token-line" style="color:#393A34"><span class="token keyword" style="color:#00009f">module</span><span class="token keyword type variable" style="color:#36acaa"> "eks" </span><span class="token punctuation" style="color:#393A34">{</span><span class="token plain"></span><br></div><div class="token-line" style="color:#393A34"><span class="token plain">  </span><span class="token property" style="color:#36acaa">source</span><span class="token plain">  </span><span class="token punctuation" style="color:#393A34">=</span><span class="token plain"> </span><span class="token string" style="color:#e3116c">"terraform-aws-modules/eks/aws"</span><span class="token plain"></span><br></div><div class="token-line" style="color:#393A34"><span class="token plain">  </span><span class="token property" style="color:#36acaa">version</span><span class="token plain"> </span><span class="token punctuation" style="color:#393A34">=</span><span class="token plain"> </span><span class="token string" style="color:#e3116c">"20.14.0"</span><span class="token plain"></span><br></div><div class="token-line" style="color:#393A34"><span class="token plain">  ...</span><br></div><div class="token-line" style="color:#393A34"><span class="token plain">  </span><span class="token comment" style="color:#999988;font-style:italic"># OIDC Identity provider</span><span class="token plain"></span><br></div><div class="token-line" style="color:#393A34"><span class="token plain">  </span><span class="token property" style="color:#36acaa">cluster_identity_providers</span><span class="token plain"> </span><span class="token punctuation" style="color:#393A34">=</span><span class="token plain"> var.cluster_identity_providers</span><br></div><div class="token-line" style="color:#393A34"><span class="token plain"></span><span class="token punctuation" style="color:#393A34">}</span><br></div></code></pre></div></div>
<p>After applying the Terraform configuration, the Keycloak identity provider will be associated with your EKS cluster.</p>
<h2 class="anchor anchorTargetStickyNavbar_Vzrq" id="authenticating-to-aws-eks-cluster-using-kubectl">Authenticating to AWS EKS cluster using kubectl<a href="https://docs.kuberocketci.io/blog/advanced-aws-eks-management-oidc-keycloak#authenticating-to-aws-eks-cluster-using-kubectl" class="hash-link" aria-label="Direct link to Authenticating to AWS EKS cluster using kubectl" title="Direct link to Authenticating to AWS EKS cluster using kubectl" translate="no">​</a></h2>
<ol>
<li class="">
<p>Configure <strong>kubeconfig</strong> file to use the Keycloak Identity Provider for authentication to the AWS EKS cluster. You can use the following template:</p>
<div class="language-yaml codeBlockContainer_Ckt0 theme-code-block" style="--prism-color:#393A34;--prism-background-color:#f6f8fa"><div class="codeBlockTitle_OeMC">kubeconfig</div><div class="codeBlockContent_QJqH"><pre tabindex="0" class="prism-code language-yaml codeBlock_bY9V thin-scrollbar" style="color:#393A34;background-color:#f6f8fa"><code class="codeBlockLines_e6Vv"><div class="token-line" style="color:#393A34"><span class="token key atrule" style="color:#00a4db">apiVersion</span><span class="token punctuation" style="color:#393A34">:</span><span class="token plain"> v1</span><br></div><div class="token-line" style="color:#393A34"><span class="token plain"></span><span class="token key atrule" style="color:#00a4db">preferences</span><span class="token punctuation" style="color:#393A34">:</span><span class="token plain"> </span><span class="token punctuation" style="color:#393A34">{</span><span class="token punctuation" style="color:#393A34">}</span><span class="token plain"></span><br></div><div class="token-line" style="color:#393A34"><span class="token plain"></span><span class="token key atrule" style="color:#00a4db">kind</span><span class="token punctuation" style="color:#393A34">:</span><span class="token plain"> Config</span><br></div><div class="token-line" style="color:#393A34"><span class="token plain" style="display:inline-block"></span><br></div><div class="token-line" style="color:#393A34"><span class="token plain"></span><span class="token key atrule" style="color:#00a4db">clusters</span><span class="token punctuation" style="color:#393A34">:</span><span class="token plain"></span><br></div><div class="token-line" style="color:#393A34"><span class="token plain"></span><span class="token punctuation" style="color:#393A34">-</span><span class="token plain"> </span><span class="token key atrule" style="color:#00a4db">cluster</span><span class="token punctuation" style="color:#393A34">:</span><span class="token plain"></span><br></div><div class="token-line" style="color:#393A34"><span class="token plain">    </span><span class="token key atrule" style="color:#00a4db">server</span><span class="token punctuation" style="color:#393A34">:</span><span class="token plain"> https</span><span class="token punctuation" style="color:#393A34">:</span><span class="token plain">//&lt;eks_cluster_endpoint</span><span class="token punctuation" style="color:#393A34">&gt;</span><span class="token plain">.eks.amazonaws.com</span><br></div><div class="token-line" style="color:#393A34"><span class="token plain">    </span><span class="token key atrule" style="color:#00a4db">certificate-authority-data</span><span class="token punctuation" style="color:#393A34">:</span><span class="token plain"> &lt;eks_cluster_ca</span><span class="token punctuation" style="color:#393A34">&gt;</span><span class="token plain"></span><br></div><div class="token-line" style="color:#393A34"><span class="token plain">  </span><span class="token key atrule" style="color:#00a4db">name</span><span class="token punctuation" style="color:#393A34">:</span><span class="token plain"> eks</span><br></div><div class="token-line" style="color:#393A34"><span class="token plain" style="display:inline-block"></span><br></div><div class="token-line" style="color:#393A34"><span class="token plain"></span><span class="token key atrule" style="color:#00a4db">contexts</span><span class="token punctuation" style="color:#393A34">:</span><span class="token plain"></span><br></div><div class="token-line" style="color:#393A34"><span class="token plain"></span><span class="token punctuation" style="color:#393A34">-</span><span class="token plain"> </span><span class="token key atrule" style="color:#00a4db">context</span><span class="token punctuation" style="color:#393A34">:</span><span class="token plain"></span><br></div><div class="token-line" style="color:#393A34"><span class="token plain">    </span><span class="token key atrule" style="color:#00a4db">cluster</span><span class="token punctuation" style="color:#393A34">:</span><span class="token plain"> eks</span><br></div><div class="token-line" style="color:#393A34"><span class="token plain">    </span><span class="token key atrule" style="color:#00a4db">user</span><span class="token punctuation" style="color:#393A34">:</span><span class="token plain"> &lt;keycloak_user_email</span><span class="token punctuation" style="color:#393A34">&gt;</span><span class="token plain"></span><br></div><div class="token-line" style="color:#393A34"><span class="token plain">  </span><span class="token key atrule" style="color:#00a4db">name</span><span class="token punctuation" style="color:#393A34">:</span><span class="token plain"> eks</span><br></div><div class="token-line" style="color:#393A34"><span class="token plain" style="display:inline-block"></span><br></div><div class="token-line" style="color:#393A34"><span class="token plain"></span><span class="token key atrule" style="color:#00a4db">current-context</span><span class="token punctuation" style="color:#393A34">:</span><span class="token plain"> eks</span><br></div><div class="token-line" style="color:#393A34"><span class="token plain" style="display:inline-block"></span><br></div><div class="token-line" style="color:#393A34"><span class="token plain"></span><span class="token key atrule" style="color:#00a4db">users</span><span class="token punctuation" style="color:#393A34">:</span><span class="token plain"></span><br></div><div class="token-line" style="color:#393A34"><span class="token plain"></span><span class="token punctuation" style="color:#393A34">-</span><span class="token plain"> </span><span class="token key atrule" style="color:#00a4db">name</span><span class="token punctuation" style="color:#393A34">:</span><span class="token plain"> &lt;keycloak_user_email</span><span class="token punctuation" style="color:#393A34">&gt;</span><span class="token plain"></span><br></div><div class="token-line" style="color:#393A34"><span class="token plain">  </span><span class="token key atrule" style="color:#00a4db">user</span><span class="token punctuation" style="color:#393A34">:</span><span class="token plain"></span><br></div><div class="token-line" style="color:#393A34"><span class="token plain">    </span><span class="token key atrule" style="color:#00a4db">exec</span><span class="token punctuation" style="color:#393A34">:</span><span class="token plain"></span><br></div><div class="token-line" style="color:#393A34"><span class="token plain">      </span><span class="token key atrule" style="color:#00a4db">apiVersion</span><span class="token punctuation" style="color:#393A34">:</span><span class="token plain"> client.authentication.k8s.io/v1beta1</span><br></div><div class="token-line" style="color:#393A34"><span class="token plain">      </span><span class="token key atrule" style="color:#00a4db">command</span><span class="token punctuation" style="color:#393A34">:</span><span class="token plain"> kubectl</span><br></div><div class="token-line" style="color:#393A34"><span class="token plain">      </span><span class="token key atrule" style="color:#00a4db">args</span><span class="token punctuation" style="color:#393A34">:</span><span class="token plain"></span><br></div><div class="token-line" style="color:#393A34"><span class="token plain">      </span><span class="token punctuation" style="color:#393A34">-</span><span class="token plain"> oidc</span><span class="token punctuation" style="color:#393A34">-</span><span class="token plain">login</span><br></div><div class="token-line" style="color:#393A34"><span class="token plain">      </span><span class="token punctuation" style="color:#393A34">-</span><span class="token plain"> get</span><span class="token punctuation" style="color:#393A34">-</span><span class="token plain">token</span><br></div><div class="token-line" style="color:#393A34"><span class="token plain">      </span><span class="token punctuation" style="color:#393A34">-</span><span class="token plain"> </span><span class="token punctuation" style="color:#393A34">-</span><span class="token plain">v1</span><br></div><div class="token-line" style="color:#393A34"><span class="token plain">      </span><span class="token punctuation" style="color:#393A34">-</span><span class="token plain"> </span><span class="token punctuation" style="color:#393A34">-</span><span class="token punctuation" style="color:#393A34">-</span><span class="token plain">oidc</span><span class="token punctuation" style="color:#393A34">-</span><span class="token plain">issuer</span><span class="token punctuation" style="color:#393A34">-</span><span class="token plain">url=https</span><span class="token punctuation" style="color:#393A34">:</span><span class="token plain">//&lt;keycloak_url</span><span class="token punctuation" style="color:#393A34">&gt;</span><span class="token plain">/auth/realms/shared</span><br></div><div class="token-line" style="color:#393A34"><span class="token plain">      </span><span class="token punctuation" style="color:#393A34">-</span><span class="token plain"> </span><span class="token punctuation" style="color:#393A34">-</span><span class="token punctuation" style="color:#393A34">-</span><span class="token plain">oidc</span><span class="token punctuation" style="color:#393A34">-</span><span class="token plain">client</span><span class="token punctuation" style="color:#393A34">-</span><span class="token plain">id=eks</span><br></div><div class="token-line" style="color:#393A34"><span class="token plain">      </span><span class="token punctuation" style="color:#393A34">-</span><span class="token plain"> </span><span class="token punctuation" style="color:#393A34">-</span><span class="token punctuation" style="color:#393A34">-</span><span class="token plain">oidc</span><span class="token punctuation" style="color:#393A34">-</span><span class="token plain">client</span><span class="token punctuation" style="color:#393A34">-</span><span class="token plain">secret=&lt;keycloak_client_secret</span><span class="token punctuation" style="color:#393A34">&gt;</span><br></div></code></pre></div></div>
<p>Replace the placeholders with the actual values:</p>
<ul>
<li class=""><code>&lt;eks_cluster_endpoint&gt;</code>: The endpoint of your AWS EKS cluster.</li>
<li class=""><code>&lt;eks_cluster_ca&gt;</code>: The CA certificate of your AWS EKS cluster.</li>
<li class=""><code>&lt;keycloak_user_email&gt;</code>: The email address of the Keycloak user.</li>
<li class=""><code>&lt;keycloak_url&gt;</code>: The URL of your Keycloak instance.</li>
<li class=""><code>&lt;keycloak_client_secret&gt;</code>: The Client secret of the <strong>eks</strong> Keycloak client (provided during the <strong>Keycloak Configuration</strong> step).</li>
</ul>
</li>
<li class="">
<p>Save the kubeconfig file and set the <code>KUBECONFIG</code> environment variable to point to the file:</p>
<div class="language-bash codeBlockContainer_Ckt0 theme-code-block" style="--prism-color:#393A34;--prism-background-color:#f6f8fa"><div class="codeBlockContent_QJqH"><pre tabindex="0" class="prism-code language-bash codeBlock_bY9V thin-scrollbar" style="color:#393A34;background-color:#f6f8fa"><code class="codeBlockLines_e6Vv"><div class="token-line" style="color:#393A34"><span class="token builtin class-name">export</span><span class="token plain"> </span><span class="token assign-left variable" style="color:#36acaa">KUBECONFIG</span><span class="token operator" style="color:#393A34">=</span><span class="token operator" style="color:#393A34">&lt;</span><span class="token plain">path_to_kubeconfig_file</span><span class="token operator" style="color:#393A34">&gt;</span><br></div></code></pre></div></div>
</li>
<li class="">
<p>Test the authentication to the AWS EKS cluster by running the following command:</p>
<div class="language-bash codeBlockContainer_Ckt0 theme-code-block" style="--prism-color:#393A34;--prism-background-color:#f6f8fa"><div class="codeBlockContent_QJqH"><pre tabindex="0" class="prism-code language-bash codeBlock_bY9V thin-scrollbar" style="color:#393A34;background-color:#f6f8fa"><code class="codeBlockLines_e6Vv"><div class="token-line" style="color:#393A34"><span class="token plain">kubectl get nodes</span><br></div></code></pre></div></div>
<p>After the first command execution, you will be prompted to log in to Keycloak. Enter your credentials to authenticate and access the EKS cluster. If the authentication is successful, you will see the list of nodes in the EKS cluster.</p>
</li>
</ol>
<h2 class="anchor anchorTargetStickyNavbar_Vzrq" id="configuring-kuberocketci-portal-with-keycloak-oidc-authentication">Configuring KubeRocketCI Portal with Keycloak OIDC Authentication<a href="https://docs.kuberocketci.io/blog/advanced-aws-eks-management-oidc-keycloak#configuring-kuberocketci-portal-with-keycloak-oidc-authentication" class="hash-link" aria-label="Direct link to Configuring KubeRocketCI Portal with Keycloak OIDC Authentication" title="Direct link to Configuring KubeRocketCI Portal with Keycloak OIDC Authentication" translate="no">​</a></h2>
<p>The KubeRocketCI platform natively supports Keycloak as an Identity Provider for OIDC authentication.</p>
<ol>
<li class="">
<p>To configure the KubeRocketCI Portal with Keycloak OIDC authentication, navigate to the <a href="https://github.com/epam/edp-install" target="_blank" rel="noopener noreferrer" class="">edp-install</a> Helm chart and set the following values in the <code>values.yaml</code> file:</p>
<div class="language-yaml codeBlockContainer_Ckt0 theme-code-block" style="--prism-color:#393A34;--prism-background-color:#f6f8fa"><div class="codeBlockTitle_OeMC">values.yaml</div><div class="codeBlockContent_QJqH"><pre tabindex="0" class="prism-code language-yaml codeBlock_bY9V thin-scrollbar" style="color:#393A34;background-color:#f6f8fa"><code class="codeBlockLines_e6Vv"><div class="token-line" style="color:#393A34"><span class="token key atrule" style="color:#00a4db">edp-headlamp</span><span class="token punctuation" style="color:#393A34">:</span><span class="token plain"></span><br></div><div class="token-line" style="color:#393A34"><span class="token plain">  </span><span class="token key atrule" style="color:#00a4db">enabled</span><span class="token punctuation" style="color:#393A34">:</span><span class="token plain"> </span><span class="token boolean important" style="color:#36acaa">true</span><span class="token plain"></span><br></div><div class="token-line" style="color:#393A34"><span class="token plain">  </span><span class="token key atrule" style="color:#00a4db">config</span><span class="token punctuation" style="color:#393A34">:</span><span class="token plain"></span><br></div><div class="token-line" style="color:#393A34"><span class="token plain">    </span><span class="token key atrule" style="color:#00a4db">oidc</span><span class="token punctuation" style="color:#393A34">:</span><span class="token plain"></span><br></div><div class="token-line" style="color:#393A34"><span class="token plain">      </span><span class="token key atrule" style="color:#00a4db">enabled</span><span class="token punctuation" style="color:#393A34">:</span><span class="token plain"> </span><span class="token boolean important" style="color:#36acaa">true</span><span class="token plain"></span><br></div><div class="token-line" style="color:#393A34"><span class="token plain">      </span><span class="token key atrule" style="color:#00a4db">issuerUrl</span><span class="token punctuation" style="color:#393A34">:</span><span class="token plain"> </span><span class="token string" style="color:#e3116c">"https://&lt;keycloak_url&gt;/auth/realms/shared"</span><span class="token plain"></span><br></div><div class="token-line" style="color:#393A34"><span class="token plain">      </span><span class="token key atrule" style="color:#00a4db">clientID</span><span class="token punctuation" style="color:#393A34">:</span><span class="token plain"> </span><span class="token string" style="color:#e3116c">"eks"</span><span class="token plain"></span><br></div><div class="token-line" style="color:#393A34"><span class="token plain">      </span><span class="token key atrule" style="color:#00a4db">clientSecretName</span><span class="token punctuation" style="color:#393A34">:</span><span class="token plain"> </span><span class="token string" style="color:#e3116c">"keycloak-client-headlamp-secret"</span><span class="token plain"></span><br></div><div class="token-line" style="color:#393A34"><span class="token plain">      </span><span class="token key atrule" style="color:#00a4db">clientSecretKey</span><span class="token punctuation" style="color:#393A34">:</span><span class="token plain"> </span><span class="token string" style="color:#e3116c">"clientSecret"</span><br></div></code></pre></div></div>
<p>Replace the <strong>keycloak_url</strong> with the URL of your Keycloak instance.</p>
</li>
<li class="">
<p>Ensure the AWS Parameter Store object contains the correct Client Secret value for the <strong>keycloak-client-headlamp-secret</strong> secret:</p>
<div class="language-json codeBlockContainer_Ckt0 theme-code-block" style="--prism-color:#393A34;--prism-background-color:#f6f8fa"><div class="codeBlockTitle_OeMC">AWS Parameter Store object</div><div class="codeBlockContent_QJqH"><pre tabindex="0" class="prism-code language-json codeBlock_bY9V thin-scrollbar" style="color:#393A34;background-color:#f6f8fa"><code class="codeBlockLines_e6Vv"><div class="token-line" style="color:#393A34"><span class="token punctuation" style="color:#393A34">{</span><span class="token plain"></span><br></div><div class="token-line" style="color:#393A34"><span class="token plain">  ...</span><br></div><div class="token-line" style="color:#393A34"><span class="token plain">  </span><span class="token property" style="color:#36acaa">"keycloak-client-headlamp-secret"</span><span class="token operator" style="color:#393A34">:</span><span class="token plain"> </span><span class="token string" style="color:#e3116c">"&lt;Client_Secret_Value&gt;"</span><span class="token plain"></span><br></div><div class="token-line" style="color:#393A34"><span class="token plain">  ...</span><br></div><div class="token-line" style="color:#393A34"><span class="token plain"></span><span class="token punctuation" style="color:#393A34">}</span><br></div></code></pre></div></div>
</li>
<li class="">
<p>After setting the values, install the <strong>edp-install</strong> Helm chart to apply the changes:</p>
<div class="language-bash codeBlockContainer_Ckt0 theme-code-block" style="--prism-color:#393A34;--prism-background-color:#f6f8fa"><div class="codeBlockContent_QJqH"><pre tabindex="0" class="prism-code language-bash codeBlock_bY9V thin-scrollbar" style="color:#393A34;background-color:#f6f8fa"><code class="codeBlockLines_e6Vv"><div class="token-line" style="color:#393A34"><span class="token plain">helm upgrade </span><span class="token parameter variable" style="color:#36acaa">--install</span><span class="token plain"> krci </span><span class="token parameter variable" style="color:#36acaa">--namespace</span><span class="token plain"> krci </span><span class="token builtin class-name">.</span><br></div></code></pre></div></div>
</li>
<li class="">
<p>After applying the changes, the KubeRocketCI Portal will be configured to use Keycloak OIDC authentication. Users will be able to log in to the Portal using <strong>Sign In</strong> option.</p>
<p><img decoding="async" loading="lazy" alt="Sign In" src="https://docs.kuberocketci.io/assets/images/sign-in-61897514acf347a032e4a3eaa2582c2d.png" width="3364" height="1660" class="img_ev3q"></p>
</li>
</ol>
<h2 class="anchor anchorTargetStickyNavbar_Vzrq" id="conclusion">Conclusion<a href="https://docs.kuberocketci.io/blog/advanced-aws-eks-management-oidc-keycloak#conclusion" class="hash-link" aria-label="Direct link to Conclusion" title="Direct link to Conclusion" translate="no">​</a></h2>
<p>Integrating OpenID Connect (OIDC) authentication with Keycloak in AWS EKS enhances security and simplifies user access management. By leveraging Keycloak's capabilities, you can implement a reliable Single Sign-On (SSO) solution that meets your organization's security standards. This guide has provided step-by-step instructions to configure Keycloak as an Identity Provider, set up necessary Keycloak resources, and enable OIDC authentication for the KubeRocketCI Portal. By following these steps, you can ensure secure and seamless access to your EKS clusters and KubeRocketCI Portal, improving both security and user experience.</p>]]></content>
        <author>
            <name>Sergiy Kulanov</name>
            <uri>https://github.com/sergk</uri>
        </author>
        <author>
            <name>Mykola Marusenko</name>
            <uri>https://github.com/mykolamarusenko</uri>
        </author>
        <author>
            <name>Daniil Nedostup</name>
            <uri>https://github.com/daniil-nedostup</uri>
        </author>
        <category label="KubeRocketCI" term="KubeRocketCI"/>
        <category label="Keycloak" term="Keycloak"/>
        <category label="AWS EKS" term="AWS EKS"/>
        <category label="SSO" term="SSO"/>
    </entry>
</feed>